Monthly Archives: September 2013

Top Ten Survival Foods You Should Grow

Can you live off your land if there’s an emergency? Can you meet your food needs for even a few weeks?

Planning perennial agriculture systems, such as food forests, along with getting some chickens is a really good plan long-term – but if you had to start gardening like it’s the end of the world – right now – what would you grow?

Here’s my top-ten list.
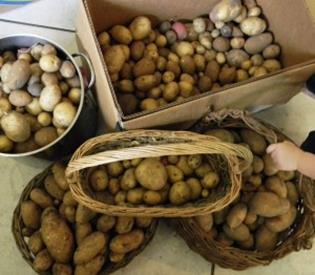
1. Potatoes

Potatoes are probably the ultimate survival crop. They tolerate poor soil, bear abundantly, handle a variety of climates and are packed with calories. Space-wise, they beat the living daylights out of grains, plus they store for a long period. In some climates, you can plant potatoes in spring and fall and get a double harvest. If you pick purple varieties, they’re high in anthocyanins, though the yields I’ve had from them are much lower than their white cousins.


2. Sweet Potatoes

Sweet potatoes are healthier than white potatoes and provide an additional benefit: the leaves are a green vegetable. With a decent sized patch of sweet potatoes, you can feed your family plus get plenty of nutrition. Nothing says “all is well with the world” like a big pile of sweet potatoes. Except for maybe a word bubble reading “all is well with the world.”

3. Kale

Kale, though not high in calories, is a nutritional powerhouse. Face it: you need plenty of nutrients to keep moving. People with deficiencies get sick a lot more often. Adding kale to your diet is good preventative medicine, plus it’s easy as heck to grow. A cold-hardy vegetable, you can plant in fall or spring across most of the US and be eating kale for a long time. Add it to smoothies, throw it in salads, mix it into stir-fries, dry it into chips or give it to your chickens as a nutrient boost. Kale is hardcore.

4. Jerusalem artichokes

Jerusalem artichokes are the plant you can rely on when nothing else does well. They also provide calories during the winter. Though it’s not the easiest root to live on, it’s a perennial stand-by that’s going to be there for you when it counts. Bonus: you get tons of biomass from the stalks you can use for compost.
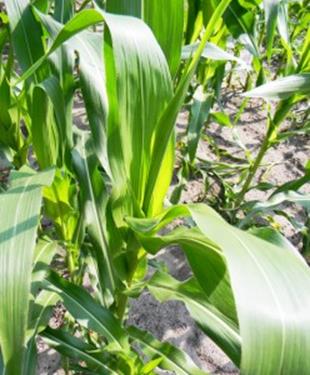
5. Corn

The first of the “three sisters,” people have lived on corn for thousands of years. Of all the grains, it’s the easiest to handle on a small scale. That said: I’m not talking about sweet corn. I’m talking grain corn – the kind of corn you use for making grits and cornbread. Note: If you plan on making corn your main staple, be sure to nixtamalize it or supplement with other foods. Otherwise you can end up with nutritional deficiencies. Overall, however, it’s an easy-to-grow storable source of calories.


6. Squash

The second member of the “three sisters,” squash is good stuff. Some varieties are boring and bland, others are tasty. Personally, I like the giant Hubbard squash as well as the ultra-tough Seminole pumpkin variety. Squash are nutrient rich and will store for months at room temperature, making them a good addition to your survival garden.

7. Beans

The final member of the “three sisters,” beans are reliably productive. Many varieties can be used as green vegetables and for dried beans. My favorite green bean is the “snake bean,” though it’s terrible for dried beans. On the dry bean side of things, you’ve got plenty of choices. Just take a look through the Seedsaver’s Exchange catalog and you’ll have a hard time picking one type to try. Unfortunately, beans don’t produce a very large yield for the amount of space they consume – but I figure they make up for their stinginess by also adding nitrogen to the soil.

8. Cassava

Cassava (also known as yuca, manioc and tapioca) is one of my personal favorite plants. Though finding cuttings isn’t always easy, once you have them, you can grow enough canes to grow cassava for life (provided you live in zone 8 or south). You can find a good variety here. Toxic until boiled, cassava roots are a dense source of calories. The leaves are rich in protein and can be used like collard greens. Since the entire plant has cyanide in it, it’s practically pest free. In colder climates, cassava freezes to the ground in the winter and will come back in the spring.
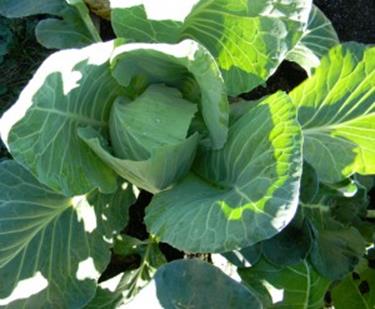
 

9. Cabbage

Cabbage is healthy, grows with moderate ease, and is storable for a decent amount of time under refrigeration or in a root cellar. If you ferment it, it stores even better. Sauerkraut fueled Germany for untold centuries, and its cousin kimchi is a Korean staple. Live fermented cabbage is incredibly healthy. It can fix stomach complaints, provide you with a lot of bioavailable nutrition, and make your house smell amazing.


10. Garlic

Garlic, though not what one might consider a “major” crop, is healthy, easy to grow, calorie dense, space efficient and makes life better. It stores well, can be pickled, and is hardy enough to withstand quite a bit of freezing. I planted it in the fall in Tennessee and it would sit through most of the winter, and then burst into growth in the spring. We ate a lot of garlic – and it tasted much better than anything you’d get in the store. Garlic also has anti-cancer and anti-bacterial properties. Add it to your garden!

So there – that’s my top-ten list of survival food crops.

Start now to make sure you are staying prepared.


Via: theprepperproject

8 Best Chicken Breeds For Preppers


Keeping just one breed of chicken is like putting all your eggs in one basket.

Are you planning to keep chickens to provide food for your family after an economic collapse? They’re the first livestock on the prepper’s list due to their small size, low maintenance, and ability to provide both eggs and meat. They’re also a great addition to your survival plan because they produce fertilizer and eat pests that could ruin your survival plantings. Before you acquire chickens, there are some things to consider. Do some homework so you’ll choose the best breeds to suit your needs.

Climate

What climate will you be surviving in…hot, cold, wet? Choose the right breeds for the location. Chickens with large combs, such as the Brown Leghorn, are adapted to hot climates. Those same chickens are susceptible to frostbite on their combs. If you live in the frigid north, choose a cold hardy breed like the Ameraucana. For rainy climates, consider keeping a breed like the Marans that were developed in a marshy region.

Camouflage

You’ll also want breeds that blend into their surroundings. White Leghorns are awesome hens due to their low feed, high egg production. However, they’re easy to spot by predators. Look for chickens that will blend in with the natural terrain. The Egyptian Fayoumi is black and white speckled and will blend into dappled shade. The Brown Leghorn’s color is better suited to sandy areas. Choosing breeds for camouflage will help them forage more safely.

Forage

Some chickens will provide a lot of eggs or meat, but they need regular rations of grain to keep them in prime condition. Choose breeds that will actively forage.  Chickens are omnivores and will eat everything from plant material and bugs to small rodents. Be sure they have room to find the nutrients they need. In a dry area with low nutrient density they’ll have to range far and wide for food. The dense foliage and rotting logs of woodland will provide better hunting grounds.  Your chickens will also need dirt to scratch in for grit, minerals, and to take dust baths. Give them any table scraps you might have, as well as finely crushed egg shells to provide extra nutrition. They also need a source of fresh, clean water to stay healthy and provide you with eggs.

If you live in an area with a dry season or cold winter, how will you provide food for them when resources are scarce? Chickens don’t like going out in snow or heavy rains. You may need to collect food for them during the abundant season and store it. The lean season is a good time to cull your old hens, extra roosters, or the less thrifty ones for the table. Feed the guts and ground bones back to the flock.

Eggs and Meat

This is your whole reason for keeping chickens. Will you be able to butcher them when the time comes? Will you have a flock that actually lays eggs for your table? If you’re bugging out and taking chickens with you, keep in mind that moving them to a new location will shut down egg production for at least two weeks while they acclimate. They will also stop laying eggs if they don’t have enough food or water, and also during the winter in areas with shorter daylight hours. Store up extra eggs during the fall to help see you through the lean months. Unwashed eggs in good condition have been stored for up to 6 months unrefrigerated.

You should also be aware that most chickens will not provide you with as much meat as you are accustomed to. Cornish Rock broilers are the premier meat chicken in the US. They’ve been hybridized by the poultry industry to provide a plump, tender bird in 8 weeks. You’ll want to raise dual purpose breeds to get the most meat, but don’t expect anything like the birds you buy on a Styrofoam slab. Older chickens are pretty chewy, too. So you may want to make soup instead of roasting them.

The Next Generation

Look for chicken breeds that will hatch out and raise their own chicks. You can’t incubate eggs without a steady temperature of about 98 to 100 degrees Fahrenheit. Your best strategy is to let the hens take care of that. Hens that stay on a nest and hatch out their own young are referred to as ‘broody.’ A broody hen stops laying eggs until her chicks can fend for themselves. Not all hens make good mothers. Sometimes they drag their little ones all over and lose them. It takes time to breed for these characteristics. And don’t forget that you need roosters for fertile eggs. Keep more than one rooster for genetic diversity

One last note for the prepper with chickens in their survival plan – Start Now! There is a learning curve to raising livestock. You need to gain firsthand knowledge ASAP. When all hell breaks loose, you’ll have enough to worry about. So get your chickens in a row and start prepping now.

My Top Chicken Picks for Preppers

These are some of the best chickens for free ranging, hot or cold climate, raising offspring, and/or laying eggs. Start with several kinds and selectively breed for your conditions. Bring in new breeding stock when possible to prevent inbreeding.

Brown Leghorn – hot climate, active forager, flighty, great layer, seldom broody, brown with green sheen.

Egyptian Fayoumi – Hot climate, active forager, wild, good layer, seldom broody, black and white speckled, disease resistant, early maturing.

Turken – Hot or cold climate, adaptable, decent layer, can be broody, good mother, color varies, docile, slow to mature.

Buckeye – Very cold hardy, adaptable, decent layer, somewhat broody, docile, dark brown, slow to mature.

Chanticler – Very cold hardy, decent layer, broody, good mother, docile, color varies, early maturing.

Dominique – Cold hardy, adaptable, decent layer, broody, good mother, barred, early maturing.

Ameraucana – Very cold hardy, adaptable, good layer, can be broody, color varies, somewhat early maturing.

Marans – Tolerant of wet conditions, adaptable, decent layer, broody, color varies.

For a great resource that lists the characteristics of different chicken breeds, check out the Henderson’s Chicken Breed Chart.


Start now to make sure you are staying prepared.


Via: theprepperproject

Growing Your Own Insecticide

Want a simple solution for growing your own insecticide, in the event that one day you might not be able to get it?

Many fruit and nut trees can become infested with insects; severely threatening your ability to produce food.  In this video I share a technique that my local permaculture designer taught me, for growing your own type of ‘insecticide’.

And the good news is, that it can be done completely off the grid, and gives your fruit or nut trees a nutritional boost that insecticides don’t offer.


The netting that you see me use in this video can be found here: http://www.premier1supplies.com/detail.php?prod_id=401

I highly recommend that you add additional supports to your purchase, especially if you are on uneven ground like I am.

Tip: You want to range your chickens on the ground infested with insect larvae during the time they are hatching.  For the tree slugs that I mentioned in this video (which are actually Sawfly larvae) I called my local Extensions office and asked them when tree slugs are born.  They told me that in my area (the Pacific/Maritime Northwest) that tree slugs are actually born two times a year… the first being in late spring.

What that means is that I should put this net around my Cherry Trees mid-April to make sure my chickens gobble them all up.

How Many Chickens Do You Need?

I asked this question from one of my designers and they said 6 chickens should be plenty to eradicate the tree slug population under my two Cherry Trees in this 1,700 square foot set up.

I plan on sharing whether or not that is true in the future by updating this article.

Hopefully you liked this little tip!

I sure thought it was cool when I discovered it.  What a perfect thing to take what is a destructive pest, and turn it into live chicken feed.  The yield of fruit or nuts from our trees improves, the health of the tree improves, and the chickens benefit from eating the high protein slugs.

It’s a Win-Win all the way around.


Start now to make sure you are staying prepared.


Via: theprepperproject

21 Medical Kit Must Haves

If you are looking for a list of items you should stock in your medical kit for treating a traumatic injury, then here’s our list of 21 Medical Kit Must Haves for treating a gunshot wound when the SHTF.

While some critics argue that a Medical Kit won’t help someone who doesn’t know how to use it, I would argue that it would be better to have a medical kit like this, and be out trying to recruit a doctor who has surgical skills, then to find someone with the skills, but have no supplies for them to use.

A medical kit is an asset.  And it’s an asset that will only go UP in value when the SHTF… whether you’re the one using it or someone else, make sure you have one.


Start now to make sure you are staying prepared.


Via: theprepperproject

Police State Checkpoints Are Already Here

“He’s perfectly innocent, and he knows his rights.  He knows what the constitution is. [But we’ll illegally search him anyway]”


Checkpoints for “public safety” are becoming more and more prevalent in our ever-evolving age of this police state.  I think many people are OK with this, as it’s for the greater good, yet others realize this is a direct violation of our constitution.

This July 4th, a young man was pulled over at a DUI checkpoint with his camera rolling.  He was instructed to pullover and get out of the car.  After asking if he was being detained, the officers refused to answer, and instead used intimidation to force him to give up his rights.

Upon a false “hit” from the K-9, the officers proceeded to check his car, to show who had the biggest pair between the cops and the 21-year-old.  Turns out the joke was on the cops when they were caught on camera saying “He’s perfectly innocent, and he knows his rights.”

This officer should be relieved indefinitely of his duties.  Clearly this is bad police work.  Type of action is not only be exposed by a brave and knowledgeable young man, but more importantly it has gone viral and is gaining the attention of the media and others who do now want to live in a “North Korea” like environment.

Please share this with your friends, and encourage them to know their rights, and NOT bend over and accept this new police state.


Start now to make sure you are staying prepared.


Via: theprepperproject

Orienteering 200 – Converting Azimuths

If you have stuck with me through this series you’ll remember that I said that grid north is what you read off your map using a protractor and magnetic north is what you read off your compass.  This is where we actually have to use a little math and do some figuring, but don’t worry.  I’ll try to break it down for you step by step.

If life were easy all you’d have to do is read the azimuth on the map and apply it to your compass and voila!  You’d be all set.  Alas, life is never that easy.

In most places grid north and magnetic north don’t line up perfectly.  In another post we talked about the GM angle, which is the difference between grid north and magnetic north.  At the bottom of most maps you’ll find the declination diagram, which gives you the variation.

For example, where I live here in Maine it’s a west declination of 17 degrees.  That means if I measure an azimuth on my map using the protractor I need to convert it to a magnetic azimuth before I use it on my compass or else I’ll be off 17 degrees as I navigate.  That’s a pretty big error and the more distance I cover the more significant the error becomes.

In the graphic below there’s a west declination of 16 degrees.  I know this because MN or magnetic north is to the left – or west – of GN or grid north.  If MN was to the right – or east – of GN it would be an east declination of 16 degrees.  This is important information as you’ll see in just a bit.


Converting Azimuths

Now let’s set up an example using this 16 degree west declination.  I pull out my map and see that I’m on a mountain top.  I want to walk to the next mountain top, which I measure out at an azimuth of 99 degrees using my protractor.  Now the trick is converting it to a magnetic azimuth I can use on the compass.

Grid to Magnetic – West Declination

There are various techniques I can use, but I’m going to use a visual aid that will help you better understand how it works.  In the chart below I’ve drawn a graphic that shows my GN (grid north) straight up and MN (magnetic north) to the west or left of GN.  I know what my grid azimuth is and what I need to know is the magnetic azimuth.

To find it I first draw an arbitrary line at 90 degrees.  This could be any angle so don’t get hung up on the 90.  In this case it’s 99 degrees that I measured off the map using the protractor.  I draw a solid line from GN to the arbitrary line because this is a known measurement.  Next I draw a dotted (or red) line from the MN to the arbitrary angle and put a question mark on it (algebra folks can put an x here)  because I need to know what the magnetic azimuth is going to be.


*Tip*:  In the example above think of it this way.  You can see that the magnetic bearing is a bigger angle than the grid (map) bearing.  Thus, the magnetic bearing will always be a larger number on a westerly declination.

Magnetic to Grid – West Declination


Now lets say we want to shoot an azimuth using our compass and then plot it on the map.  I’m standing on a mountain top and I see a tower in the distance.  I need to know where that tower is.  I know where I am on the map, but I’m not quite sure where the tower is in relation to me.  I pull out my compass and shoot an azimuth to the tower of 120 degrees magnetic.  Now I have to plot it on the map.

Looking at the graphic above I see that Magnetic North is a bigger angle than Grid north on a West Declination, so in order to get from Magnetic to Grid I have to subtract.

Thus:    120 degrees magnetic
– 16 GM
—————————
= 104 degrees grid

Therefore on the map I would use my protractor to plot an angle of 104 degrees from my current location on the hilltop out until I hit the tower on the map.  At that point I would know precisely where the tower is located.

Grid to Magnetic – East Declination

Now let’s say that we’re using an East Declination of 16 degrees.  We measure an angle off the map of 270 degrees and want to put it on our compass.  What magnetic azimuth do we use?

Keep in mind that on an East Declination the magnetic azimuth is always less than Grid Azimuth.  Refer to the graphic below.

Thus:

            270 degrees grid
–   16 GM
————————
254 Degrees Magnetic

So you follow 254 degrees on the compass to match 270 degrees on the map.


East Declination – Magnetic to Grid

In our last example we are going to plot an azimuth measured from our compass onto our map.  Let’s say we’re on a hill and see an intersection in the distance.  We want to plot a straight line to that intersection.  You measure an angle of 315 degrees from your location to the intersection and want to plot that on the map.

What is the azimuth you’re going to plot using your protractor on the map?

315 degrees Magnetic
+ 16 GM
—————————-
= 331 degrees Grid

Don’t forget that the magnetic angle is always less on an Easterly Declination.


I’m going to create a couple of videos showing how to do this using examples from a real map.  That way you can see how it all comes together.

Orienteering series

Why Should I Learn Map Reading?

The Pace Count

The Pace Count 2

Using the Pace Count

Parts of the Lensatic Compass

Understanding the Topographic Map

Discussion of Grid and Magnetic Azimuths

Converting Azimuths


Start now to make sure you are staying prepared.


Via: shtfblog

Orienteering 101 – Discussion About Grid and Magnetic Azimuths

Here’s where map reading starts to get a little sticky.  It’s important to understand that there are different norths when talking about map reading.

There are really three norths that you will see on a map’s declination diagram (usually.)  Take a look at the declination diagram below.  This chart shows us the three norths.  First is MN (magnetic north) to the left – or west – of the other two in this case.  Second is the line with the star, which is true north, and the last north is GN or Grid North, which is what you would measure off a map.  In this instance grid north and true north are almost perfectly lined up, but imagine GN to the right a little and picture three different lines and it could just as easily be the diagram below.


The line with the star or true north won’t be used by us as we learn map reading, so you can disregard it for now.  If you’re interested in a more detailed explanation of true north check it out here.  Below is a quote directly from Wikipedia:

True geodetic north usually differs from magnetic north (the direction a compass points toward the magnetic north pole), and from grid north (the direction northwards along the grid lines of a map projection). Geodetic true north also differs very slightly from Astronomical true north (typically by a few arc seconds) because the local gravity may not point at the exact rotational axis of the earth.

For our purposes magnetic north is what your compass points to.  The funny thing about magnetic north is that it tends to wander around a little, so you should take the time to find out what your declination is in your area.  Declination is the difference between magnetic north and grid north.  Looking at the example above the diagram is telling us that magnetic north is actually about 16 degrees west (left) of grid north.

The two norths that we are interested in are magnetic north and grid north.  Simply put grid north is what you read when you’re looking at your map – and magnetic
north is what you read when you look at your compass.

For example:  if I hold my compass and shoot an azimuth toward a mountain top and it reads 215 degrees, I would say, “The mountain top is at 215 degrees magnetic form my current position.”

When I measure an azimuth on my map I would say, “The mountain top is at 215 degrees grid from my position.”

Now here’s the fun part.

Magnetic north and grid north very rarely line up.

But first let’s look at how to measure an azimuth on a map.

Protractor Method to Measure Grid Azimuth

There are different ways to measure an angle, but the one I prefer is by using a special protractor you can buy online.  They’re relatively cheap – between $5 and $10 – and very useful when measuring angles on a map.


To use a protractor to measure an azimuth make sure it is straight up and down with the map – 0 degrees on the protractor will point straight up (north) on the map.  Like the compass there are two scales to read – the outer scale is in mills, which is 0 to 6400 and the inner is degrees and it is 0 to 360 degrees, which is the one we want.

In the example above I’m shooting an azimuth from a road intersection to a hill top.  First I draw a line from the intersection to the hill top. Then I place the exact center of the protractor over the intersection, which is my current location, and measure the angle to the hill, which is 38 degrees.  Now I know that the azimuth from the intersection to the hill top is 38 degrees grid.

Measuring a Magnetic Azimuth

 There are two methods for reading an azimuth on a compass, which I’ll show in a later post.  The important part is reading the angle.

To do that line your compass up on the object you want the azimuth to and then look down through the lens at the red numbers on the dial.


In the example above I’m lined up on 5 degrees magnetic.  The black index line is lined up over the 5.

I’m not going to get into a whole lot of detail on that in this article.  In the next post we’ll talk about using the compass to measure an azimuth and I’ll try to have a video to show you the various ways to do it.

The two important concepts in the lesson are this:  

1.  When you read an azimuth from a map it’s referred to as a grid azimuth.

2.  When you read an azimuth from a compass it’s called a magnetic azimuth.

It is critical that you know the difference between the two for later lessons.

Orienteering series

Why Should I Learn Map Reading?

The Pace Count

The Pace Count 2

Using the Pace Count

Parts of the Lensatic Compass

Understanding the Topographic Map

Discussion of Grid and Magnetic Azimuths

Converting Azimuths


Start now to make sure you are staying prepared.


Via: shtfblog

Orienteering 101 – Understanding the Topographic Map

The topographic map is a wonderful invention full of useful information once you learn how to read one.  They come in different shapes, sizes, and scales, but they all share certain conventions that make it easy to pick up a map from different manufacturers and read them without a problem.

They are used by the military, surveyors, and anybody who has the need of knowing where they are and where they’re going.  If you plan on doing a back country hiking trip, a canoe trip, or anything in the woods or wild it would be foolhardy to leave without one of these in your pack even if you’re carrying the latest and greatest GPS.

A topographic map is simply a two dimensional representation of the Earth; however, the way it’s drawn represents three dimensions, which is handy if you want to know how high a mountain or how deep a valley is.  There are some colors that represent various features on a map.  These can change a little from map to map, but these are the basics:

Black – man made features.  Names on the map, elevations, buildings, rail systems, transmission lines, etc.

Red – Paved roads, highway numbers.

Brown – contour lines, elevations.

Blue – water.  Lakes, ponds, streams, etc.  Also swamps and marshes.

Green – wooded areas, orchards, vineyards.

White – some maps will show white patches, which are unforested areas such as grasslands.

Depending on who put the map out there may be other colors as well, but these are the majority.


Legend

There are also many symbols on a map and most maps have a key or legend telling what the various icons on the map stand for.  It’s best to consult the map you’re reading so you’ll know what the symbol refers to.  The above Legend is for a hiking trail map put out by National Geographic.  I won’t go into the markings here too much, but if you have questions about the map you have in front of you try doing a Google search to find out what the symbols are for.

Another important section of the map is the Scale.  This will tell you how far one inch or one centimeter is on a map.  When you’re plotting a route it’s important to figure out the distance you’ll be traveling over land as accurately as possible.


Scale

When I looked at the scale above I was confused for a minute by the scale.  1:63360 is kind of an odd number.  After a minute of thinking about it I realized that the answer is right next to it.  1 inch = 1 mile.  This map is designed to be read in miles and not the metric system like I’m used to, which is why it confused me for a second.  Remember that I said 1: 63360 really means that 1 inch on the map equals 63360 inches over land?  Well if you divide 63360 by 12 you get 5280, which is the number of feet in a mile.

The NatGeo map I’ve been referencing so far is a very nice map.  The paper is heavy and the detail on the map is excellent for the scale, plus it has grid squares, which makes lining the protractor up pretty easy.


I prefer the 1:24,000 map because it gives a lot more detail. On the flip side it doesn’t cover as much territory as one like the 1:63360 maps.

Luckily they also put the metric scale in there as well, which is what I use because I’ve measured my pace count in meters.

Contour Lines

Another important piece of information you should find somewhere on your map is the contour interval.  This is the distance between each contour line on the map unless otherwise noted.  This map has the contour interval at 50 feet.  Other maps have contour intervals of 20 feet, so be sure to study your map closely.

But what are contour lines exactly?  This is one of the features of a topographic map that make it such a powerful tool.  Contour lines are simply lines on a map of even elevation.  Thus, if I stood on a hill and took a piece of string and walked all along a height of 873 feet laying out the string as I went until I got back to where the string started, that would be a contour line.  Using the map above if I walk uphill until  my elevation was 50 feet higher there would be another contour line.

This doesn’t mean that I walk 50 feet, it means that I’ve risen 50 feet in height.  I might have to walk 100 yards to gain 50 feet in elevation.  Conversely, I might only have to move 20 horizontal feet to gain 50 feet in elevation.

Question:  is it possible to not move on a horizontal axis at all and still gain or lose 50 feet?

Answer:  yes, it’s called a cliff.

 If you’re looking at a map and there are big looping contour lines spaced far apart you’re looking at fairly flat land.  If you’re looking at a point on the map where the contour lines are very close together you’re probably looking at a mountain or a deep hole.

As you’re looking at contour lines you’ll notice that about every fifth line has a number associated with it.  These are called index lines.

Thus, if you’re planning to hike through unknown territory if you can get your hands on a topographic map you’ll have a much better idea of what you’ll be walking over.  If you’re studying a regular road map you might never know that part of the route you’re looking at is over a mountain, whereas one look at a topographic map would show that you’re in for a big elevation change in a very short distance.


United States Department of Commerce Coast and Geodetic Survey

In the map above I’ve outlined a few of the terrain features you might see on a map.  Near the lower right portion you can see a hill top labeled 910.  This means the hill top is at an elevation 910 feet.  You can see that it looks like a small circle with another line circling it and so forth.  Each line represents a rise of 20 feet as you can see from the scale below where it says Contour Interval:  20 Feet.


Near the middle top of the map I’ve labeled a terrain feature “Very Steep Terrain.”  You can see how the contour lines run pretty close together meaning it’s quite steep.  If you saw a bunch of lines all converge into one line that means there’s a cliff at that location.

Look the example above over and you can I’ve pointed out a trail, valley, hill top, building, index lines and some other things.  With this information you can now start to get an idea of what your terrain looks like.

If I were standing on the road exactly where the arrow points from the word “Road” in the map above and I was facing due north (up) what do you suppose I’d see?

If I looked left I probably wouldn’t be able to see the lake because I’ve got a spur of the hill coming down from behind me blocking my view.  I’d see a hill with trees with the hill tapering off.  If I looked right I’d see an open field in the foreground and then a hill rising into a mountain – all tree covered.  Looking due north I’d see an open field in front of me rising into a smaller hill than what’s to my right or east.

What else can I tell just by looking at the map?  I can see that the road (the red line) runs through a valley next to a couple of lakes.  I know that the terrain to the north and east is very hilly or mountainous, and that there’s a hill behind me.  So there’s plenty of information you can glean from a topographic map if you know how to read it.

Take the time and get yourself a topographic map of your area.  Sit down and give it a good look and you might be surprised at some of the terrain in your area.

A  good exercise is to plan a hiking route or a  bug-out route through terrain you haven’t seen before then actually go out and see what the terrain looks like.

One quick note about forested areas:  the map doesn’t tell you how dense the forest is.  In northern Maine the forest in some places is very thick and difficult to move through and in other places it’s a little more open.  The only way to really know for sure is to go out and have a look or talk to someone who’s been there.  A person who’s hiked the area you’re looking at can be a wealth of information.

Orienteering series

Why Should I Learn Map Reading?

The Pace Count

The Pace Count 2

Using the Pace Count

Parts of the Lensatic Compass

Understanding the Topographic Map

Discussion of Grid and Magnetic Azimuths

Converting Azimuths


Start now to make sure you are staying prepared.


Via: shtfblog

Fundamentals of Orienteering–Using the Pace Count

Ok, we’ve talked about the pace count and how to measure it and now it’s actually time to use it.  So how exactly do we do that?

When you plot a route on a map you have to take into consideration obstacles such as rivers, mountains, swamps, etc.  Very rarely will you ever go straight from where you are to your destination.  Instead you’ll set up a series of routes called “legs.”

A leg is one segment of a journey such as from point A to point B on the map below.  If you’re plotting a trip using a map you want to plot your route in such a way that you avoid obstacles.  Lets say you start at point a on the river, then walk up river for a while until point b, then at point b you turn into the woods for the final leg to your destination in the clearing.

How do you know when to leave the river and turn inland for the final leg?

If you measure the straight line distance between the two points it’s only 900 meters, but you can tell by looking at the map that the actual distance traveled will be more than that because the river twists and turns.

How do we measure those twists and turns?


Point b is important because it’s where you leave the river in order to get to the clearing (point c).  If you go too far north you’ll walk past the clearing (point c) that you’re aiming for because you’ll over shoot.


To figure out the distance using the scale below, take a piece of scrap paper and mark out the increments from 1 to 1000 meters on the paper.  Then use that piece of paper to get the actual ground distance you’ll be traveling.


Check out the short video below on how to measure ground distance.


Measuring Ground Distance On a Map


As you can see from the video the straight line distance is 900 meters, but the actual distance you need to travel is 1.4 kilometers or 1400 meters.  Following a river here is fairly rough terrain (I’ve actually walked a little piece of the river in this map), so I’d probably go with 100 meters = 75 paces average from the last post.

Keeping Track of Your Distance

As you walk you’ll need to find a way to keep track of how far you’ve gone.  There are Ranger Beads that can help you keep track of how far you’ve gone, which I’ve used in the past.

One of the things I do most often is just stop and pick up a small twig or a pebble and hold onto it after walking 100 meters or 75 paces, then I start counting over from 1.   After I’ve got ten of them in my hand I know I’ve walked a kilometer and I start over again knowing I’ve got 1 kilometer behind me.

Thus, if I were walking the course above I’d look for a couple of different things.  First, I’d make sure I had at least 14 pebbles in my hand (1.4 kilometers) and second, I’d look to make sure I was at a bend in the river where the bend was heading almost due north.

If these things were true then I’d get out my compass and follow the azimuth towards point c.

Orienteering series

Why Should I Learn Map Reading?

The Pace Count

The Pace Count 2

Using the Pace Count

Parts of the Lensatic Compass

Understanding the Topographic Map

Discussion of Grid and Magnetic Azimuths

Converting Azimuths


Start now to make sure you are staying prepared.


Via: shtfblog

Fundamentals of Orienteering–The Pace Count part 2

I talked a little about pace count in the last orienteering post and I’d like to expand on that in this article.

Pace count is the way you keep track of distance when you’re using a map and compass to navigate over land.  The more accurate your pace count the better you’ll be able to know where you are on a map.

As noted earlier the best way to get your pace count is to find a track and walk 100 meters on it carefully counting each time your left foot strikes the deck.  Do this a number of times and take the average.  Most people fall in between 62 to 66 paces.  My pace count is 63 steps for 100 meters.

However, what happens when you’re walking through the forest, or up a hill, or through a swamp?  That will absolutely affect your pace count.  If I count 63 steps and I’ve had to walk around trees, step over streams, and so forth chances are slim that 63 steps will actually equal 100 meters.

Here’s a list of averages I found on the internet and it looks pretty close to how I was trained.  If I could remember where I found it I would link to it, but it’s one of those things I wrote down and moved on before thinking I might actually post it someday.   If you’re the originator of this information please contact me and I’ll post a link here.

Here are the averages:

Flat easy terrain                100 meters    65 paces

Rougher terrain
with some slope                 100 meters     75 paces

Steep hill terrain               100 meters     95 paces

This is some very good information to have in your arsenal.  I always keep a small notebook with me and I suggest you do the same.  This is exactly the kind of stuff I write in that book.

Another good way is to find an area in the woods that’s about 500 meters long and walk through it time and again keeping track of your pace count as you go.  Average it out and that will give you a good realistic idea of what you’re pace count is for that distance in that terrain.

Orienteering series

Why Should I Learn Map Reading?

The Pace Count

The Pace Count 2

Using the Pace Count

Parts of the Lensatic Compass

Understanding the Topographic Map

Discussion of Grid and Magnetic Azimuths

Converting Azimuths


Start now to make sure you are staying prepared.


Via: shtfblog