Category Archive: Animals

Homemade Dog Food

Dog food can be expensive and tedious to buy. There tends to be an unbalanced nutrition in common dog foods. Generally there is a lot of corn or other grains and very little protein or healthy fats. Making dog food at home can be much more rewarding for you and your dog.

When preparing your dog’s meal, you must think about cover all bases of nutrition. You want to have a balanced meal that provides enough calories and also has enough what your dog needs. Make sure that you give your dog the right amount of protein, carbohydrates and fats. Below are some suggestions of what you can add to your homemade dog food.

Proteins – Our main source of protein is raw eggs. Yes, raw from the backyard coop. He goes crazy over them. Shells included, crushed up. For smaller dogs, one egg a day would be enough. But Samson is quite the big boy, so two eggs a day does it for him, though sometimes I do only give him one. Raw eggs not only help your dog get its necessary protein, it also helps tremendously in making their coat shiny and beautiful.

Other proteins include meat, beans (he loves beans), seafood and some dairy. You can feed your dog raw or cooked meat, however, you should never mix them. If you choose to do raw meat in your dog’s diet, it must strictly be a meal of raw meat. A dogs body processes cooked and raw meats differently — giving them to your dog in the same meal can cause more harm than good. Strictly raw, nothing cooked (including other things like veggies and oatmeal).

Fats – This can certainly come from the meat that you give your dog. You can also use oil, but we choose to just use drippings or fat from the meat.

Carbs – Grains such as rice and oatmeal are a great base for your dog food, and carbohydrates are necessary to keep your dog’s energy levels up to par. We tried brown rice several times, but his body did not digest it &mdash it came out the same way it went in. Therefore, oatmeal is our go-to grain. His body digests it easily, and there are lots of good things that oatmeal does for the body and the coat.

Vegetables – This goes along with the “carbs” section, but I like to treat it separately. Take this time to really dive into what veggies your dog might like, each dog is different. Samson loves carrots and peas (cooked or canned). Vegetables are a necessary part of the diet, though not as necessary as proteins, fats and carbs. I always suggest doing more of the top three, and then sprinkling a thin layer of veggies over top.

Calcium – Egg shells, certain dairy (yogurt, cheese, limited raw milk).

Fatty Acids – This is kind of an “eh” category. Your dog will be getting most of these from the other things that you’re giving in the homemade dog food. Fatty acids come from egg yolks, oatmeal and some plant oils.

Source: MotherEarthNews

Here is one idea for a good mixture of dog food:

-2 cups of cooked oat meal (steel-cut oats)

-1 cup of kale or spinach

-1 to 2 cups of cooked meat

-1 raw egg (with the shell)

-1 cup raw yogurt


Start now to make sure you are staying prepared.


Via:  survivalist


Save pagePDF pageEmail pagePrint page

Walking your dog can help you Prep

Next time you take Bonzo out for his daily exercise, turn it into a prepping activity. Dog walkers raise no more eyebrows than, say, a robin pecking at a patch of grass. It’s all part of the scenery, but for you, my friend, it’s much more. You are actively prepping!

Preppers must be highly observant and know their surroundings AND who surrounds them, so why not turn dog walking time into something more?

Here’s how walking your dog can help you prep.

Your neighborhood has an atmosphere

While walking your dog you can observe your neighborhood’s overall atmosphere. You should get a pretty good idea of the types of people who live near you.

Do see many trucks with Glock or Sig Sauer bumper stickers or lots of Smart Cars and Priuses? Nothing against any of those vehicles, but if your neighborhood is home to many of one versus the other, a person’s choice of car says a lot about them.

Do you see specific homes that you would warn your children about? Chances are in a big enough crisis, the residents of those homes may not have the best of intentions.

Are there yard signs that indicate specific religious or political persuasions?

Look for homes flying military flags such as this one or this one. Knowing who in your neighborhood has served in the military might come in handy.

Likewise, are there homes that have police cars parked in the driveway indicating that an officer lives there?

Is your neighborhood filled more with families with young children? Empty nesters? Senior citizens? As a population ages, it generally becomes poorer and less able to tend to a home’s upkeep.

Look for signs of trouble: graffiti, empty homes, broken windows, people coming and going at all hours of the day and night.

Do you see signs of vegetable gardening or backyard chickens? These can be tell tale signs of a prepper or, at least, someone wanting a bit more self-sufficiency.

What is your gut feeling about your neighborhood? Do you feel safe walking its streets?

Your neighborhood is full of people, potential allies and otherwise

If your dog is friendly and doesn’t have any history of aggression, allow neighbors to come and meet him or her. Sometimes people warm up to an animal before they warm up to a person. Your dog may be your ticket to a new friendship or, at least, a friendly acquaintance.

As you meet people along your way, be friendly and get to know them. This will enlarge your circle of neighborhood acquaintances but also let any potential ne’er do wells that you are someone who is out and about and observing.

Retirees and stay at home moms often know neighborhood gossip, and that can be a helpful thing.

Offer help to neighbors who need it. Just last night a family we had never met before was across the street looking for their cat. We pitched in with extra flashlights and kitty treats. No one ever forgets a helpful hand in time of need, and if there’s one thing every prepper will need in an emergency, it’s a circle of friends.

As you regularly walk your dog through your neighborhood, are there homes that frequently have police cars parked out front indicating there is trouble of some sort inside? Take note.

There’s more to look for when walking the dog

Use your dog walking time to check out evacuation routes and things that might impede that evacuation, such as waterways that could become flooded.

Are there areas near your house where you could quietly plant unobtrusive crops, such as potatoes, grape vines, and herbs?

If you had to walk from your home to a grocery store, could you do it, and how many ways do you know of to get there safely?

Are there “safe houses” in your neighborhood? If your home was threatened or uninhabitable, where could you go? Identify churches, homes of friends and co-workers, etc.

Best of all, as you’re doing this neighborhood reconnaissance, you’re just the guy or gal out walking the dog. You’re getting some exercise and fresh air, your dog is getting some exercise and is happy, while at the same time your sharp eye is taking note!

Just don’t forget the doggie pooop bag!


Start now to make sure you are staying prepared.


 Via :  thesurvivalmom


Save pagePDF pageEmail pagePrint page

Organize Your Emergency Evacuation in 5 Simple Steps

“All for one and one for all!” makes a great family motto when it comes to an emergency evacuation.  When everyone has designated jobs and knows exactly what to do, your family can be packed and out of town before most other families grab their toothbrushes.  To make this happen and avoid hysteria, chaos, and needless tears, your family needs an evacuation plan.  Bugging out can be better organized and less traumatic than you might think.

When I first began thinking about the possibility of evacuating from our home, I visualized sheer panic.  Immediately, I realized the need for a written list of procedures posted in two or three locations and a family meeting or two to insure that everyone was informed and on board.  As I put our evacuation plan together, five basic steps became apparent.

1.     Make provisions for animals.

2.     Pack personal necessities, food, and water.

3.     Prepare the house.

4.     Pack important documents and a computer.

5.     Insure the vehicle is ready to go.

Follow these five simple steps to create your own evacuation plan.

1.  Make provisions for animals

I put this at the top of my list because I’m crazy about our dogs, cats and bird.  There were so many unnecessary tragedies that involved beloved pets in the aftermath of Hurricane Katrina, and after watching that unfold, I determined that I would never leave ours behind.


Bugging out is difficult enough for the human members of the family, but the excitement, fear, and flurry of activity will be highly stressful for your animals.

Once you’ve made the decision to evacuate, one of the first steps should be to determine how best to care for each animal.  Certainly, most cats and dogs will need to be either evacuated with you or transferred to a safer location.  Either way, you don’t need them underfoot as you rush around, so a first step will be to put them in crates or carriers.  Delegate this task to one or two family members.

Depending on the size of your dogs and cats, you may want to first load their crate in your vehicle and then the animal(s).  So, first on my list is to load the dog crate in the Tahoe, and put each dog inside.  We have four small dogs so they all fit, in a cozy sort of way!

Pre-position collars, leashes, and water and food bowls in the crate, along with some dog food, double-bagged in two large Zip-Locs.  (Ants love dog food!)  Add the dog, and you’re good to go!

If your cat isn’t used to being in a carrier, now is the time for Crate-the-Cat practice!  Along with her crate, pack a small package of kitty litter and her food.

If you’re the proud owner of fish, reptiles, rodents and/or farm animals, consider whether or not you’ll take them along, leave them on their own with a plentiful supply of food and water, or transport them to another location.  Have a Plan B for their care in case circumstances suddenly change.  For more tips, read this.

2.  Personal necessities, food and water

While the designated family member is rounding up the animals, delegate who will be responsible for the following.

  • Load 72 Hour Kits, if you have them.  Take some time now to put these kits together while you have time and are not under any duress.  I carry a Vehicle 72 Hour Kit in my Tahoe at all times in case of emergencies while we’re on the road.  If we only had time to grab our Kits, at least we’d have the most necessary items for survival to get us through the first three or four days.
  • Load firearms and ammunition.  Guns are one of the first things vandals look for, and I don’t want ours getting into the wrong hands.  In a worst case scenario, we may need them for defense.  If our family is bugging out, hundreds or even thousands of people will be doing the same thing, and they may not all be law-abiding citizens.
  • Cash.  I usually keep this in twenty dollar bills or smaller. In case of a widespread electrical outage, ATMs and credit/debit card machines may not be working.  I want to be sure we can pay for hotels, gas and food.  A roll of quarters is a good idea if you may be washing clothes at a laundromat or using pay phones, which, by the way, are often up and running before land lines and cell phone towers are operational.
  • An emergency toilet: a handy-dandy five-gallon bucket with plastic liners.  This bucket can also hold a couple of small blankets, toilet paper and a bottle of bleach/water mixture.  You can even buy a toilet seat designed to fit one of these buckets.  I’ve read accounts of the Hurricane Ike evacuation in 2008, and I don’t want my family using the side of the road as a toilet.  Enough said.
  • Load additional food and water, as much as there is room for.  Your 72 Hour Kits will contain emergency provisions, but extra food will always come in handy.  Collapsible water containers are a good option since they gradually take up less space as they’re emptied.
  • Bedding items, such as sleeping bags, blankets, and pillows will add comfort and reassurance.  How much you can take with you will depend on how much room you have left in your vehicle.  I always keep a couple of lightweight blankets rolled up under the back seat, just in case.
  • Pack tools we might need.  A claw hammer or a Phillips screw driver might make all the difference in the world in a survival scenario.
  • Family heirlooms and valuables, including photos.  Now, before a crisis hits, would be a good time to transfer irreplaceable photos to CDs.  It’s much easier to grab a few CDs than armfuls of photo albums, or, if you’re like me, boxes of loose photos.

3.  Prepare the House

As you drive away from your home, no doubt you’ll have feelings of sadness and, perhaps, loss.  A written plan to protect your home will increase the chances of having a home to come home to.  Here is a checklist I’ve used.

  • Turn off gas and water.
  • Go out to your electrical panel and switch off everything except for the breakers marked for the kitchen.
  • Unplug everything in the house except the refrigerator, freezer and a kitchen lamp.  Even if our entire neighborhood is evacuated, I would just rather my home look occupied.
  • Shut down and unplug the computers.
  • Close and lock all windows.  Close blinds and curtains.
  • If your emergency requires it, board up the windows or put up your storm shutters.
  • Depending on the current weather, turn off air conditioner and/or heat or set them at minimal levels.  (Make sure to leave those breakers in the ‘on’ position on your electrical panel.)

4.  Pack important documents and a computer

  • Load our strong box.  (This contains originals of things like Social Security cards and birth certificates.)
  • Pack my Grab-and-Go Binder containing copies of vital financial and family documents and my Survival Mom Binder with printed information helpful in emergencies, such as maps and water purification instructions. This could all be part of your G.O.O.D Survival Manual (Get Out Of Dodge).
  • Use a flash drive to save important business and financial information from our desktop computer.  Pack flash drive with laptop.
  • Pack our laptop computer.  Be sure to include the charger!


Bugging out

5.  Insure the vehicle is ready to go

Hopefully, you’ve been keeping an eye on weather and news reports and have made sure your vehicle’s gas tank is full.  In addition to that simple, obvious step, here are a few more.

  • Load extra filled gas cans, if you have them.
  • Check air pressure of tires.
  • Be sure you have everything necessary for dealing with a flat tire, including a spare.
  • If your vehicle is likely to need it, pack extra engine oil and other fluids.

Delegate, Post, and Rehearse

Now that your plan is finished, discuss each step with your family and delegate each task to family members.  Even the youngest will want to be useful, and in a crisis situation, assigned tasks will help defuse feelings of panic and confusion.  It’s more difficult to become hysterical when you have something to focus on.  Not impossible, just more difficult!

There’s one final step.  Will this really work?  How much time will it take, and will there be any room for passengers in your vehicle once it’s loaded?  It’s now time for an evacuation drill.  This will help refine your plan and give everyone a real-life rehearsal.  Post your final plan around the house, and then, when they least expect it, start the drill.

“Hey kids!  There’s a mountain of red hot lava rushing toward us, and we have to be out of the house in thirty minutes.  Everybody know their jobs?  Okay!  Ready…..GO!!!”

Start the timer, and let the fun begin!  Be sure to follow up with a family meeting to discuss what went well and what needs to be improved upon.  When your plan is in place, a potential evacuation will be one crisis you won’t have to worry about.


Start now to make sure you are staying prepared.


 Via :  thesurvivalmom


Save pagePDF pageEmail pagePrint page

Be Prepared For Pet Emergencies

When it comes to our four legged friends, being prepared goes beyond having the proper pet supplies in our bug-out bags and in-home emergency kits.  There is also the component of pet healthcare and the need to recognize and then act quickly and decisively during a pet emergency.

In my opinion, this is a topic that is not addressed often enough in the preparedness community.  The truth is that while it is easy to use a proactive approach with our own healthcare, most of us are at a bit of a loss when it comes to our pets.

Let’s face it. We can count on our pets body language and demeanor to tell us that they are not feeling well but other than that, they cannot verbalize their aches and pains and other woes like a human can.

With that introduction, today I share suggestions and tips to help you be prepared for pet emergencies. As much as for myself as for you, I have put together the following list of solutions to pet accidents and illnesses that may occur following a disaster or other catastrophe when professional help is not around.

Disclaimer: I am not a health care professional or veterinarian.  The information below was gathered from what I believe to be credible sources.  That said, if you have any questions, please consult with your pet’s own veterinarian for expert advice on what to do in an emergency situation.  Also, please remember that in almost all of these circumstances, it is preferable to transport your pet to your veterinarian than to treat the illness yourself.

Checking Your Pets Vital Signs

If your pet is ever in distress, it is helpful to be familiar with your dog’s vital signs. So what should those vital signs be?  The best thing to do is to determine your pet’s “normal” or baseline vital signs so that you can make a comparison to this baseline during times of stress, accident or illness.

The vital signs you want to measure are heart rate, breathing rate and body temperature.

According to Dr. Rebecca Jackson:

A normal heart rate for dogs is between 60 and 140 beats per minute. To determine your dog’s heart rate, put your hand to his chest and count how many pulses you feel in 15 seconds, then multiply by 4 to get the number of beats per minute. If you have trouble detecting heart beats in the chest area, try placing two fingers on the middle of your dog’s thigh near where the leg joins the body. There, you should be able to feel the femoral artery pulsing each time the heart beats.

Next, you want to determine your dog’s rate of respiration, at rest (in other words, not right after a game of Frisbee). A healthy dog takes between 12 and 24 breaths per minute. To measure breathing rate, count the number of times the chest expands in 10 seconds and multiply by 6. You can do this either by watching your dog or resting your hand on the ribs. Normal respirations should not make any noise, and should require very little effort. Of course, if you have a brachycephalic breed like a Pug or English Bulldog, a little snort from time to time can be expected!

The final vital sign to measure in your pet is body temperature; a normal temperature is around 100.5 degrees Fahrenheit to 102.5 degrees Fahrenheit. And yes, the best measure of true body temperature is taken rectally, so you might want to distract your dog with a treat or toy while you take the temperature. If you (or your dog) aren’t comfortable with that particular method, the next best tool is an ear thermometer or “touch-free” infrared thermometer that is made for animals.

Once you have taken your dog’s vitals, keep a log of his normal numbers in your pet first aid kit, in the event you ever need to grab it and go. The three main vitals you want to measure are the heart rate, breathing rate and body temperature.

How to Deal with Common Pet Emergencies

Poisoning and Exposure to Toxins

Poisoning is a pet emergency that causes a great deal of confusion for pet owners. In general, any products that are harmful to people are also harmful for pets. Some examples include cleaning products, rodent poisons and antifreeze. But you also need to be aware of common food items that may be harmful to your pet since many foods that are perfectly safe for humans, can potentially be deadly to dogs and cats.

To be safe, keep the following food items out of your pet’s menu:

  • Coffee grounds
  • Fatty foods
  • Tea
  • Chocolate
  • Avocado
  • Alcohol
  • Yeast dough
  • Grapes/raisins
  • Salt
  • Macadamia nuts
  • Onions
  • Garlic
  • Chewing gum, candy and breath fresheners containing xylitol

In addition, always keep garbage out of a pet’s reach since rotting food often contains molds or bacteria that could produce food poisoning.

If your pet’s skin or eyes are exposed to a toxic product (such as those in many cleaning products), check the product label for the instructions for people exposed to the product; if the label instructs you to wash your hands with soap and water when exposed, then wash your pet’s skin with soap and water – just make sure that you do do not get any into its eyes, mouth or nose.  If the label tells you to flush the skin or eyes with water, do this for your pet as soon as possible.

Bee or Wasp Stings

Neutralize the sting. Since bee stings are acidic, you can neutralize them with baking soda.  On the other hand, wasp stings are alkaline and should be neutralized with vinegar or lemon juice. After neutralizing the sting, apply a cold pack plus calamine or antihistamine cream,

Seizures

In the event of a seizure, keep your pet away from any objects (including furniture) that might hurt it. Do not try to restrain the pet.  Time the seizure and after the seizure has stopped, keep your pet as warm and quiet as possible.

Fractures

If your pet has a fractured bone, he will be in pain and may act erratically.  It is important to muzzle your pet so that you can treat him.  After doing so, gently lay your pet on a flat surface for support.  Attempt to set the fracture with a homemade splint, but remember that a badly-placed splint may cause more harm than help.  Only do this if it is your only choice.

External Bleeding

First muzzle your pet then press a clean, thick gauze pad over the wound, and keep pressure over the wound with your hand until the blood starts clotting. This will often take several minutes for the clot to be strong enough to stop the bleeding. Instead of checking it every few seconds to see if it has clotted, hold pressure on it for a minimum of 3 minutes and then check it.

If the bleeding is severe and on the legs, apply a tourniquet (using an elastic band or gauze) between the wound and the body, and apply a bandage and pressure over the wound. Loosen the tourniquet for 20 seconds every 15-20 minutes.

Internal Bleeding

The symptoms of internal bleeding include bleeding from nose, mouth, rectum, coughing up blood, blood in urine, pale gums, collapse, weak and rapid pulse. If your pet is exhibiting these symptoms, keep him as warm and quiet as possible.  Alas, there is nothing much you can do unless you can transport your pet immediately to a veterinarian.

Burns

For chemical burns, first muzzle your pet then flush burn immediately with large quantities of water.  For other types of sever burns, muzzle then quickly apply an ice water compress to burned area.

Choking

The symptoms of choking are difficulty breathing, excessive pawing at the mouth, choking sounds when breathing or coughing of blue-tinged lips/tongue.   Use caution since a choking pet is more likely to bite in its panic.

Look into the pet’s mouth to see if a foreign object is visible. If you see an object, gently try to remove it with a pliers or tweezers, but be careful not to push the object further down the throat.  If you can not remove the object or your pet collapses, place both hands on the side of your pet’s rib cage and apply firm quick pressure, or lay your pet on its side and strike the rib cage firmly with the palm of your hand 3-4 times. The idea behind this is to sharply push air out of their lungs and push the object out from behind. Keep repeating this until the object is dislodged.

Heatstroke

Pets can succumb to heatstroke very easily and must be treated very quickly to give them the best chance of survival. If your pet is overheated, move him to a shaded area and out of direct sunlight.  Place a cool or cold, wet towel around its neck and head (do not cover your pet’s eyes, nose or mouth).

Remove the towel, wring it out, and rewet it and rewrap it every few minutes as you cool the animal.  Pour or use a hose to keep water running over the animal’s body (especially the abdomen and between the hind legs), and use your hands to massage its legs and sweep the water away as it absorbs the body heat.

Monitor your pet’s temperature with a rectal thermometer.  When his temperature drops to 103 degrees, dry your pet off.

Shock

The symptoms of shock are a weak pulse, shallow breathing, nervousness and dazed eyes.  Shock usually follows a severe injury or extreme fright.

If you pet is in shock, keep him restrained, warm and quiet. If your pet is unconscious, keep head level with rest of body.

Not Breathing

If your pet is not breathing, stay calm and check to see if your pet is unconscious. Open your pet’s airway by gently grasping its tongue and pulling it forward (out of the mouth) until it is flat. Check the animal’s throat to see if there are any foreign objects blocking the airway (see the section above on Choking).

Perform rescue breathing by closing your pet’s mouth (hold it closed with your hand) and breathing with your mouth directly into its nose until you see the animal’s chest expand. Once the chest expands, continue the rescue breathing once every 4 or 5 seconds.

No Heartbeat – CPR for Pets

Do not begin chest compressions until you’ve secured an airway and started rescue breathing (see the section above, “Not Breathing”).

  • Gently lay your pet on its right side on a firm surface. The heart is located in the lower half of the chest on the left side, just behind the elbow of the front left leg. Place one hand underneath the pet’s chest for support and place the other hand over the heart.
  • For dogs, press down gently on your pet’s heart about one inch for medium-sized dogs; press harder for larger animals and with less force for smaller animals.
  • To massage the hearts of cats and other tiny pets, cradle your hand around the animal’s chest so your thumb is on the left side of the chest and your fingers are on the right side of the chest, and compress the chest by squeezing it between your thumb and fingers.
  • Press down 80-120 times per minute for larger animals and 100-150 times per minute for smaller ones.
  • Don’t perform rescue breathing and chest compressions at the same exact time; alternate the chest compressions with the rescue breaths, or work as a team with another person so one person performs chest compressions for 4-5 seconds and stops long enough to allow the other person to give one rescue breath.
  • Continue until you can hear a heartbeat and your pet is breathing regularly, or you have arrived at the veterinary clinic and they can take over the resuscitation attempts.

Please remember that your pet’s likelihood of surviving with resuscitation is very low. However, in an emergency it may give your pet its only chance.

The Pet First Aid Kit

The items below are suggestions for a pet first aid kit.  As you read through this list, you will see that many of these items can perform double duty as first aid in your human first aid kit as well.  I leave it up to you to decide whether you want to create one kit – for you and your pets – or separate kits for each of you.  Note that you will find links to many of these items in the bargain bin.

  • Digital thermometer (normal temperature is around 100.5 – 102.5 degrees; a couple degrees above that is a likely sign of infection (fever) and a few degrees below can signal shock.
  • KY jelly (to lubricate thermometer before your insert into the pet’s rectum)
  • Kaopectate (to stop diarrhea – be careful to only give amount appropriate for the pet’s weight)
  • Syringes without needles or an eye dropper (to administer liquids into pet’s mouth)
  • Bandages – gauze pads, non-stick Tefla pads, cotton gauze (to cover wounds; gauze can also be used as a make-shift muzzle but NOT in cases of vomiting)
  • Anti-bacterial ointment (to speed healing and prevent infection) or some DIY Miracle Healing Salve
  • Cotton swabs (to clean wounds)
  • Small splint (to stabilize a broken limb)
  • Vet Wrap or Medical tape (to keep bandages or splints in place)
  • Scissors (to trim hair from wound site and shape bandages as needed)
  • Tweezers (to remove dirt, pieces of glass from wounds)
  • Locking hemostatic forceps (to clap off a blood vessel or to help remove porcupine quills)
  • De-ticker tool (good for removing all kinds of ticks)
  • Hydrogen peroxide – (to induce vomiting; use ONLY with veterinary instruction as some poisons can cause more damage if they travel back up the esophagus)
  • Activated charcoal (absorbs poisons – again, use ONLY with veterinary instruction)
  • Rubbing Alcohol (to clean and disinfect wound)
  • Dawn dish washing soap – to wash off toxins or skin irritants that they may have rolled in)
  • Saline solution (to flush out eyes)
  • Instant cold pack (to lower body temperature of hypothermic patients)
  • Muzzle (for dogs to protect you from bites if your pet is in severe pain and cannot quietly tolerate your care)
  • Rescue Remedy (to calm distressed animals)
  • Blanket (to calm as well as keep the pet warm)
  • Hot water bottle (to keep the pet warm if you suspect hypothermia or shock)
  • Honey & a bottle of water (to ward off hypoglycemia)
  • Lavender essential oil to calm and to treat wounds (dogs only)

Essential Oils for Dogs

No article about first aid for pets, and especially dogs, would be complete without a brief mention of the use of essential oils.

According to well-known expert Valerie Worwood:

Dogs have a very good instinct for the essential oils and even seem to know what is good for them. If you put an oil that is digestive on one hand, and a pesticide oil on the other, a dog with a stomach upset will invariably come forward to lick the hand that will do him most good.

Remember though that dogs have a much stronger sense of smell than humans, so generally aim to use a minimum quantity of essential oil and increase the quantities if and when necessary.

The nice thing about EOs for dogs is that the very same basic essential oils you use on yourself can be used on dogs.  These include Lavender, Melaleuca (tea tree), and Frankincense among others.  As with humans, these oils can be used to sooth and calm and to treat cuts and wounds so that they do not become infected.

As a basic rule of thumb, dilute your EOs first, starting with 1 drop of essential oil to 9 drops of carrier oil.  With pets, especially, less is more.

Note that in this discussion, I am specifically referring to dogs.  The use of essential oils on felines is somewhat controversial and beyond the limitation of my knowledge.  I would suggest that if you have a cat, discuss the use of essential oils with your veterinarian first.

Additional Resources

For more information, visit the American Veterinary Medical Association (AVMA) and First Aid Tips for Pet Owners.

The AVMA brochure
Household Hazards
offers a summary of what foods and common household items may pose a danger to your pet. (Select “download” to get this for free; do not add to the cart.)

Get a Free Rescue Alert Sticker.  This easy-to-use sticker will let people know that pets are inside your home.  Make sure it is visible to rescue workers, and that it includes 1) the types and number of pets in your household; 2) the name of your veterinarian; and 3) your veterinarian’s phone number. If you must evacuate with your pets, and if time allows, write “EVACUATED” across the stickers.

The Final Word

Emergency treatment and first aid for pets should never be used as a substitute for veterinary care. But if professional help is not around? As with our own medical self care, we just may need to take matters in our own hands.  Having the the basic knowledge and a proper pet first aid kit may actually save your pet’s life.  Let us hope so.


Start now to make sure you are staying prepared.


Via :  backdoorsurvival


Save pagePDF pageEmail pagePrint page

Preparedness Plans for Animals

Guest post by Stephanie Dayle


If you own animals, you need to have an emergency plan for them too.  Leaving your animals at home with extra food and water is NOT A PLAN.  Not only does it put them in danger but it endangers the lives of people who might try to rescue them.

If you have pets or livestock, you need to be able to keep track of them, care for them, feed them, and protect them during an emergency, even a LONG TERM emergency. If you can’t do that, you don’t need them. This sounds harsh but reality is sometimes.  You need to think ahead with plans for water, food and evacuation.


FOOD

Owning horses, chickens or other livestock means you always should keep enough hay or feed on hand to feed them and make it all the way through the winter until the next growing season.  You also need a way to get water to them if there was a long term power outage.  This is the only way to completely protect them from anything that could affect the area’s supply of feed and water.  For preparedness purposes avoid the bad habit of buying a ton of hay or a bag of feed, using it, then running to town to buy more only when it’s gone.  What if there was no hay available in town or anywhere else near by?  Instead, get into the habit of having a large supply of feed that you rotate by using the oldest first and putting the new stuff in the back.  You would continue buying new feed to replace what you just used, but you would have a large supply on hand at all times.

Don’t be to concerned about it going bad, most livestock feed will last at least 6 months if not longer when stored properly, most commercial dog and cat food will last up to a year if not longer.  If you can’t afford that much feed or don’t have the storage space for it, you might consider reducing your herd or adding storage space so that it meets the demands of at least one winter for all of your animals.


The only exception to this would be a butchering plan.  With livestock, such as cattle meant for beef, it is possible that if faced with a draught (such as ranchers in Texas and the midwest recently faced) or a food shortage, the animals may be butchered at an earlier date than originally planned.  This may not produce the best meat, but it would prevent any suffering on the animal’s part.  Euthanizing your animals should only be a last resort.


Other animals need a backup food supply too.  Cats, dogs, birds – no one wants to run out of food right in the middle of a crisis so have at least a 3 month supply if not more stored at home (we have at least an eight month supply on hand a all times).  In fact, you may want to store it with some travel bowls and a pet first-aid kit so that if you, your family, and your pets ever have to evacuate, it’s all in one spot easy to grab. Click here to see a GREAT article on how to store pet food for emergencies!


EVACUATION PLANS


Let’s say you live in the city with a few dogs and a hurricane is headed your way.  Evacuation is mandatory, and disaster is imminent.  Here is how you could be prepared and make a plan.  These plans may not work for everyone, but I hope they give you some ideas and jump-start your own planning process.


Plan A – You have pre-scouted some “pet friendly hotels” in a small town several hours from you.  Knowing that the hotels will fill up exceedingly fast, you call ahead and secure a room, you leave town WITH YOUR PETS as soon as possible so as not to get caught in grid lock risking the loss of your room.  This doesn’t take long since you keep their first-aid kit, stored with some extra food and travel bowls in your laundry room.

 If they are taking cards, use one that you leave cleared off for “emergencies only” or better yet a pre-paid cash card, as you may need the real cash you have for extra food or whatever you left behind.  While you were planning, you also wrote down the numbers of the local urgent care center, the local vet office, and a doggie day care center. You grab your own emergency kit (and your family’s if you are evacuating with others) with your pet’s kit remembering to grab leashes and poop bags, and important documents. Next you pile your family and your dogs (in their crates if they will fit) in your car, and hit the road with your tank nearly full of gas because as a prepper you stopped letting it run empty a long time ago.  You have a couple of routes to the small town in mind in case one route is blocked.  With emergency cash on hand to pay for a week up front, you arrive at the hotel to check everybody in.  

This plan gives you a “base of operations” where you can assess the damage and arrange for repairs on your home or make other living arrangements if need be.

Plan B – You have family four hours away from you and have cleared it with them ahead of time that you AND YOUR PETS can stay with them in case of an emergency.  You repeat the above evacuation process and pre-planning.

Plan C – You don’t have any family nearby and can’t afford a hotel. You can still figure out where local rescue groups will be setting up temporary animal shelters for the disaster, you pack up and take your pets there knowing most “people shelters” do not allow pets.  You arm yourself with vaccination certificates, photographs and any ownership papers to prove that you do in fact own these dogs so you can claim them when the disaster is over.  After you drop your pets off at a shelter you and your family will go find a shelter that will take all of you as a group.  Hopefully you will pick your animals up at the shelter when you are allowed to return home.

Evacuation plans also need to include livestock, and somewhere for them to stay with food and water until you’re home is safe again.  If, for example, a wildfire is threatening our place, I would take my horse and all the documents I need to prove ownership, to either my friends place 10 miles away, or my parent’s place 60 miles away.  I have discussed this plan with both parties and have permission to drop him off at either location in case of emergency.  My truck and horse trailer is in good working condition, and my horse is completely trailer broke, meaning he will load up in a horse trailer and unload for anyone (all “must haves” for horses; slacking on trailer training could endanger their lives and the lives of other people).  If I were to be at work when disaster strikes I may not be able to get back to the house in time.  So our neighbor has permission to scale our fence, access a couple of hidden spare keys, and has agreed to throw Pat in the trailer and evacuate with him. 


Part of being a responsible pet/livestock owner means having a plan.  While I don’t expect anyone to use my plans I want you to start thinking about what YOU could do.  Tragedy strikes most often when we are flat footed.  Sit down today and start answering some of those “what if questions”.


Start now to make sure you are staying prepared.


Via:  American Preppers Network


Save pagePDF pageEmail pagePrint page

This Pet First Aid app could become man’s next best friend

American Red Cross has long been a great resource when it comes to providing education and assistance in disasters. I knew about their First Aid and CPR classes but just discovered their Pet First Aid class and this Pet First Aid app for smartphones.

The app is 99 cents (mine cost $1.06 with tax), but I’ve been very impressed with the amount and quality of information it provides, including instructional videos.

For both dogs and cats, the app defines what is normal for their breathing, temperature, heart rate, pulse rate, capillary refill time, and mucous membrane color. There are quizzes to test your knowledge, an area to enter your own vet’s contact information and locate the nearest animal hospital, along with a detailed list of warning signs that your pet needs treatment now.

As well, you can enter each pet’s name and details about their medical history, special diet, and current medications. Having this information in one place, instead of in paper files at home, is very helpful.

I highly, highly recommend spending 99 cents for this app. It’s easy to navigate, very user friendly, and just might be your pet’s next best friend.

Other Red Cross apps you may be interested in:


Start now to make sure you are staying prepared.


Via: thesurvivalmom


Save pagePDF pageEmail pagePrint page

How Much Food Can I Grow Around My House?

In summer 2006 Judy Alexander embarked on an experiment to see how much food she could grow, and how many neighbors could benefit, from the garden around her house. Check out her homegrown rainwater collection and irrigation system – watering her 60+ edible crops. Meet the bees, the chickens and the worms. And catch her joy in producing so much food for so little effort.


Start now to make sure you are staying prepared.

via: thesurvivalistblog


Save pagePDF pageEmail pagePrint page

Pet Food for Emergency Preparedness – What to Store and How

The best way to protect your household from the effects of a disaster is to be prepared. If you own pets you are responsible to prepare for them as well.  Many disasters could cut off your access to more pet food from the store.  A prolonged power outage could keep the stores closed, or they may already be sold out.  Storing some extra food for pets is essential for their health and well-being.


As a pet and livestock owner I have researched and tested various ways to store pet food.  The easiest approach is to store what your dog or cat currently eats, that way you can keep the food in rotation and nothing is ever wasted.  Start by building up a three-month supply of pet food and work your way up from there.  Here are some recommendations and options for storing emergency pet food.

Store Dry Kibble in the Bag 
I work right next to a Purina Mill, and have had several in-depth conversations with the employees in packaging on how to best store dry kibble.  Surprisingly, they all say the best way you can store dry kibble is right in the bag.  Here is another article (click here) which helps to explain the science behind dry pet food storage.  If you look on the back or bottom of a dry food bag you will find a ‘Best Buy Date’ or “Expiration Date”, this date could be several years out.  ‘Natural’ pet food formulas tend to not last as long due to their lack of preservatives.  The date on the back of the food bag means that the manufacturer will not guarantee optimum freshness and nutritional quality past that date.  It’s doesn’t mean that it will suddenly rot and go bad after that date.  It usually indicates that nutritional value could be lost after that point in time, therefore the goal is to use the pet food by then.

Containers:  Pet food manufactures want their product to keep as is stated on the bag or they get in trouble. So they provide you with one of the best containers for it.  The bag keeps the food dry, dark and even allows it to breathe slightly. This is important because even dry pet food contains moisture in the form of fats and oils; it is for this reason that repackaging dry pet food in Mylar or other vacuum sealed bags for long-term storage is not recommended.  Few containers and/or storage methods are appropriate for processed food which contains fat and oils.  The wrong storage container could cause a greasy film to build up on the container’s sides that will go rancid, cause the food to be distasteful and hasten food spoilage of any new food you add to the container.  Even if you seal the dry food up in bags with oxygen absorbers and silica packets the fat and oils in dry kibble will still go rancid.

Keeping dry pet food sealed up in the bag it comes in, is the best way to preserve it.  If further protection is needed it is recommended that you place the entire unopened bag into another container like preferably a metal bin, or an airtight plastic container.  As soon as you open a bag of dry pet food oxidation starts to occur at a rapid pace, once opened, most commercial pet food will last less than six months so it’s best to use it in that time.

The best option for storing dry kibble is to build up a supply and rotate it out for use before exceeding the manufacturers date on the bag.  Use the oldest bag first and purchase new bags just like normal to replace them, rotate the older bags to the front.  Keep an eye on the food’s appearance and smell, if the kibble goes bad before the date on the bag; return the bag to the manufacturer or place of purchase. Keep dry kibble in a dark, dry area protected from extreme temperature swings.

Store Canned Pet Food 
Just like the date on the dry food bag, the date canned pet food means the manufacturer will only guarantee the nutritional quality listed up to that point in time.  Canned pet food can last anywhere from 2-5 years according to most manufacturers.  Some people claim it should be nutritionally valid for up to 10 years.

A year’s supply of canned pet food is fairly inexpensive to acquire, will last longer and takes up less space than dry kibble.  Rotate the supply by using the oldest food first and putting the new stuff in the back.  Once a supply has been acquired continue using and purchasing pet food like usual, this way you are continuously renewing your supply.  If a disaster were to strike on any given day cutting off the flow of new food, there would be still a year’s worth of stored pet food left to use.  Keep canned pet food in a dark cool area protected from extreme temperature swings.

Make Your Own Pet Food 
There are many different recipes for homemade dog and cat food available on the internet.  After all, store-bought pet food didn’t appear on the market until the 1930s so up to that point in time everyone just made their own pet food or fed their pets whatever they ate. In fact, one of the biggest trends in pet health today is organic raw diets, resulting in pet owners around the world moving away from store bought food.


Home Canned Dog Food
(click here for recipe)

One of the ways you can preserve homemade pet food is by canning it. While the resulting jar of food will be cooked and no longer raw it is still FAR healthier than it’s store bought counter parts. Homemade pet food lacks many of the unhealthy additives and preservatives that most commercial pet food contains.  

Click here for a Homemade Dog Food recipe
Click here for a Homemade Cat Food recipe from PetMD

The only drawback to canning pet food is that the canning recipes have not been scientifically tested for safety, so there is a greater margin of risk.  This is an option I would only recommend to someone who has had experience with canning and knows how to mitigate the risks involved with using an untested canning recipe. The running estimate for the self-life of home canned pet food is 10 years.

Another “homemade” option is just to stock extra amounts of the ingredients used to make their food.  This usually consists of rice, meat and some veggies, all these items are easy to add to long-term storage in a house or ‘bug out location’.  Just make sure there is enough food stored for both humans and animals.

Store Freeze Dried Pet Food 

Another option you may not hear about real often is freeze-dried pet food this would also be an option for Raw Diet fans.  It is usually formulated with high quality ‘raw’ food, and then freeze-dried for convenience and longer storage times.  Freeze-dried pet food is expensive just like human freeze-dried food is, but it could be a viable lightweight, long-term storage option for emergency pet food.  Below I have linked to a few types of freeze-dried pet food, click on the blue text to see the product.  I currently use freeze-dried dog food while camping with my own dogs so I can tell you first hand that it’s easy to prepare and they love every bite.

This is freeze-dried dog food, rehydrated.


Most of the freeze-dried pet food products available on the market would need to be repackaged in Mylar as the plastic packages it comes in are not meant for long-term storage.  Adding some oxygen absorbers and silica packets to the mix would also be a good precaution.  Unlike dry kibble, freeze-dried pet food is completely suitable for this storage method. The manufacturers were probably not thinking that preppers would stash their products away for years at a time, so repackaging is necessary.

Word to the Wise on Raw
While raw diets can be a challenge to prep for there are a couple of options available. Not prepping for your pet because they are on a raw diet and it is too expensive or bulky is irresponsible. I am pretty sure store bought or cooked food would be more healthy for your pet than starvation.

As the owner of three very large dogs I combine several of the above options for our pet food storage because I like having a plan B, C, and sometimes D.  Doing what works best for your situation and storage space while making sure your pets are taken care of is key.  Hopefully this information makes setting aside and storing extra food for pets a little more doable and less confusing.


Start now to make sure you are staying prepared.


Via: stephaniedayle1


Save pagePDF pageEmail pagePrint page

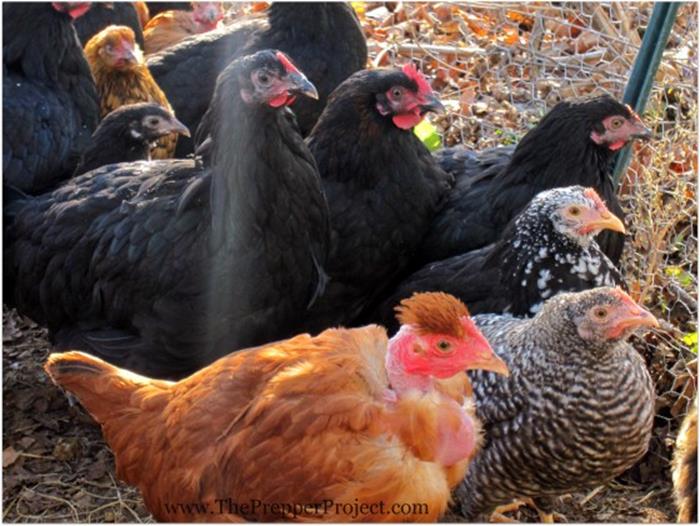
8 Best Chicken Breeds For Preppers


Keeping just one breed of chicken is like putting all your eggs in one basket.

Are you planning to keep chickens to provide food for your family after an economic collapse? They’re the first livestock on the prepper’s list due to their small size, low maintenance, and ability to provide both eggs and meat. They’re also a great addition to your survival plan because they produce fertilizer and eat pests that could ruin your survival plantings. Before you acquire chickens, there are some things to consider. Do some homework so you’ll choose the best breeds to suit your needs.

Climate

What climate will you be surviving in…hot, cold, wet? Choose the right breeds for the location. Chickens with large combs, such as the Brown Leghorn, are adapted to hot climates. Those same chickens are susceptible to frostbite on their combs. If you live in the frigid north, choose a cold hardy breed like the Ameraucana. For rainy climates, consider keeping a breed like the Marans that were developed in a marshy region.

Camouflage

You’ll also want breeds that blend into their surroundings. White Leghorns are awesome hens due to their low feed, high egg production. However, they’re easy to spot by predators. Look for chickens that will blend in with the natural terrain. The Egyptian Fayoumi is black and white speckled and will blend into dappled shade. The Brown Leghorn’s color is better suited to sandy areas. Choosing breeds for camouflage will help them forage more safely.

Forage

Some chickens will provide a lot of eggs or meat, but they need regular rations of grain to keep them in prime condition. Choose breeds that will actively forage.  Chickens are omnivores and will eat everything from plant material and bugs to small rodents. Be sure they have room to find the nutrients they need. In a dry area with low nutrient density they’ll have to range far and wide for food. The dense foliage and rotting logs of woodland will provide better hunting grounds.  Your chickens will also need dirt to scratch in for grit, minerals, and to take dust baths. Give them any table scraps you might have, as well as finely crushed egg shells to provide extra nutrition. They also need a source of fresh, clean water to stay healthy and provide you with eggs.

If you live in an area with a dry season or cold winter, how will you provide food for them when resources are scarce? Chickens don’t like going out in snow or heavy rains. You may need to collect food for them during the abundant season and store it. The lean season is a good time to cull your old hens, extra roosters, or the less thrifty ones for the table. Feed the guts and ground bones back to the flock.

Eggs and Meat

This is your whole reason for keeping chickens. Will you be able to butcher them when the time comes? Will you have a flock that actually lays eggs for your table? If you’re bugging out and taking chickens with you, keep in mind that moving them to a new location will shut down egg production for at least two weeks while they acclimate. They will also stop laying eggs if they don’t have enough food or water, and also during the winter in areas with shorter daylight hours. Store up extra eggs during the fall to help see you through the lean months. Unwashed eggs in good condition have been stored for up to 6 months unrefrigerated.

You should also be aware that most chickens will not provide you with as much meat as you are accustomed to. Cornish Rock broilers are the premier meat chicken in the US. They’ve been hybridized by the poultry industry to provide a plump, tender bird in 8 weeks. You’ll want to raise dual purpose breeds to get the most meat, but don’t expect anything like the birds you buy on a Styrofoam slab. Older chickens are pretty chewy, too. So you may want to make soup instead of roasting them.

The Next Generation

Look for chicken breeds that will hatch out and raise their own chicks. You can’t incubate eggs without a steady temperature of about 98 to 100 degrees Fahrenheit. Your best strategy is to let the hens take care of that. Hens that stay on a nest and hatch out their own young are referred to as ‘broody.’ A broody hen stops laying eggs until her chicks can fend for themselves. Not all hens make good mothers. Sometimes they drag their little ones all over and lose them. It takes time to breed for these characteristics. And don’t forget that you need roosters for fertile eggs. Keep more than one rooster for genetic diversity

One last note for the prepper with chickens in their survival plan – Start Now! There is a learning curve to raising livestock. You need to gain firsthand knowledge ASAP. When all hell breaks loose, you’ll have enough to worry about. So get your chickens in a row and start prepping now.

My Top Chicken Picks for Preppers

These are some of the best chickens for free ranging, hot or cold climate, raising offspring, and/or laying eggs. Start with several kinds and selectively breed for your conditions. Bring in new breeding stock when possible to prevent inbreeding.

Brown Leghorn – hot climate, active forager, flighty, great layer, seldom broody, brown with green sheen.

Egyptian Fayoumi – Hot climate, active forager, wild, good layer, seldom broody, black and white speckled, disease resistant, early maturing.

Turken – Hot or cold climate, adaptable, decent layer, can be broody, good mother, color varies, docile, slow to mature.

Buckeye – Very cold hardy, adaptable, decent layer, somewhat broody, docile, dark brown, slow to mature.

Chanticler – Very cold hardy, decent layer, broody, good mother, docile, color varies, early maturing.

Dominique – Cold hardy, adaptable, decent layer, broody, good mother, barred, early maturing.

Ameraucana – Very cold hardy, adaptable, good layer, can be broody, color varies, somewhat early maturing.

Marans – Tolerant of wet conditions, adaptable, decent layer, broody, color varies.

For a great resource that lists the characteristics of different chicken breeds, check out the Henderson’s Chicken Breed Chart.


Start now to make sure you are staying prepared.


Via: theprepperproject


Save pagePDF pageEmail pagePrint page

Tacti-K-9 Bug Out Training Tips for Furry Friends


Turn Your Dog Into a Tactical K9

Nearly everyone loves the constant love and affection that only a dog can truly offer, but very few people realize a dog’s full potential for a post-rule-of-law or TEOTWAWKI environment.  Dogs are wonderful addition to any bug out bag checklist you’ve come up with.  Aside from the obvious early detection and self defense aspect of canines, one must understand that a properly trained and equipped dog can also help you bug out.  From sniffing bombs to tracking your family members, dogs have a multitude of talents that are just itching to be revealed.

No matter what your current bug-out plan is, when it comes time to make the cognitive decision to actually leave the dog behind to die a miserable death in agony and solitude, or take him with you, you’ll most likely decide to take him with you.  You’ve prepared for yourself and your family, but have you considered your dog’s emergency needs?  What about the ways that he can assist you?


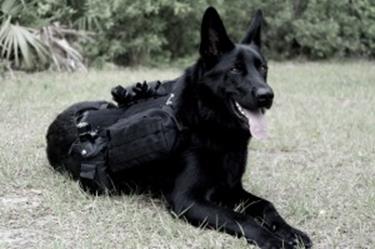
Signature K9 Modular LLC Harness

Clearly we can sit here all day long telling you about the vast array of preps that you should have in place, but since I have newborn to tend to and I am already severely sleep deprived, allow me to continue with the 1st essential preps to get your K9 ready for tactics and bugging out.

To clarify, there are many novels written about the art of bugging out, and everyone has a different view on what it should look like.  Are you going by car, truck, or train?  What about by boat, or simply by foot?  Since bugging-out on foot seems to be the worst case for me, we’ll focus there.

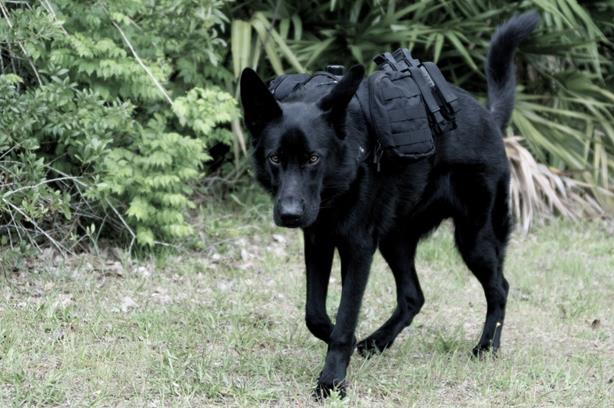
My long term intention with this series of posts is to touch on tactical training with your dog.  Due to that, I’ve selected gear that will take me in that direction for the long haul.  With that said, the first piece of gear that you should consider is a Molle-Capable Vest for your dog.

Since I have a German Shepherd, that’s an easy thing to come by.  However, it’s not hard to find backpacks and sweaters for dogs now, so if you have to buy an off-the-rack item for your dog from petsmart, just make sure it’s not colored with glitter and rainbows – you can always have a seamstress add Molle, but you can never undo gay.


German Shep With Tactical Gear

My goal was to make sure that my dog could carry his own supplies to sustain himself for at least 24 hours so I’m not forced to haul his food and water for him.  If you missed the hilarious article about my duck and pheasant hunting German Shepherd, then I’ll tell you now that he’s trained to help me hunt… so gathering food won’t be my initial struggle.

I wanted him to be able to carry a canteen of water, a day or two worth of dry food, and anything else is simply a bonus.  It also needed to be versatile, and capable of working into my existing systems, so Molle Compatible gear was essential in my decision making process.

Keep in mind that each pound you add to your dog will result in calories burned and water lost.  For this fact, along with not wanting to put added weight on my dog’s hips, I’ve strategically picked items for him to carry.  So let’s examine his vest now, and discuss the thoughts behind each item, and help you create a list of items to keep in your dog’s bug out bag.


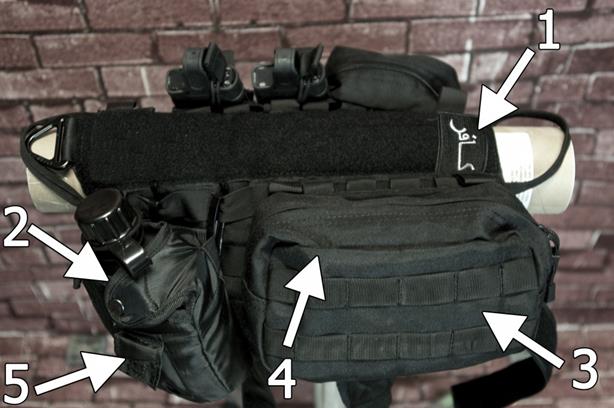
Side 1
Vest With Molle Capable Attachments

1) Infidel Patch for added tough-ness.
2) Canteen of water with stove and cup to cook food like opossum, etc
3) Folding bows to maximize efficiency with food/water
4) Conibear Trap(s) for catching additional food
5) Fire Starting Device(s) (flint and magnesium)

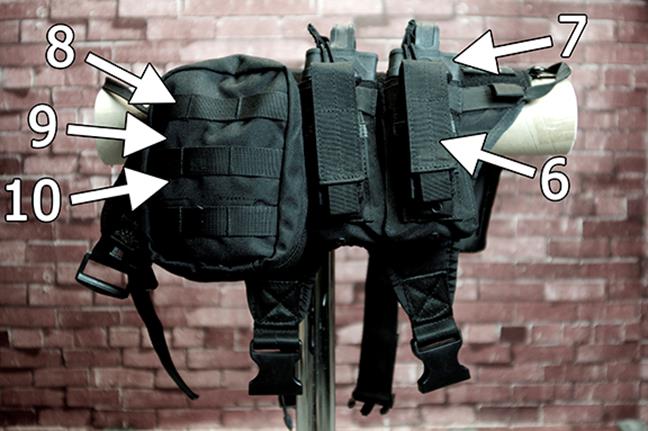
6) 9mm Mags
7) AR15 Mags
8) Daily servings of food, divided into 3 bags
9) Paracord or leash
10) Trifexis (for flee and tick control)


Side 2
Vest With Molle Capable Attachments


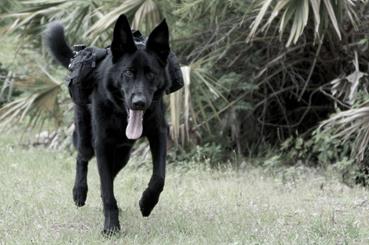
K9 In Action

Clearly the magazines of ammo not only add to the essential intimidation factor, but will come into play with the tactical dog training posts to follow.  To quote Harry Reid, I’d love him to be able to carry a “100 Clip Magazine,” but that would be a bit too much weight.  Besides, according to Rep. Diana DeGette (D-Colo.) the chief co-sponsor of the High Capacity Ammunition Feeding Device Act, once they’re fired they are disposable, I have to buy a new one anyway. Due to this, I’ll stick with just two mags of .223 and 2 mags of 9mm.

Via: theprepperproject


Save pagePDF pageEmail pagePrint page