Monthly Archives: May 2015

How to Make a Tin Can Trail Alarm

Many of you, have watched the old war movies where the approaching enemy trips an alarm made of tin cans, which in turn alerts the good-guys to their approach. The advancing troops trip the wire and the cans fly up into the air, making enough noise to alert the good guys to the approach, allowing them time to mount an effective counter.

In the real world there are better, more effective alarms that can be made to guard the entry points to your position, but since we love movie magic, I thought this infamous contraption would be a good place to start.

First find the most likely area of approach and one offering enough cover to effectively hide the trap and wire. One of the best places is where the trail makes a sharp turn in another direction, this makes it more difficult for the target to spot the wire before tripping the trigger and sounding the alarm.

Try to make everything look natural, avoid braking branches, turning over leaves or loose dirt, clean up all wood shavings etc. You want everything to look just like it did before you set the alarm.

It’s best to dig a slight depression to hide the cans, do this on the opposite side of the tree away from the approaching enemy. Add two or three rocks to inside each can then cover with natural cover to hide them from view.

This design and trigger can be used with other “noise makers” one of my favorites is a cowbell or goat-bell, a bell is louder and easier to hide. The main problem is that they may not be available when needed. But I’m sure you can come up with more ideas.

If you are interested in learning more about traps and path guards I recommend the Trapper’s Bible: Traps, Snares & Pathguards by Dale Martin. This book includes pest snares, large animal snares, and transplant traps, plus camp alarms that alert you to intruders and deadly pathguards that could save your life.


Start now to make sure you are staying prepared.


Via: thesurvivalistblog


Staying Safe at Large Events

Large, planned events can attract tens of thousands of people and the potential for chaos.

Security planning for major sports events has become a major concern for the security industry; with so many people packed into one area, these events are an attractive target for lunatics who are looking to make a political statement. Pack 20,000 people into a concert venue or hundreds of thousands of people into a NASCAR race and the possibility for an emergency situation is nothing to laugh off.


In the aftermath of the chaos in Ferguson and Baltimore, and in the shadow of the Boston Bombing, large events and rallies need to be a source of consideration when thinking about threats to your personal security. High profile sporting events, political rallies, and social justice protests are all a major cause for concern, as terrorists and those looking to spread chaos are increasingly targeting these events.


Be aware that large events can be an evacuation nightmare:

When it comes to safety concerns at a large event, one of the largest post-disaster threats is what happens during an evacuation. Even a relatively small disaster – one that doesn’t pose a large-scale threat to the crowd – can quickly spiral out of control. Panic alone can cause a crowd to stampede exits, causing a dangerous situation or providing a secondary target in the case of a terrorist attack.

Large scale events are often logistical nightmares, and a person can easily be caught off-guard and find themselves in the middle of the chaos without a quick way to get out.

Some problems to keep in mind when attending large events:

  • Roadways around the event will likely be blocked off or flooded with vehicles trying to flee the scene.
  • Exit routes will quickly become chokepoints, filled with panicking people who will likely make the situation even worse.
  • Oftentimes large venues have safety protocols in place; these protocols might not always be the safest thing to follow. You should always be looking for alternative ways out, even if everyone else is being told to go a certain direction. In the case of a terrorist attack, an attacker might look for these chokepoints in order to inflict mass casualties by attacking exits.

Even those who stay home could be affected by large events:

Even those of us who avoid these large events might not be able to avoid the dangers associated with them. During any large-scale event that happens near your home, you should always be alert and have a plan to deal with emergencies.


Some problems to keep in mind for those who stay home:

  • If something happens at one of these events that cause people to evacuate, the roads near your home will quickly become clogged. You need to have multiple routes mapped out in case your normal Bug Out routes become compromised.
  • Large events are targets. Political rallies, social justice marches and protests all invite problems. As we’ve numerous times lately, these rallies and events can quickly grow violent; they can also spread into nearby neighborhoods putting even those who stayed home at risk.

Tips for staying safe at large events:

Safety starts with researching the event: One of the best ways to stay safe at any event is to be situationally aware of what’s going on around you; that process starts by knowing exactly what you’re getting in to.

  • How many people are expected at the event?
  • Where are the exit points at the venue? This is something you should know ahead of time. Also, take note of all secondary exit points where less people will be likely to head.
  • Jump on social media and see what people are saying about the event. Have threats been made towards the event? Is the event controversial in any way?

Scan the area: Once you’re at the event you need to stay aware of your surroundings.

  • Take note of emergency exits, restrooms and exit routes.
  • Familiarize yourself with the venue’s layout. Pay attention to the location of a medical tents or first aid stations.
  • Have a plan on where you will head if an emergency happens.

Stay aware of your surroundings at all times. If you get the slightest feeling that something may be wrong, you need to listen to your instincts and act fast.

  • Keep an eye on the crowd. If you notice an abnormal increase in the number of people pouring into your area, or if you notice a loner that doesn’t seem to belong in the area, this could be the first sign that something isn’t right. If you see something that doesn’t seem right, it’s probably a good time to make your exit.
  • Checkout our article on surviving a riot; it will give you some good tips on what to do should violence erupt at or around the event.

Have a meetup plan: Should something happen at the event, everyone in your group should have an evacuation plan and an area to head to when trouble starts.

  • Choose a meeting spot for your family, in the case anyone gets separated from the group.
  • Have a contact outside the event that can be called to coordinate planning should something go wrong at the event.


Also check out: Self-defense in a “flash mob”‏ / Riot?


Start now to make sure you are staying prepared.


Via: offgridsurvival

Surviving a Riot

It seems like civil unrest has finally started to reach its boiling point where one little spark could cause things to go bad rather quickly. Look at everything that’s happening in Egypt, Libya, and throughout the Middle East, hell even in our country people are going crazy.


So what happens if you find yourself in the middle of a full blown riot?


The first thing that you want to do is quickly assess the situation. Are you in immediate danger? Where are the quickest routes of escape? Is this beginning of something larger?


After assessing the situation, I advise you take the following steps:


If you have an easy way out, take it now – The last thing you want to do is get caught up in the storm. If you are near an escape route, get out as fast as possible.


Becoming part of the crowd – If you were not able to make a quick exit, the first thing you want to do is look like you are part of the crowd. If everyone is shouting against something, then you should be doing the same thing. By blending into the chaos, and not drawing attention to yourself, you’re less likely to become a target.


Be aware – Watch your surroundings and be ready for an attack. Watching the crowd’s body language can help you decide what your next move should be. Scan your surroundings and find the best route of escape.


Don’t get caught up in the chaos. – How many times have you been stuck in traffic, only to find out the crash was on the other side? We see it every day, for some reason people are drawn towards disasters. It’s human nature to want to look at the accident.


Don’t make that mistake during a riot situation. I don’t care how safe or protected you think you are, when things start going bad your first priority is to make your way to safety. If you’re that curious about what happened you can watch the action on the evening news.


Go with the flow – Think of the crowd as a large raging river. The best way to get out of a river is to swim with the current and slowly make your way to the edge. The same is true when stuck in the middle of a crowd.

Don’t try to cut through the crowd, as this could cause unwanted attention. Instead, go with the flow of the crowd and work your way to the edge. Then quietly slip away to safety.


Being Armed: I think always being armed is a good thing, but pulling a gun out in the middle of a riot might not be the smartest idea. Unless you’re physically being attacked, it’s better to slip away unnoticed. Don’t try to scare the crowd away you’re your gun. That being said, if you are being physically attacked or threatened with attack all rules are out the window.


Also check out: Self-defense in a “flash mob”‏ / Riot?


Start now to make sure you are staying prepared.


Via: offgridsurvival

Use Plants To Charge Your phone – E-Kaia


Did you know that you can charge your phone whether you have an outlet near you or not? No, I’m not talking about lugging a battery around to keep your phone charged. I’m talking about the soil. You can use energy from plants in the soil to charge your phone or other low energy products. In Chile, three engineering students have developed a new device to charge your phone by simply plugging your the terminals of a handheld device directly into the soil. This could be a monumental change for developing countries around the world.

So many do not have electricity readily available to them like we do here in the United States. Rather than bringing the energy to those areas, this device could simply allow them to harvest the energy that is available right beneath their feet all the time.

Three engineers in Chile have invented a smartphone charger that is able to harness energy from plants in order to charge a phone, removing the need for an electrical power supply.


E-Kaia is the brainchild of Evelyn Aravena, Camila Rupcich and Carolina Guerrero, three engineering students who came up with the idea for an electricity-free smartphone charger when they were in university at the Duoc UC in Valparaíso and the Andrés Bello National University in 2009.

In the Netherlands, there is a solution called Plant-e that involves harnessing electricity from living plants, but many plants are required to create the energy needed. Instead, E-Kaia only needs one healthy plant.

A biocircuit is buried in a plant pot with a plant, with outputs leading out of the soil, and 5 volts and 600 milliamps can be harvested and converted into electrical energy without causing any damage to the plant. This amount of power can charge a smartphone in one and a half hours, according to the creators.

The portable ergonomic charging device prototype is still patent-pending, and the creators say that it is not just limited to charging phones– the technology can harvest enough electricity to charge LED lamps, fans, speakers and any type of low-power product that recharges its batteries using a USB port.

Start now to make sure you are staying prepared.


Via: survivalist

Son Arrested for Wearing NRA T-Shirt, Mom Sues School


Here’s an interesting story out of West Virginia about a student (and his mother) who are refusing to be silenced by the idiocy of school officials who had him suspended and arrested for wearing a shirt with an NRA logo.

From EAGNews.org:

Tanya Lardieri filed the lawsuit on behalf of her son, Jared Marcum, who was charged with disrupting the educational process and obstructing an officer in 2013 when he refused to turn his NRA t-shirt inside-out, the Charleston Gazette reports.

Those charges were later dismissed by a judge, but Marcum was forced to serve a one day suspension for his defiance.

“The shirt was an un-alarming olive green tee shirt bearing the NRA logo, which is the letters ‘NRA’ in black, the words ‘PROTECT YOUR RIGHT,’ an image of a hunting rifle and the officials NRA logo which has an eagle and two cross firearms,” according to the lawsuit cited by the Gazette.

You can read the rest of the story here. His unwillingness to cede his rights in the face of silly, and unwarranted, authoritarianism is one we should all take to heart.


Having a local school trying to get me suspended myself years ago for wearing a shirt they did not like, I’m glad my parents did not put up with the stupidity of the system even then.

Start now to make sure you are staying prepared.

Via: outdoorlife


Cool Tools for EDC Maintenance


Source: Flickr

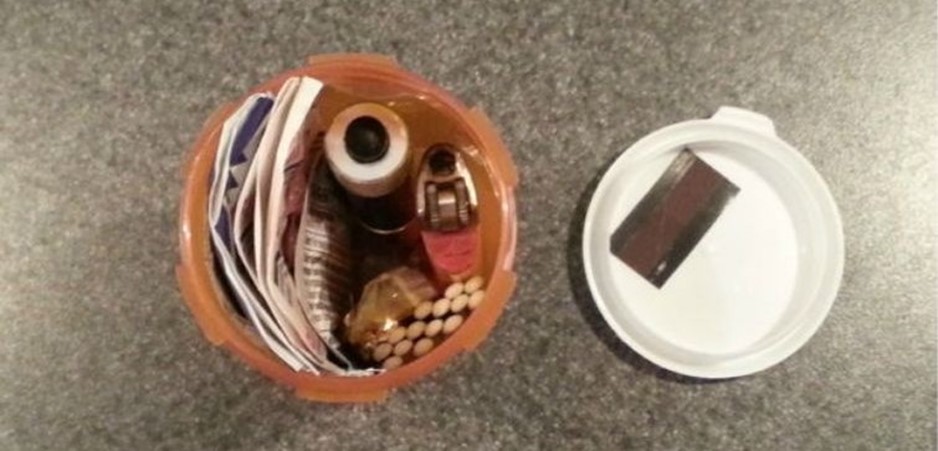
I have been asked for a long time to lay out all of my EDC maintenance stuff. This was done in a shorter form a long time ago, here. Over time I have refined and upgraded what I use. And then I found Kevin Kelley’s Cool Tools, and I starting thinking about this stuff more carefully. I tested and refined this set of things until I found the exact right tools for the job. For example, I tried out three or four different formulations of Loc-Tite. I did that so you don’t have to.

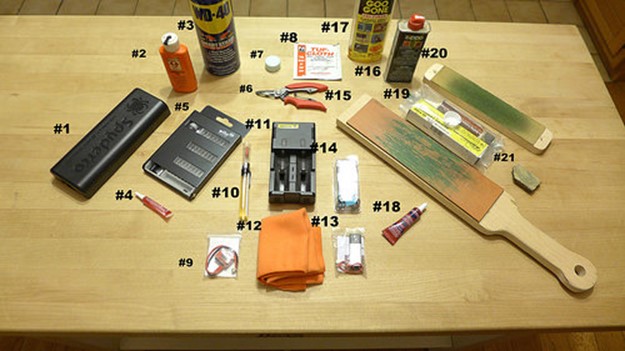
For reference, I tried to pin each number to the top and left of the given object. Hopefully it will be obvious what they are once I describe them.

#1: Spyderco Sharpmaker: There are a lot of expensive and automated ways of reprofiling an edge, but they basically do what the Sharpmaker does with a bit more precision or speed. For around $60 this will get you started, and once you add stropping to your knife maintenance regime, you probably won’t find a need for anything more.

#2: Hoppe’s #9 Lubricating Oil: I know lots of folks like Rem Oil, but this is pretty darn good. I don’t use it as much as I used to (you’ll see why in a minute), but for big or really stuck things, this works wonders.

#3: WD-40: I love the smell of WD-40. It smells so clean. Oh, and it also prevents rust from building up and lubricates parts. I like running some of this on a fixed blade before and after big cutting jobs, especially if the fixed blade is a high carbon model. Also, note the can; the spray/straw variant is very handy and easily worth the upgrade in price (of like $0.70).

#4: DeOxIt Red: There are a few variations of this deoxidizing liquid, but Red is the one you want. This will clean connectors in a flashlight, and you need only very smallest drop. Good thing too because it is exceedingly expensive. One hundred percent worth it, as it can fix lights that nothing else can, but be careful; a big squeeze is like $9 worth of red stuff.

#5: Wiha Micro Driver Set with Rotating Tail Caps: This is also expensive, but as I have mentioned before with the upgrade treadmill, buy good stuff right away and you will save money. I spent $70 over 5 years buying Kobalt, Craftsman, and Husky sets that all rounded off instead of buying this $60 set. Stupid, stupid, stupid. Be sure to get the ones with the rotating tail cap, that way you can apply pressure and still rotate the screw. $60 might seem like a lot, but when you strip a screw on a custom knife because of crappy drivers, you’ll wish you ponied up the cash.

#6: Split Ring Pliers: Over the years I have reviewed dozens of things with split rings, and some were really tough. These cheap pliers work exceedingly well. You can find them in the fishing aisle at Wal-Mart for $8. It’s definitely worth it if you have a tool keychain, a Swiss Army Knife, or any number of things that run annoying split rings.

#7: Silicone: Your lights all have o-rings, so once a year, grab some of this and coat them with it. It will keep them nice and rubbery. Dry o-rings can crack and lose their watertight seal. Use this and they won’t.  It’s cheap and takes about 3 minutes to do a dozen lights.

#8: Tuff Cloth: This is a great rust inhibitor designed specifically for knives, tools, and firearms. It’s pricey, but a few packs in a backpack can keep your blades looking nice over a long camping trip.

#9: Cotton Picker’s Micro Battery Charger: For those uber-tiny cells, no other arrangement will do. The Cotton Picker design is great. In a pinch it can charge RCR123as. Opt for the metered version, as it is not much more money and allows you to leave a battery to charge and only momentarily check on it.  Otherwise you should probably sit and wait. Lithiums and overcharging don’t mix.

#10: Nano-Oil in Needle Tip Applicator: Hoppe’s, WD-40, and the like all pale in comparison to this miracle liquid. Like the DeOxIt, this stuff is uber-expensive, but it is 100% worth it. The needle tip applicator is an absolute must. Don’t bother unless you can get this feature. Otherwise, you will waste a lot of liquid and you won’t be able to get in to the nooks and crannies you need to to make this stuff really work. This is probably my favorite thing in this picture as it can rescue stuck pivots and change below average pivots into “I swear this is on bearings” smooth.

#11: i2 Intellicharger: It’s not ideal, but it’s the best out there right now for under $100. This dual well charger can take everything from RCR123as all the way up to 18650s. It can’t do super small cells, hence #9, but it does everything else. I really like the fact that you can put two totally different batteries in the charger at the same time. So many of my lights are single cell lights that I don’t often need to charge to identical batteries. I wish it weren’t so finnicky about battery placement, but every other model out there is just as bad or worse.

#12: Microfiber Cloth: Just 100% essential. They are great for cleaning a knife or polishing a flashlight lens. Simple, cheap, and awesome.

#13: Cotton Picker Volt Meter: This is a handy little thing to have but probably not essential. It’s helpful with super small cells because most regular volt meters have a hard time getting around their tiny structures.

#14: Spare O-Rings: Uber cheap and handy to have around, o-rings are a necessity if you like flashlights. Invariably something will dry out and break or get sliced in a dreaded cross threading accident.

#15: Home Made Strop: This is made from an old barber’s strop; it’s two pieces of leather mounted on pressboard, a void free form of Baltic Birch plywood. One side is coarse and the other side is smooth.  Strops are just too good. Since using them I have basically stopped using the Sharpmaker. Regular stropping is all you really need. This was free. A leather belt with some Tripoli compound would work too.

#16: Naphtha Lighter Fluid: I don’t smoke, but I do use this to clean parts and it works very, very well. It is also dirt cheap; this bottle was $2 at a cigar store.

#17: Goo Goo: When naphtha can’t be used because of the smell, this does the job. I think it works a little better, but I have no evidence of that. It is, however, not as cheap, so if you can only get one, get the naphtha.

#18: Loc Tite Blue 242: After trial and error I think this is the perfect formulation for our needs. I use it to lock in pivot screws that like to walk around, and in that application it works fine. Any stronger and it is hard to undo, and any weaker and it doesn’t work as well. The Goldilocks Principle makes this the right choice.

#19: Stropping Compounds: Get the black Tripoli compound for coarse and the green compound for fine. If you have the ability, finish it off with white compound. Be sure to keep them in a ziplock as they can dry out and lose their effectiveness (they won’t stick to the strop, crumbling on the surface instead).

#20: Secondary Strop: This will eventually be converted to white compound only, but for now it is a suede leather surface with green compound. The suede makes it a little softer on the steel and you can get a pretty nice polish with it just by using an even, quick motion with your hands (god that sounds terrible, but you know what I mean).

#21: Sandstone: This is what I use to sharpen my BK9 when I am away from the house. It’s very flat and very coarse, but in a jam it can put an edge back on the beast. Sandstone works well as the coarse sharpening stone and granite would work well in the fine slot, provided it is smooth and flat. You’d be surprised at how good of an edge this can put on a knife. Don’t buy one when you can find a field sharpening stone pretty easily.

There you have it: a relatively complete, time tested kit for maintaining your gear. For multitools, flashlights, and knives, this will get you a very, very long way.

One thing I also use that I couldn’t get in the picture: an air compressor. It blows gunk out of a knife or multitool quite well. Just don’t use it to dislodge a stuck battery in a flashlight. That’s also called an air gun.  I have a AAA shaped dent in my workshop bench to prove that this is dangerous.


Start now to make sure you are staying prepared.

Via: alloutdoor

This Pill Bottle Survival Kit Could Be a True Lifesaver


Instructables

An empty pill bottle might seem like an item that’s destined for the trash. However, what if we told you that little bottle could potentially mean the difference between life and death? And even in scenarios that aren’t so drastic, if packed with the right things, they could truly come in handy in a pinch. How so, you ask? Instructables shows us how to turn that average pill bottle into a mini survival kit.

Clean It


After you’ve removed everything from the pill bottle and washed it thoroughly, here are the things you should consider packing it with.

Piece of Candy


Never be in danger of suffering from a blood sugar drop again. Especially if you’re diabetic, this single piece of candy could be a lifesaver if you’re stranded.

Emergency Lighting


A 2″ flashlight is the perfect emergency light source for your pill bottle kit. That way, if you have a power outage or you get stranded in your car in the dark, you’ll be able to shine some light.

Matches


You never know when you’ll need to start a fire or light a candle.

Strike Strip


Attach a strike strip for your matches to the inside of the pill bottle’s lid.

Mini Lighter


This will serve as your backup if the matches end up getting wet.

Tin Foil


Just one square foot of aluminum foil can do so many things; like keeping food warm or signaling for help, for example.

Safety Pins


You’d be able to make a sling, dig out a splinter and achieve several other tasks with the help of one of these.

Sanitizing Hand Wipes


Clean a wound in a pinch with one of these. Also can be used as fire-starter.

Antibiotic Ointment


Instead of getting an individual pack of this expensive stuff, grab a straw and cut it to the size of your pill bottle. Then fill the straw with ointment from your medicine cabinet before sealing the ends.

Single Use Antibiotic Packs

Fabric Bandages


Keep a sterilized and treated wound clean by protecting it with a band aid. The flexible kind are perfect for keeping any dirt out of a wound.

Arrange Your Supplies for Packing


Extra Room?


You could consider adding things like strips of duct tape, gauze, tweezers or a small pocket knife.

A small piece of cheese cloth would be very useful for filtering water, and a small tube of bleach to kill any bacteria that gets through. Water is life!

Stow Your Kit


Cover with a lid and your survival kit is good to go. And it’s the perfect fit for your purse, glove compartment, backpack, or even your pocket.


Start now to make sure you are staying prepared.


Via: tiphero


EMP Survival & The First 15 Things You Must Do Immediately After An EMP

Another great post from our friends at http://thesurvivalmom.com/

————


I’ve been working on a book about EMP survival for the past couple of months. It hasn’t been an easy task, since much of what I’m researching involves scenarios that have never happened, or have happened only in third world countries. It’s been challenging to apply those scenarios to the world in which I’ve grown up.

In a weird way, this research has been fun. I feel a bit like Dr. David Livingstone venturing into parts of Africa that had never been imagined, much less explored.

Will my lovely next door neighbors really turn into cannibals, given enough time and lack of food?

Will the gangs and violent predators in the big city nearest me really begin going door to door, as a sort of perverse version of the Jehovah Witnesses, robbing, raping, and killing or will they end up killing each other first?

If well-prepared preppers have the perfect bug out location, equipped with every survival supply possible, how will they get there if the electromagnetic pulse has destroyed the electronic-based engines in their vehicles?

The approach I took to preparedness and survival in my first book,Survival Mom: How to Prepare Your Family For Everyday Disasters and Worst-Case Scenarios, was all about common sense. My goal was to equip the average mom with information, checklists, and strategies for surviving the typical natural disaster, medical emergency, or job loss.

My second book is different. So far, it contains a lot of doom and gloom just because of the nature of a post-EMP world. However, it’s made me think twice about the predictions found in most EMP survival novels. I believe that desperate times encourage and, in fact, create just the type of environment that breeds innovation. In a post-EMP world, many communities may never need, or want, to go back to old systems once new and better ones have been devised.

Human beings are damn smart when they need to be.

EMP Survival for moderate preppers

That’s where, you, the moderate prepper can play an important role. Take practical steps now to prepare for everyday emergencies but also keep in mind that worst case scenarios are entirely possible.

  • Each month, you can add new skills and knowledge, which is why there is a Survival Mom Skill of the Month!
  • You can save money toward buying the gear and supplies that are truly necessary. (Have you joined my 52 Weeks Savings Club on Facebook?)
  • Prepare your body with exercise, training, and healthy eating so we are physically ready for difficult tasks, regardless of the crisis. (If you need a support group, join my Skinny Survival Moms group on Facebook!)

    I don’t believe that only Green Berets, Navy SEALS, and the most vicious, lawless predators will be the ones to survive. In fact, moderate preppers already have many advantages over these groups. We recognize warning signs that have led us to take proactive steps to prepare. We’ve incorporated both the mindset and lifestyle of preparedness into our daily lives and, by doing so, blend in with every other household around us.

    The “Gray Man“? Yeah, that’s us.

    Survivors of a worst case scenario will need to think on their feet, quickly adapt and improvise, and be willing to connect with others to form communities. Moderate preppers who continue to refine their skills and supplies, connect with like-minded people, and stay up to date with the world around them are excellent candidates for EMP survival.

    Here’s an EMP Survival tool I have for you

    I wish I could say that my EMP survival handbook was ready to put in your hands today, but it’s not. I’m finishing the book now and then it will require editing and more.

    What are the first 15 things you must do immediately after an #EMP? Get this FREE report!

    However, here’s what I can give you now, via email: A special report that provides details for, “The First 15 Things You Must Do Immediately After an EMP.” As a mom, and knowing the fears that moms have for their kids, I’ve included information for when and how to retrieve your kids from school. I’ve listed items that should be in everyone’s Get Home Bag, tips for informing neighbors about what has happened and why this is a vital thing to do, and specific places to shop for last minute supplies, even if you’re already well-stocked.

    Along with this Special Report, I’ve prepared follow up emails that will answer some of your most difficult questions:

  • Should I immediately evacuate my home following an EMP?
  • I don’t have a survival group or community. Can I survive on my own?
  • What if I have a newborn? What can I do to make sure he/she survives in a post-EMP world?
  • What can I do if I’m stranded hundreds of miles from home?

    Along with these follow-ups that you’ll receive every 3-4 weeks, I’ll let you know when my book is ready for pre-order and how you can get a signed copy.

    If you already get my weekly emails and occasional exclusive articles, this Special Report is sitting in your email box! Otherwise, sign up here:

    There’s peace in being prepared and EMP Survival is possible!

    Download link to Special Report: http://thesurvivalmom.com/wp-content/uploads/2015/05/One-Second-After-the-Lights-Go-Out-Special-Report-5-11.pdf


    Get this FREE Special Report! Sign up via email.


    Start now to make sure you are staying prepared.

    Via: thesurvivalmom

Free online garden planner & resource

I recently came across a great free online garden planner where you can create a garden of up to 12 feet x 4 feet, add your crops – and print it out. Great for smaller raised beds.


The website also has many educational resources such as Getting Started, When to Plant, Container Gardens, Compost and Fertilizer, as well as numerous guides on individual fruits and vegetables.

Worth checking out.

Start now to make sure you are staying prepared.

Make Your Own Shoot-and-See Targets

Why spend a lot on things you’re just going to perforate?


Targets should be cheap, right? I mean, you’re just going to shoot them full of holes, after all. And sometimes, paper targets can be affordable, but targets that let you see your shots, like Birchwood Casey Shoot-N-C and Caldwell Orange Peel, can cost more than $2 each.

Someone came up with a way to make targets that do the same thing for cheap. The nice thing is, you can even do it to a large surface affordably if you’re just starting to zero a gun and don’t know where it’s hitting. It would cost a small fortune to cover a two-foot-square piece of cardboard with commercially-made targets, but you could apply this method to the same size surface for considerably less than a buck.

The video below will show you how, but here’s the gist: Take some brightly-colored paper like construction paper. Cover one side of it with slick plastic packing tape. Spray paint it with “el cheapo grande” flat black spray paint. Then paint (or stick on) some dots for aiming points.

Voila! Now you can see your shots, and you saved some money that you can use for ammo, gasoline, or a nice cold beverage to enjoy when the shooting’s over.

Nice.


Start now to make sure you are staying prepared.

Via: alloutdoor