The topographic map is a wonderful invention full of useful information once you learn how to read one. They come in different shapes, sizes, and scales, but they all share certain conventions that make it easy to pick up a map from different manufacturers and read them without a problem.
They are used by the military, surveyors, and anybody who has the need of knowing where they are and where they’re going. If you plan on doing a back country hiking trip, a canoe trip, or anything in the woods or wild it would be foolhardy to leave without one of these in your pack even if you’re carrying the latest and greatest GPS.
A topographic map is simply a two dimensional representation of the Earth; however, the way it’s drawn represents three dimensions, which is handy if you want to know how high a mountain or how deep a valley is. There are some colors that represent various features on a map. These can change a little from map to map, but these are the basics:
Black – man made features. Names on the map, elevations, buildings, rail systems, transmission lines, etc.
Red – Paved roads, highway numbers.
Brown – contour lines, elevations.
Blue – water. Lakes, ponds, streams, etc. Also swamps and marshes.
Green – wooded areas, orchards, vineyards.
White – some maps will show white patches, which are unforested areas such as grasslands.
Depending on who put the map out there may be other colors as well, but these are the majority.
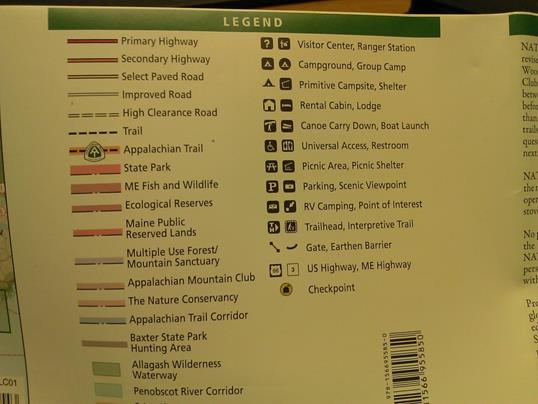
Legend
There are also many symbols on a map and most maps have a key or legend telling what the various icons on the map stand for. It’s best to consult the map you’re reading so you’ll know what the symbol refers to. The above Legend is for a hiking trail map put out by National Geographic. I won’t go into the markings here too much, but if you have questions about the map you have in front of you try doing a Google search to find out what the symbols are for.
Another important section of the map is the Scale. This will tell you how far one inch or one centimeter is on a map. When you’re plotting a route it’s important to figure out the distance you’ll be traveling over land as accurately as possible.
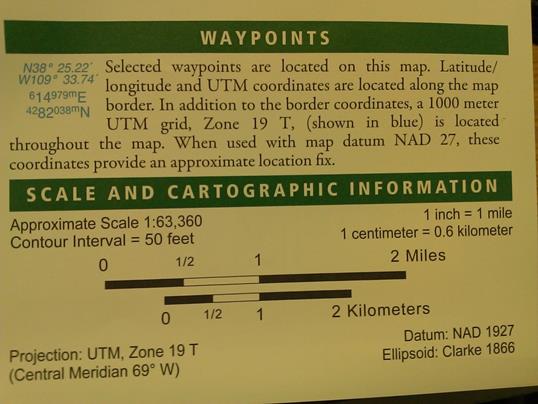
Scale
When I looked at the scale above I was confused for a minute by the scale. 1:63360 is kind of an odd number. After a minute of thinking about it I realized that the answer is right next to it. 1 inch = 1 mile. This map is designed to be read in miles and not the metric system like I’m used to, which is why it confused me for a second. Remember that I said 1: 63360 really means that 1 inch on the map equals 63360 inches over land? Well if you divide 63360 by 12 you get 5280, which is the number of feet in a mile.
The NatGeo map I’ve been referencing so far is a very nice map. The paper is heavy and the detail on the map is excellent for the scale, plus it has grid squares, which makes lining the protractor up pretty easy.
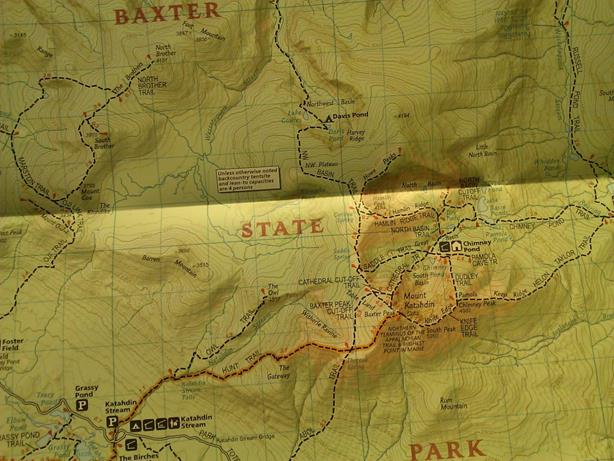
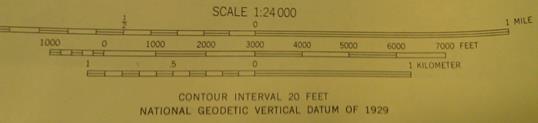
I prefer the 1:24,000 map because it gives a lot more detail. On the flip side it doesn’t cover as much territory as one like the 1:63360 maps.
Luckily they also put the metric scale in there as well, which is what I use because I’ve measured my pace count in meters.
Contour Lines
Another important piece of information you should find somewhere on your map is the contour interval. This is the distance between each contour line on the map unless otherwise noted. This map has the contour interval at 50 feet. Other maps have contour intervals of 20 feet, so be sure to study your map closely.
But what are contour lines exactly? This is one of the features of a topographic map that make it such a powerful tool. Contour lines are simply lines on a map of even elevation. Thus, if I stood on a hill and took a piece of string and walked all along a height of 873 feet laying out the string as I went until I got back to where the string started, that would be a contour line. Using the map above if I walk uphill until my elevation was 50 feet higher there would be another contour line.
This doesn’t mean that I walk 50 feet, it means that I’ve risen 50 feet in height. I might have to walk 100 yards to gain 50 feet in elevation. Conversely, I might only have to move 20 horizontal feet to gain 50 feet in elevation.
Question: is it possible to not move on a horizontal axis at all and still gain or lose 50 feet?
Answer: yes, it’s called a cliff.
If you’re looking at a map and there are big looping contour lines spaced far apart you’re looking at fairly flat land. If you’re looking at a point on the map where the contour lines are very close together you’re probably looking at a mountain or a deep hole.
As you’re looking at contour lines you’ll notice that about every fifth line has a number associated with it. These are called index lines.
Thus, if you’re planning to hike through unknown territory if you can get your hands on a topographic map you’ll have a much better idea of what you’ll be walking over. If you’re studying a regular road map you might never know that part of the route you’re looking at is over a mountain, whereas one look at a topographic map would show that you’re in for a big elevation change in a very short distance.

United States Department of Commerce Coast and Geodetic Survey
In the map above I’ve outlined a few of the terrain features you might see on a map. Near the lower right portion you can see a hill top labeled 910. This means the hill top is at an elevation 910 feet. You can see that it looks like a small circle with another line circling it and so forth. Each line represents a rise of 20 feet as you can see from the scale below where it says Contour Interval: 20 Feet.
Near the middle top of the map I’ve labeled a terrain feature “Very Steep Terrain.” You can see how the contour lines run pretty close together meaning it’s quite steep. If you saw a bunch of lines all converge into one line that means there’s a cliff at that location.
Look the example above over and you can I’ve pointed out a trail, valley, hill top, building, index lines and some other things. With this information you can now start to get an idea of what your terrain looks like.
If I were standing on the road exactly where the arrow points from the word “Road” in the map above and I was facing due north (up) what do you suppose I’d see?
If I looked left I probably wouldn’t be able to see the lake because I’ve got a spur of the hill coming down from behind me blocking my view. I’d see a hill with trees with the hill tapering off. If I looked right I’d see an open field in the foreground and then a hill rising into a mountain – all tree covered. Looking due north I’d see an open field in front of me rising into a smaller hill than what’s to my right or east.
What else can I tell just by looking at the map? I can see that the road (the red line) runs through a valley next to a couple of lakes. I know that the terrain to the north and east is very hilly or mountainous, and that there’s a hill behind me. So there’s plenty of information you can glean from a topographic map if you know how to read it.
Take the time and get yourself a topographic map of your area. Sit down and give it a good look and you might be surprised at some of the terrain in your area.
A good exercise is to plan a hiking route or a bug-out route through terrain you haven’t seen before then actually go out and see what the terrain looks like.
One quick note about forested areas: the map doesn’t tell you how dense the forest is. In northern Maine the forest in some places is very thick and difficult to move through and in other places it’s a little more open. The only way to really know for sure is to go out and have a look or talk to someone who’s been there. A person who’s hiked the area you’re looking at can be a wealth of information.
Orienteering series
Why Should I Learn Map Reading?
Understanding the Topographic Map
Discussion of Grid and Magnetic Azimuths
Start now to make sure you are staying prepared.
Via: shtfblog


 Follow
Leave a Reply