Category Archive: Light

Solar AIR Lantern – Review

There have recently been a multitude of innovative preparedness products hitting the market and the Solar AIR Lantern is one of them.

Most any emergency generally ends up with the lights out. Ever get up in the middle of the night to go to the bathroom and stub your toe navigating the darkness? Yeah – me too. Light is valuable and a redundant supply of multiple light sources should be a basic stored preparedness supply.


The Solar Air Lantern is a solar powered light source unique in that the body of it is blown up. Yeah – I said “blown up” – like a beach ball. This means the light will float. The 10 LED’s are surprisingly bright. On the bottom of the unit is a reflective surface to help spread the light out in all directions.

It is lightweight and when deflated is extremely compact. An integral handle is built in to the top and can be hung easily.

The light has three settings – High, Low, and Emergency Flash.

The Solar Air Lantern is charged with the built in solar panels on top of the unit. This allows for easy charging by leaving it exposed to sunlight.

Here are a few pictures:


Above: The pictures really do not do the Solar Air Lantern justice when displaying the level of brightness. The amount of light is not blinding however it does an great job lighting up an area.


Above: Light from fully charged batteries will last upwards of 12 hours.

Below: Like I said before – pictures do not do the Lanterns just. Here are two lighting up my garage. In person the garage was much brighter than what the picture conveys.


Below: The deflated Solar Air Lantern can be hung on a backpack and charged while hiking. Its lightweight and small footprint makes it perfect for inclusion in a survival or get home kit.


Summary:

The Solar Air Lantern is an area illumination option that is unique, portable, lightweight, and rechargeable via the sun – it works! It’s darn right pretty cool.

Did I mention that it is waterproof?

At $19.97 the price point is right on for the features provided.

For more information visit the following website – http://survivalfrog.com/products/solar-lantern.


Start now to make sure you are staying prepared.


Via: modernsurvivalonline


Save pagePDF pageEmail pagePrint page

DIY Emergency Lights from Solar Yard Lights

When it comes to emergency lighting, flashlights and lanterns rule.  The problem, however, is that they require a power source, be it batteries, propane, or some other type of fuel.  There are candles, of course, but candles do eventually burn out, plus, in some environments and especially around children, candles can represent a safety hazard.

The option of choice, for many, is solar lighting.  Indeed, I have a SunBell that gives off a lot light and is easily recharged, even on a cloudy day.  That marvelous piece of gear comes at a price though.  At, $70, it is well worth the cost for one but just how many can I afford?  (In all fairness, the SunBell also charges my phone and other portable devices.)


With that introduction, today I am going to show you how to make your own DIY emergency lights from solar yard lights.  This is not a new concept and many of you are undoubtedly already using these lights yourself.

Before you yawn off though, let me explain that in this DIY, we will be adding a switch to those ubiquitous solar yard lights, so that once the lights are charged up, you can turn them on then off again, thus mitigating setting them out in the sun each day.

How to Make Emergency Lights from Solar Yard Lights

Using inexpensive solar yard lights for emergency lighting inside your home is an easy deal.  Charge them up in the sun, bring them inside, and you have light. The problem, however, is that once the activation tab is pulled on the lights, they have to be put in sunlight each day to ensure that the battery is charged up and ready to go during an emergency. This is not a practical solution.

To get around this, some people do not pull the activation tab until the light is actually needed in an emergency. This essentially is a onetime use. Again, not a practical solution.  We are going to solve this conundrum by installing a micro switch that can turn solar lights on or off whenever we want.

To being with, you are going to need a solar yard light.  There are various makes and models of solar yard lights available.  In this article, I am using a 1 lumen light purchased at Wal-Mart but you can find comparable solar lights just about anywhere, including your local hardware store or Amazon.


You are also going to need some “Micro Switches”.  If you can not find them locally, they can be purchased from Amazon (see these) or from eBay.  When shopping on eBay, search for “On Off Mini Push Button Switch for Electric Torch.” Usually you can buy 10 micro switches for $1.99 and that includes shipping. They are shipped directly to you from Hong Kong, so allow some lead time to get your micro switches.  Amazon is faster but still relatively inexpensive.

Step One

First remove the screws holding the base plate to the solar unit. There are 3 screws on the light shown.


Step Two

Carefully clamp the base plate in a vise. Drill a hole through the base plate, slightly larger than the diameter of the round part of the switch base. A ¼” drill bit was used on the light being modified. It is easier when you first drill a small pilot hole.


Step Three

Attach the micro switch to the base plate. Shoe Goo (good to have in your preps regardless), works very well. A hot glue gun would also work well.

Turn the switch so that one of the leads is as close to the small circuit board as practical. If necessary, trim the glue the manufacture used above the hole as shown so that the switch mounts flat to the base plate.

Step Four

Locate the wire that goes to the negative end of the battery. Cut this wire, leaving enough length to attach the wire coming from the circuit board to the closest terminal of the micro switch. Carefully remove enough of the wire insulation to expose a short length of bare wire.


Step Five

Locate some wire with about the same gauge as the wire cut. Don’t worry about the color of the wire as no one will ever see it. Solder about 1″ of additional wire to the wire coming from the ground end of the battery. You can insulate the wire splice if you wish with Shoe Goo or other cement.

Next, solder both ends of the cut wire to the micro switch terminals.


Step Six

Now you are ready to test the operation of the micro switch. Pull the actuating tab. The LED light should turn on and off when you toggle the micro switch


Bend the micro switch terminal connected to the battery ground and reposition the wire so that they fit inside of the solar unit. Lastly, place the base plate back on to the solar unit being careful not to allow any of the wires to be placed over the screw holes. Re-install the screws that attach the base plate to the solar unit.  You are done!

Using Your MacGyver’ed Solar Light

When you want to turn your modified solar lights on or off, simply push the micro switch button.

When turned on, you can expect it to provide light for up to eight hours.  Keep in mind, though, that lights having only 1 lumen do not put out a lot of light,  That said, if you place several in a dark room, you can see well enough to easily move about without running into things.  Also, if you turn the lights upside down, they stand up very well

Something to remember is that you will need to turn the light on when you take the light outside to recharge it in the sun. Likewise, turn the light off when you remove it from the sun light. The beauty of this is that when the solar light is not in use, the battery will stay charged for a long time before needing recharging.

Here is one last additional tip. If you have a lot of lights to charge up outside at once, create a charging stand by drilling holes in a board to hold the lights when the bottom of the solar light has been removed.

The Final Word

To be truly prepared, we all need options as well as redundancy.  The beauty of these DIY indoor emergency lights is that they are inexpensive if not downright cheap, and can be used over and over again without reliance on an outside power source.  In addition, although they do need to be charged in the sun, most of the better quality yard lights will also charge up in the shade.  They just need more time.


Start now to make sure you are staying prepared.


Via: backdoorsurvival


Save pagePDF pageEmail pagePrint page

American Black Out – National Geographic

This has been out for a while. I finally got around to watching it totally.

There are some lessons are in there; or there is at least a good reminder of the importance of preparing.

If nothing else it’s not a terrible show to watch.

It did bug me how the one survivalist is a complete goober.

Try not to be a goober. (Learn” if nothing else what “not to be like.)


A cyber-attack takes down the grid and leaves millions of ordinary people without electricity. Follow the first-hand stories of five different groups stranded in the darkness as their desperate scenarios unfold. What happens when the lights go out? How long would it take for civilization to crumble? Would you know what to do?


Start now to make sure you are staying prepared.


Save pagePDF pageEmail pagePrint page

LED Lantern technology for Survival Preparedness

Being a bit of a geek for things like LED technology (which is now being designed into flashlights, lanterns, and other lighting products), I know that it is a perfect technology fit for anyone’s survival preparedness kit, emergency lighting situations, or any general purpose lighting application.

Present day LED lighting technology is enabling very bright and powerful light while consuming very little power. The power consumption of LED lamp products is a fraction of that from traditional types of bulbs.

The LED’s themselves will seemingly last forever without burning out like other bulbs and the batteries that are powering them will last for a very long time before requiring replacement or a recharge.

So let me tell you about this lantern that I bought some time ago, a Rayovac 300-lumen LED lantern. I believe this one is a great example of compact portable lighting, perfect for any emergency, and surprisingly small and light weight.


Rayovac 300 lumen lantern Review

It is much smaller than a traditional lantern, like the classic Coleman  lantern that many of us have or have had (the Coleman white fuel lantern has its own advantages and I still wouldn’t be without one).  However this Rayovac model is small enough to pack nicely into small spaces. It’s only 7 inches tall (3.5 inches square). It is perfect to stash into a survival kit.

Batteries

It takes three D-size batteries, and will power the LED on high brightness for about 3 days straight, 24 hours a day! Of course you wouldn’t have it turned on during the day, so if you ran it for 6 hours a night, the batteries would last for 12 days. On low brightness, this same scenario would last 25 days! If you use rechargeable batteries, and a solar powered battery charger, you would be set up for many years with ‘free’ light.

Brightness

This lantern is brighter than I expected. It is bright because of two reasons, 3 watt LED power (three 1-watt LED’s) and a very good reflector lens design. The plastic lens assembly spreads the light, seeming to magnify it so to spread around a 360 degree circle.

Light Settings

The settings seem ‘right’ with bright, low, and strobe. The strobe is very bright, and a great idea for an emergency survival situation where you are trying to be seen or located. Also, just above the on-off button is a small LED indicator that flashes dimly and unobtrusively about every five seconds to help you locate the lantern in the dark (great idea!).

Ruggedness

This lantern, although small in size, is rugged. All edges, and the bottom are rubberized for shock absorption, plus it will grip nicely on any surface. There is a traditional type of carrying handle as well as a clever folding hook on the bottom which allows you to hang it upside down, which better projects the light when it is up high. Nice touch.


Conclusion

I rate the Rayovac 300 lumen lantern with 5-stars for a perfect set of features for its intended purpose, rugged and compact design, LED technology, and reasonable price.

I highly encourage anyone who is survival preparedness minded, to get yourself some LED flashlights and – or a lantern similar to this one.

You can have a look at the Rayovac SE3DLN 300-Lumen LED Lantern here.


Start now to make sure you are staying prepared.


Via :   modernsurvivalblog


Save pagePDF pageEmail pagePrint page

How to make a Pine Knot Torch for emergency light


For thousands of years prior to the invention of electricity and the kerosene lantern, pine knot torches were used to illuminate the darkness of night. Though candles and oil lamps were the preferred form of lighting, pine knot torches were sometimes used instead during times of economic hardship, or when candles or oil for lamps simply weren’t available.

An illustration of Swedish life in 1555, showing a husband and wife illuminating their cottage at night with pitchwood torches (taken from Olaus Magnus’s “History of the Northern Peoples” circa 1555).


What inspired me to investigate pine knot torches was a passage in JRR Tolkien’s “The Hobbit,” in which Bilbo Baggins and the Thirteen Dwarves sneak around the dark tunnels of the Lonely Mountain, trying to figure out a way to steal back the Dwarve’s treasure from Smaug the Dragon:

“But in the end, when Bilbo actually began to stamp on the floor, and screamed out “light!” at the top of his shrill voice, Thorin gave way, and Oin and Gloin were sent back to their bundles at the top of the tunnel.

After a while a twinkling gleam showed them returning, Oin with a small pine-torch alight in his hand, and Gloin with a bundle of others under his arm. Quickly Bilbo trotted to the door and took the torch; but he could not persuade the dwarves to light the others or to come and join him yet.”

This mention of “pine torch” really piqued my interest, so I began researching old texts for references. To my surprise, I found that there were lots of references going back as far as the ancient Greeks, up until the 19th Century. Here are just a few that I found-

In his left hand he raised his curved shield, and in his right a huge pine-torch, and near him in front stood up his mighty spear.-Argonautica, 3rd Century BC

And directly there came out of the cabin a white-headed old man with a lighted pine-knot in his hand, and a blanket on his shoulders.-Jamie Parker, the Fugitive (1851)

It gives, in pictures, with only a line or two of description, the progress of different industries — such as the locomotive, from the clumsy engine of 1802 to the elaborate machinery of the present day; the evolution of lighting, from the pine-knot and tallow-dip to the electric light; methods of signalling, from the Indian fire-signal to the telegraph; time-keeping, etc.-Richard Rogers Bowker & Charles Ammi Cutter, Harvard College Library Journal, 1895

Another interesting thing I found was that the streets of New England were lit by pine fatwood knots in what were known as “basket torches,” as late as 1820.


HOW TO MAKE A PINE KNOT TORCH


NOTE: Before you read the instructions below, make sure to check out our “Wilderness Survival: An easy way to find Fatwood in the Rockies and Beyond….” article on how to find suitable pine knots for this technique.


*Tools for making a pine knot torch:

  • A good, sharp hatchet
  • A folding saw
  • A good, sharp knife
  • A way to light the torch (matches, firesteel, magnesium starter, etc)

A hatchet and saw are not absolutely necessary (a fixed blade bushcraft knife and a wooden baton would suffice if need be), but they make the job easier.


WARNING!- Do not ever attempt to carry a pine knot torch around during fire season! Pine knot torches drip flaming pitch while burning (think Mother’s Nature’s napalm) and they WILL ignite dry wood or grass almost immediately.

You will notice that the torches being demonstrated in this article are burning over large rocks and stone-lined fire pits, with both water buckets and shovels at hand in case of emergency. If you fail to heed the warning above, you will most likely start a forest fire and could be held criminally responsible for widespread death and destruction. During fire season, this technique can only be used in a true survival situation and only if you clear a wide area of dirt around the torch, or put it on top of large rocks or in stone-lined fire pits. Use extreme caution!

Ok, now that I’ve scared you straight, let’s get to the fun part- making a pine knot torch!


Find a suitable pine knot


Find a good, fatwood-laden pine knot and saw it off at the base.


Prepare the torch stave


Using your hatchet, remove the bark on both ends of the stave


On the knot end, split the stave into four sections


Using your hatchet, split the knot end of the stave into four sections


Stuff green twigs into the split to hold it open


Using your hatchet as a wedge to hold open the split, stuff green twigs towards the base of the split to open it up. This will allow tinder to be placed in the gap to ignite the torch, and also allows positive airflow while it is burning.


Score the outside of the knot-end with your hatchet to help the torch burn more efficiently


Stuff the inside of the split with fatwood shavings 


Stuff the inside of the split with fatwood shavings taken from another pine knot or the torch itself.


Also, add a large pile of pitchwood shavings on top of the torch end, at least 3 times the amount shown in the photo. I skimped when I conducted this experiment, and got lucky that the torch still ignited. In a survival situation, don’t take any chances. With a large piece like this, the pitchwood, though highly flammable, will have to heat up to release it’s combustible pitch. A large pile of shavings on top ensures that this process will take place when you need it most.


Igniting the torch


Ignite the pitch shavings from the top, being careful of wind gusts that could blow them away. For the first 2-3 minutes, try to keep the torch sheltered from the wind. You may have to hold the torch on its side or upside down to ensure that the initial flames heat the pitch enough to create a sustained burning process.


Once it’s going, you’ll have something that looks like this:


It will burn so intensely that neither rain nor wind will put it out. In fact, during one of my torch tests, a fast moving storm came through and dumped moderate amounts of rain on the torch for about 10 minutes. Incredibly, it managed to keep burning. NOTE: If you need to put out a pine knot torch, jam it into the dirt or snow until it is completely out.


This torch ended up burning for almost an hour and a half. It will easily illuminate the immediate vicinity of a camp site, enough to build an emergency shelter or render wilderness first aid.


Start now to make sure you are staying prepared.


Via:   rockymountainbushcraft


Save pagePDF pageEmail pagePrint page

Candles Aren’t Just For Birthday Cakes

Candles come in all shapes and sizes and are very handy to have in your various survival kits. They serve two main purposes–providing light and assisting with fire making.

There are different types of candles suitable for survival purposes.

Starting Fires

Small tea light candles are great for small to medium size kits and you can pack several into a small plastic bag. They weigh almost nothing so you won’t notice them in your kit. They don’t last a long time once lit but they work great with helping to get a fire going.

Light the candle, then build your tinder and kindling around it. Or, construct your fire lay in such a way that you can push the tea light out once the fire is going. That way, you can blow out the candle and save it for use again later.

The gimmick birthday candles, the ones that relight themselves after you blow them out, also work well for fire making. They are pretty much single use, though, and don’t burn a long time. The advantage is they are small and you can pack a whole bunch into a small pouch.

There are, of course, candles that are specially designed for emergencies. Generally speaking, they are somewhat thicker than the ones you’d buy for a romantic dinner and thus they burn longer. However, due to their size, they aren’t suited for use in small kits.


Make Your Own or Buy Them on Clearance

You could also consider making your own emergency candle for a survival kit. Use an Altoids tin or another similar size metal container. Use broken candles or old crayons for the wax. Wicks can be purchased at any craft store.

Melt the wax in a clean soup can placed into a few inches of boiling water. Once melted, carefully pour the wax into the Altoids tin and as the wax begins to set, insert the wick. I usually do two or three wicks, placed evenly apart. This gives me the option of more or less light based on how many wicks I have burning.

A great time to go candle shopping is right after Christmas, when all sorts of holiday decorations are on clearance. You can pick up a bunch of candles for pennies on the dollar. In a survival situation, it really doesn’t matter if it is the middle of July and you’re breaking out the Santa candles, or April and enjoying Halloween colored ones.

Obviously, once lit, candles are an open flame and need to be treated with caution. Always be aware of what is near the candle and where it is positioned, lest you accidentally bump into it.

Personally, I like to use oil lamps and candle lanterns for emergency light in the home during a power outage, as they tend to be a bit safer. But, there’s no arguing that candles can be a very cheap and reliable source of emergency light, as well as a great way to help get a fire going.


Start now to make sure you are staying prepared.


Via: thesurvivalmom


Save pagePDF pageEmail pagePrint page

The no-batteries-necessary UVPaqlite – Product Review


Just yesterday afternoon I sent my son on a search for 3 AAA batteries for my headlamp. It was time for my CERT class and I wanted to make sure I had a bright work light after sundown.

Eventually he found the batteries, and therein lies the problem with almost every emergency light source in the house. Batteries.

They die and need to be replaced, which requires a steady stream of purchases. If they’re re-chargeable, they have to be charged — when you remember to charge them!

The answer to this dilemma is a light source that never requires batteries, and that would be UVPaqlite.

Products from UVPaqlite never need batteries. Not ever. From their GloStick to their UVO Necklace, their products provide a constant, steady glow for many hours, far longer than any glow stick.

How does it work?

Each UVPaqlite product is made of a combination of 3 all-natural elements, strontium, aluminum, and europium. These elements are safe and there’s no worry if children handle them. In fact, they’ll go nuts over the magical lights, which is why I highly recommend the UVO Necklace or UV GloStick in every kid’s emergency kit.

The natural elements combine to create a glowing light when exposed to a light source. That source can be just a minute in the sun, a couple of minutes exposed to a flashlight, or 10 minutes in ambient light. The more intense the source, the quicker the charge.

Once charged, the UVPaqlite is ready to go. When they aren’t in use, the glow will diminish, so I recommend hanging one on the outside of an emergency kit or backpack, so it’s charged when you need it. I keep one right by my computer monitor for those nights when I’m burning the midnight oil and need just a bit of light.

A different Paqlite for different needs

UVPaqlite is a small, family owned business, and over the years they have developed a wide variety of products based on this unique, patent pending technology.

The UVO Necklace is particularly good for kids and pets. Attach it to your dog’s collar when you’re in the wilderness, and they’ll be easy to spot. Attach the necklace to the zipper pull on an emergency kit, tuck it into your kid’s school backpack, and place one by their bedside for an always-ready nightlight. As of this writing, the UVO Necklace is just $4.95 each.

I own one of the large UVPaqlites. This is a flattened, sealed bag that has more surface area than a glo sticks and can provide a broader area of light. One of these is handy in a tent, and rolled up, it takes up very little room. I keep mine in the glove compartment of the Tahoe, and it’s been a good light source within that small area.

When the power’s out in the neighborhood, it’s amazing how dark it can be. Even maneuvering around a familiar house can become a challenge. Glow in the Dark Spots (GIDS) can be attached anywhere to provide illumination along a hallway (place them a couple of feet apart along the baseboard), on each step on a staircase, or anywhere in the house where there’s a step up or a step down into another room. The last thing you need on such a night is a sprained ankle!

Is the flashlight extinct?

You’ll still want a good LED flashlight in your emergency kit and around the house for times when a bright spotlight is needed. UVPaqlite products provide a constant, steady glow useful for overall, ambient lighting. But unlike the flashlight, these will never need batteries and can be reused over and over again. A single purchase will provide a light source that will be handy and ready for use indefinitely.

Check it out in person!

I bought my UVPaqlites last year at a prepper expo in California. You can find the UVPaqlite at survival and prepper events around the country. Click here to see their current schedule.


Start now to make sure you are staying prepared.


Via: thesurvivalmom


Save pagePDF pageEmail pagePrint page

Getting found when you’re lost: 4 low-tech strategies

By contributing writer, Jim Cobb.

Getting lost in the wilderness can be dangerous, not to mention frightening.  Search and rescue teams are trained how to track people, of course, but you can do them a big favor by carrying with you just a few simple tools to use to signal for help.  Using these items will help get you home much sooner.


Naturally, if you have a cell phone with you, that should be the first thing you grab.  Remember, even if you don’t have enough of a signal to place a call, sometimes text messages will still get through.  It never hurts to try.  But, don’t rely only upon the much-vaunted smartphone to get you out of this jam.  Even Siri, in her infinite wisdom, may be ineffective.

Low tech tools

One of the smallest signal tools is a simple whistle.  It can be carried in a pocket but I suggest looping it around your neck on a lanyard, preferably using paracord.  This serves to keep the whistle on your person, no matter what.  Plus, paracord is extremely useful for a variety of tasks.

There are two basic types of whistles, those with peas and those without.  If at all possible, carry the pea-less variety.  In extreme cold, the moisture in your breath could freeze inside the whistle, causing the pea to stick inside the whistle and rending the whole thing useless.  It is also due to the possibility of cold conditions I suggest the whistle be plastic rather than metal.  Remember that scene in A Christmas Story where the kid sticks his tongue to the flag pole?

When using the whistle to bring help, blow three short blasts at regular intervals.  This is the standard rescue signal.  The sound of the whistle will be heard at far longer distances than that of your shouts.  Plus, you won’t get a sore throat from blowing a whistle.  All of my children are equipped with a whistle when we embark on a hike, just in case.

Please note; People who are disabled and/or who can not blow a whistle should be shown how to swing /spin the whistle quickly to force air thro the device without using your mouth – lungs …To make the signal it would not be the three long three short blast ( SOS )but a one long waving of a whistle tone … an extra Boot or SHOE LACES tied to make whistle longer to swing over head for Louder tone.

Attract attention with light

A signal mirror is a common item found in many prepackaged survival kits and for good reason.  Used properly, the reflected light can be seen for miles.  The downside of this tool, though, is it requires sunlight so it is useless at night or in very low light conditions.  You can improvise a signal mirror with a compact disc, if need be.

To use a signal mirror, you hold it in one hand and raise your other hand up, making a V shape with your fingers.  Look through the hole in the middle of the signal mirror and slowly rotate around until you see a spot of light appear on your outstretched hand.  Angle the mirror and that hand up until that spot of light reaches through your raised fingers.  Continue looking through the mirror’s sighting hole aim toward your target, such as a plane overhead.  Waggle the mirror slightly up and down to create flashes and call attention to your location.

Another signal tool that uses light is a cyalume light stick, sometimes called snap lights.  You can find these in dollar stores and toy departments just about everywhere, especially around Halloween.  They are thin plastic cylinders you bend and shake, mixing the chemicals inside until they begin to glow.  To signal for help with one, tie it to a length of cord about two long.  Then, twirl the cord in front of you, creating a large circle of light.  While you’ll need to be in a cleared area so it can be seen, it is far safer than trying to get a signal fire lit quickly.

Another inexpensive product on the market is the UVPaqlite.

Then there’s the smoke signal…

Speaking of signal fires, they aren’t a bad plan, provided you don’t let them get out of control.  For use during the day, you want to burn a lot of green wood and leaves so as to create smoke.  The smoke is what will be seen during daylight hours.

At night, go the opposite route and burn dry wood that will cause big, bright flames.  If you believe there may well be search planes or other aircraft looking for you, find a clear area and build three fires in either a line or a triangle.  This is a common distress signal.  Of course, if the clear area is large enough, you could spell out HELP with rocks or tracks in the snow.

Now, all these various methods of signaling for help are at least somewhat contingent upon people looking for you in the first place.  It is vitally important that before any hiking or camping trip you let someone know when you’re leaving, where you are going, and when you plan to return.  Be sure to instruct them that if they do not hear from you by a specific date and time, they should alert the authorities that you may be missing.  Naturally, in order to avoid embarrassment, don’t forget to keep your end of the bargain and let them know you’re home safe and on schedule.

Jim  Cobb is a Disaster Readiness Consultant and author of Prepper’s Home Defense, The Prepper’s Complete Book of Disaster Readiness, and Prepper’s Long-Term Survival Guide. His websites are Survival Weekly and Disaster Prep Consultants.


Start now to make sure you are staying prepared.

Via: thesurvivalmom


Save pagePDF pageEmail pagePrint page

How to Store Fuel Properly

Fuel is one of the most important things that you can use in an emergency. Whether it powers a car, generator, or stove; you’ll need to make sure that your fuel is ready for when you need it.

Handle all fuels with care. Remember that all of these could light at a moment’s notice.

We’ve collected a few tips on how to properly store different types of fuels, where you should store them, and how long they can store.

Containers for liquid fuel
When storing fuel, or other fire-starting material, you’ll want to make sure to put them in a different colored container. Most of the time, liquid fuels are stored in red containers. At a minimum, containers should be obviously labeled.

Make sure that containers are sturdy, reliable and have a good seal on them. You want to make sure that the fuel won’t leak. You should also consider a container that isn’t clear or translucent.

Gasoline

The American Petroleum Institute recommends that you only store gasoline for up to two years. This recommendation does not include gasoline that has been treated with a stabilizer.

There are many types of stabilizers on the shelf that can get your gasoline to store for a few years longer.

While I’ve used gasoline that has been stored for years on my lawn mower, using “stale” gasoline that has been stored for an long time can have some diverse effects on your motor. The recommendation for 1-2 years of shelf-life would provide optimal gasoline.

Diesel Fuel


Surprisingly, diesel doesn’t have a very long shelf-life. It can only last for 6-12 months.

The problem with storing diesel is that it begins to oxidize as soon as it leaves the refinery. Sediments begin to form that would clog the motor. This reaction can be slowed by keeping the fuel cooler and by adding stabilizers. The condensation from the gasoline can also form algae.

Some people who store diesel for a long time (the Navy, gas companies) use methods to stabilize their supply. These methods can be pretty expensive though.

We recommend that you store only a maximum of two-month’ worth of diesel at a time and empty the canisters into your car or generator when you rotate. (Thanks to Oblio13’s blog for the insight.)


Kerosene


Kerosene is one of the easiest fuels to store, and is more versatile than most people think. It does not evaporate as readily as gasoline and will remain stable in storage with no special treatment.

Kerosene has a shelf-life of about three months in a plastic container. Storing kerosene for longer than that can result in bacteria and mold forming in the container.

When you store the kerosene, be sure to label the container properly. You want to make sure that it doesn’t mix with gasoline or another type of fuel. You should store your kerosene in a different color container than gas to ensure that they are not mistakenly mixed.

Be sure to store the kerosene outdoors but protected from direct sunlight. Prolonged sunlight can degrade the kerosene.


Butane


Butane isn’t as popular of a fuel as gasoline or kerosene but many people use the fuel for lighters or other small fire starters. Many backpacking kits use butane fuel.

Butane comes in pressurized containers and the canisters are required, by law, to have instructions on the label regarding storage and usage of the product. Following the instructions will ensure that you keep your butane supply safe.

Proper storage is the first element in butane safety. Keep it in a safe place at home that is out of any children’s reach. Many containers can withstand even high temperatures. Even if you live in a climate that is rather warm, your butane should still store well … find a dry and cool place, out of the direct sunlight and away from any other sources of extreme heat.

Additionally, also make sure that the tip of the butane container is not damaged or clogged. If the tip is damaged or is clogged through use, remove the clog or throw away the container and buy a new one. (Read the Ebay article.)


Propane


You’ll obviously want to store your propane in a well-ventilated area outdoors. Make sure that your propane tank is stored upright – probably on a concrete slab.

Don’t store the propane tank next to anything flammable. Also ensure that it is stored in an area where a large amount of water will not fall on the tank – for example, next to a gutter or in the open under the rainfall.

Never store the propane in a house or garage. Click here to read Propane 101’s article about proper propane safety.


Charcoal


Charcoal is a great option for cooking fuel. They might get your hands a little bit messier but that’s not always a bad thing. The good thing is that you can store this dry fuel inside your home! However, never cook with charcoal indoors!

You can store charcoal in a dry location – like a bin or metal canister. You can also make a waterproof container by placing the charcoal in a bucket and use a gamma lid to seal the top. This should keep the briquets by not letting moisture into the bucket!

Coal
According to the Fireplace Supplier Register, coal can be stored in damp places without harming it. It can also be retained in areas that have little or no protection from the rain and snow. If you choose, so you don’t have to handle wet coal, you can cover it outside with tarps to keep it dry.

Store bagged coal inside the bags until you’re ready to use it. It will be easier to store it and carry it to the stove. Coal either comes by the bag or by the truckload (if you order several tons). Loose coal is easier to contain if it’s stored in wooden bins, but it’s not necessary. (Reference to the eHow article.)

Firewood
Avoid the temptation to keep a lot of firewood in your home. You can obviously carry in a few logs indoors at a time, but the best location to store firewood is outdoors. It’s recommended that you keep your firewood at least 30 feet away from your house – not leaning against the house, next to the door. Ideally, wood should be kept off the ground too.

You can make a simple firewood holder out of two-by-fours in order to stack the wood properly. Be sure to stack the larger pieces of wood on the bottom of the pile. This will help the pile from leaning or falling over.Here is an article on how to build a firewood caddy.

You’ll want to use a cover to protect the wood from getting wet. You can purchase a specific log rack cover or a simple tarp will do. Make sure that the cover is secured so it doesn’t blow away in the wind.

You may notice that there are some bugs in your firewood. Do not spray your wood with insecticide! This can seep into the wood and fume in your house when you burn the log. Instead, the best thing to do is dry out the wood as quickly as possible. This will encourage most of the bugs to leave the wood.

Matches
There are a variety of matches out there. Avoid placing cheap matchbooks in your kits and emergency supplies. They can absorb moisture a lot easier.

Instead, focus on matches that are waterproof and have longer stems. This will allow you to light things from a safe distance and make sure that your matches are safe from moisture.

If you don’t have waterproof matches, you can place your matches in a waterproof container. Make sure that the container is a thick plastic and isn’t stored in direct sunlight.


Start now to make sure you are staying prepared.


Via: survivalring


Save pagePDF pageEmail pagePrint page

How to Build a Solar Energy Generator for Emergency Backup Power

Solar Energy Generator for When TSHTF

(Originally posted a few years ago.  I’m reposting because of interest generated when I mentioned it in an article written earlier this week.)

———————-

Over the last few months I’ve been reading various accounts of how people have been making their own solar generators and I knew that I had to give it a try.  Think about it!  Spend a few hundred bucks and you basically have a power source sitting in the house ready to go at any time that never needs gasoline, kerosene, or any other fuel except the sun.  How cool is that?  Why would I want a solar power generator?  For a quick look at peak oil and what the government is doing about it check this out.

Parts 

You will need a solar panel, charge controller, deep cycle battery and an inverter plus assorted wire and wire connectors.  You can either leave it sitting on a bench or put it in some kind of housing system, which I’ll cover later.
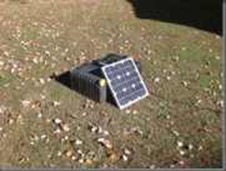
Solar Panel
The solar panel sits in the sunshine and delivers electricity to your system.  How much juice gets delivered depends on the panel.  This is a smaller system so I decided to try and get away with a small 20 watt panel.  The good thing about these is that you can usually hook them up together to deliver more electricity.


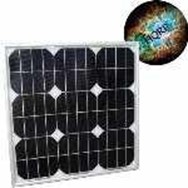
For the solar panel I bought a HQRP 20W Mono-crystalline Solar Panel 20 Watt 12 Volt in Anodized Aluminum Frame plus HQRP Coaster from Amazon.  It got good reviews and so I decided to give it a try.  Price:  $100.
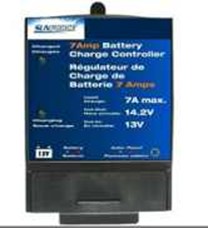
Charge Controller

This device sits between the battery and the solar panel and regulates how much charge the battery gets.  It monitors the battery and will stop charging once it’s full, so that it doesn’t get damaged.  Here’s the description right off the web site:

  • Charge controller prevents overcharging of 12-volt batteries
  • Intended for use with 12-volt solar panels
  • Handles up to 7 amps of array current and up to 100 watts of solar power
  • Charging light indicates the battery is charging, and a green light indicates a fully charged battery

Measures 4 x 1 x 2.5 inches (WxHxD) and weighs one pound

Price for the charge controller:  $19.89
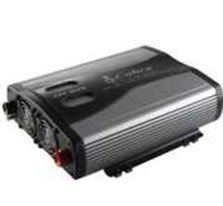


Inverter
This is what actually delivers 120 volt power to your devices.  It takes the 12 volts of electricity from your battery and converts it to 120 volts through some modern magic.  The one I bought can also be hooked up to a car or truck.

This is a Cobra CPI 1575 1500 Watt 12 V DC to 120 V AC Power Inverter and costs $98.95.
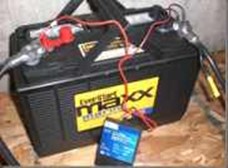
Battery
The deep cycle battery is what holds the electricity for the system.  If you have large electricity demands you’ll need more than one battery in your battery bank.  I bought a deep cycle marine battery from Walmart for around $100.

I figure that three batteries hooked together in parallel will be enough to meet my needs in case of a 24 hour power outage.

Next – Putting It All Together
The first thing I did was hook the inverter up to the battery to see how well it worked.  Beautifully, as it turns out.  I ran a drill off it as a test and currently I’m running my laptop, external speakers, and a lamp and after two hours of use haven’t noticed much drop in the battery’s voltage.  It started out at 12.3 volts and is currently sitting at 12.1 V.  Needless to say if you’re in a black out situation you could run several small items like these.  One of the cool things about the inverter is that it has a USB port so you can charge your MP3 players or whatever directly from the device while it’s turned on.  Pretty sweet!

Once the inverter was connected to the battery I hooked up the charge controller like this:


Next I hooked the solar panel to the charge controller and set the panel outside to start charging.


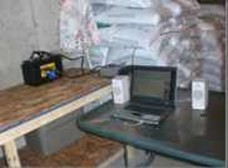
The wire from the solar panel to the charge controller can be seen being held in place by a pellet bag just above the laptop.


Small Solar Panel

How big an inverter do you need?  The first thing to do is figure out how much power you’ll need if the power goes out.  I want to be able to run a pellet stove or a freezer, so let’s use the freezer as an example.  *Warning* Geeky stuff follows.

You can usually find the electrical information on the back of the appliance, but if you don’t see it a trusty Google search can usually help you get the information you need.  My freezer uses 115 volts and 5 amps for a total of 575 watts.  (volts x amps = watts)  I have a 1500 watt inverter, so even factoring in the startup voltage (motors have a higher energy draw when they first start up) I still have enough power in the inverter to comfortably run this device.

I could also run the laptop and a few other small gizmos, but if you tax the inverter too heavily it needs to shut down and allow time to cool off every once and awhile.  Still, the freezer doesn’t run continuously, so it should be fine.

The Battery Bank
Granted, one battery isn’t much of a bank, but I’ve pretty much determined at this point that the system isn’t going to get a lot of heavy use.  I figure that one 120 amp hour deep cycle battery could run the freezer continuously for roughly three hours before it dies.

Testing
In the last few days the laptop and speakers have run off the system without any problem at all.  I haven’t yet tested the voltage being produced at noon, but I have noticed that the battery is being charged up 12.5 volts during the day thanks to some sunny skies.   So far the system has been a success and my girlfriend thinks it’s pretty cool too.

Other Stuff
There are a lot of things I haven’t touched on here due to the amount of information I had to dig through.  For example:  batteries create hydrogen when they’re charging and need to be properly ventilated.  Battery maintenance in and of itself is a huge part of a solar array.

Cabling is another factor.  I’m using #14 wire used to run electricity to outdoor lighting and it should really be #12 or #10 wire, but for what I’m using it for it should work fine.  When I add to the system I will have to upgrade the wiring.

Size of the system.  In order to figure out how many solar panels and batteries you need and the rating on the charge controller and the inverter you need to start with what you want to run and then give it a healthy boost because we don’t have sunshine every day.

Further Plans
One more thing I want to do with this system is put it in a container.  I happen to have a wheeled tool box sitting around not being used and I’m planning on putting it in that.  The bottom half of the toolbox will house the battery and the top will hold the inverter.


Containment System (an old toolbox)

There are two reasons for doing this.  One is to keep it out of the way of my young son who is intensely curious about Dad’s projects and the second is because that sucker is heavy!  If I’m going to wheel this thing say, out to the truck from my basement, it’s nice to have it all in one unit that I can pull along behind instead of trying to carry it.

One important note for anybody who might try to build one of these: If you do put your battery in a system like this make sure it’s vented!  I’m going to put a small fan on the battery container that will vent the hydrogen out as the battery charges.

Eventually I want to add enough panels and batteries to this system to run a pellet stove off it full time.  So, I’m not quite ready for the zombie apocalypse quite yet, but like the rest of you preppers I’m working on it!


Comments made:


neat project, but…

if the asteroid does hit, there will be copious quantities of dust suspended in the atmosphere. you will need to size your panel array accordingly. for the first few weeks you may not have enough daylight, regardless.

—————-

I was looking at getting involved in installing large solar farms (I have an unlimited electrical licenses).

One good is that you have not tried to tie it into your ac system. Unless you have access to lots of tax credits it adds all sorts of traps and foibles.

Be aware that when you to using disconnects etc, that the rating on dc is not necessarily the same as that for ac. DC disconnects at the same voltage are usually larger. Since your DC here is 12v it is not a problem. But if you got ambitious and started tieing panels in series it might.

To avoid voltage drop, you will want the larger wire on the lower voltage side. You may have doen that, but it is not clear. When I used 12v leds in a string under our kitchen cabinets, I used #10.

The real deal killer for me on the sun farming concept was a warning I read from an experienced installer who said that the inverters were the achilles heal. He said that they often went out within a 2 year time period. For short term emergency usage that is not such a big deal. For a hundre dollars, that inverter looks like a good deal. If you have a freezer that you store meat, etc, in you would easily save the $100 in not loosing your supplies. I am not criticizing: just commenting. I like the setup and will have to look into doing one for myself.

—————

You’re absolutely right about doing a grid tie-in. If I were to do something like that way down the road I’d hire someone like you to come in and do it. Also, I plan to keep it a 12 volt system and won’t be putting anything together in series. (For those who are wondering – if you tie two 12 volt batteries together in series you’ll get 24 volts.)

I used battery cables to tie in to the inverter, but it’s hard to see in the photos.

Due to the amount of information I had to keep the post (somewhat) brief, so left out some of these important details. I would hope that if someone does build this system they take time to do the same research I did.

—————-

As a final aside, I was not aware until recently that the trucking world has a whole alternate universe of 12 volt operating TVs, refreigerators, etc.

————

That would add a different element to the whole thing.

————-

Yes it would cause there is something like a 25% lose when stepping up voltage.


————-

ummm , if you wire the batterys in a paralle circut insted of a series you i will keep it 12V but still have all the battery power get a uglys manual i know i cant spell but i am pretty sure about this hey ranger man love the blog some of the best reading i do here in afganstan is this helping me plan my compound in the hard praires in the Midwest

—————–


Your idea is just awesome. Solar power can be considered as a great ecological energy saving, bring a new way of living and worth more than the fuel or gas generators. With a small investment, eliminate your dependency from the power company and generate your own electricity from the sun and wind by solar powered generator.

————-

I live in Miami, and have built 11 solar electric systems in the jungles of Belize…I have no vested interest in this company but some of the best prices in the USA for solar stuff is http://www.suneclec.com.

———-

BTW I agree that the inverter is the Achilles Heel of the system..there are good 12 and 24 volt freezes and refrigerators and of course there are kero/propane refeers and freezers also

————

Since I made the comment above on the low volage refrigeration, I had a conversation with an HVAC mechanic. He warned me that the system of refrigeration that these units tended to use had a very limited cooling delta. So you would need to keep them someplace that stayed relatively cool- like below grade.

Still useful, but more limited than I originally though. Might not be a bad addition to a root celler setup though.

—————

No expert here. However, please keep in mind batteries can explode. Any gas must be vented. Connecting the battery can produce a spark able to denote the gas/battery.

Not a huge issue, just something to be aware of. In my profession I’ve seen a couple batteries explode. It clears a very large area quite quickly. The gas/acid expelled after the explosion is pretty tough. Not something you would want to breath. I would keep the batteries outside my home personally. Just my 2 cents.

Sweet set up. Just might make myself one of those.


Start now to make sure you are staying prepared.


Via: shtfblog


Save pagePDF pageEmail pagePrint page