We’ve all seen the First Aid kits you can buy at the store. Many of us have made our own. But does your child have one they can take to school without getting in trouble?
My kids go to public school. I like their schools, but there is no denying that public schools have a lot of crazy rules when eating a poptart into the wrong shape (a gun, in someone else’s opinion) can get a second grader suspended, even if that wasn’t the kid’s intention.
Signed forms are required for kids to get simple over the counter allergy medicine, and the school nurse has to dispense it. A “medicated” cough drop is considered medicine and kids are not allowed to have them at school or on a school bus.
A school nurse has to dispense cough drops. Seriously.
My son is very excited about emergency preparedness and wants to carry a First Aid kit wherever he goes, including school. Even in second grade, though, he knew he couldn’t have any medicine or sharp objects in school, so we set about making him a First Aid kit he could have at school.
All those crazy school rules make it harder to build a good First Aid kit. But it isn’t impossible to make school-friendly First Aid kit! It just requires thinking outside the box a bit.
Non-Medicine
Herbal remedies only require a few drops at a time, and aren’t considered medicine by the average school district. That helps a lot in creating a school acceptable First Aid kit.
A contact lens case is a great place to store liquids and gels! You can buy plastic bags in any size online. Another good option is a simple drinking straw, which you can get for free at restaurants. Melt the end closed, add the liquid or gel, cut the tube short, then seal the other end. Single use size! You can even buy straws in different colors so they are color-coded.
A homemade rehydration solution is 1/4 tsp of salt plus 3 teaspoons of sugar added to a half liter of water. If you read the previous link, you may notice that the amounts I listed are half of what they list. That is because half liter bottles of water are extremely common and it’s easier to carry two packets than try and guess how much half is if you make the full amount.
Also, little kids are, well, little. They really may just need a half liter.
Aloe gel is great for burns, including sun burns, but be aware that it can get sticky as it dries.
I would love to include essential oils, but really haven’t figured out a great, stable way to store them yet. I am uncomfortable with storing them in plastic, such as a straw, because they could easily interact with the plastic, altering their chemical composition or simply evaporating quickly.
If you have a great way to store and transport tiny amounts of essential oils, please share!

Non-Medicine to include:
- Aloe: for burns, including sunburn
- Honey: disinfect cuts (instead of Neosporin) – just make sure it’s raw, preferably local, honey
- Cayenne pepper: add 1 tsp to 1 cup warm water and drink to stop a heart attack; help wounds coagulate (stop bleeding)
- Rehydration solution: You can make your own with sugar and salt, or buy Pedialyte(TM) Powder if you think the school will be OK with it
- Essential oils: there are many articles on this, choose the ones to suit your child’s needs. Companies like Young Living sell individual packets that could be very easily packed in a first aid kit.
- Glucose tablets
- Hand sanitizer: can also be used to sanitize objects because of the high alcohol content, and definitely school accepted
- Salt for heat stroke
Bandages and More
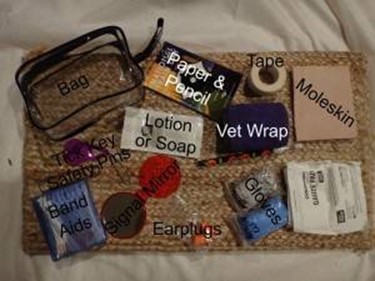
There are some items that even schools allow. Bandages, for example. And tape.
- Bandages (the link goes to novelty bandages with mustaches, bacon, and more printed on them)
- Gauze pads
- Paper tape
- Moleskin
- Plastic card, like a hotel room key, to remove stingers from bug bites
- CPR face shield: A very small child probably can’t use this, but it can be used on them and older children and teens can learn CPR.
- Non-latex gloves: Size small and large; small is for them to use; large is to be used ON THEM
- Finger splint: A popsicle stick and tape
- Vet wrap, in place of Ace bandages which have those terribly dangerous sharp, pointy closures (Hey, if a cough drop is dangerous, those must nearly be lethal weapons!) – Bonus: you can choose a fun color!
- Super Glue for closing wounds
- Small children’s safety scissors: They provide those in classrooms, after all, so they can’t be a danger.
- Toothbrush: Use this to debride a wound
- Syringe: irrigate a wound (I use free ones that come with medication.)
- Face mask
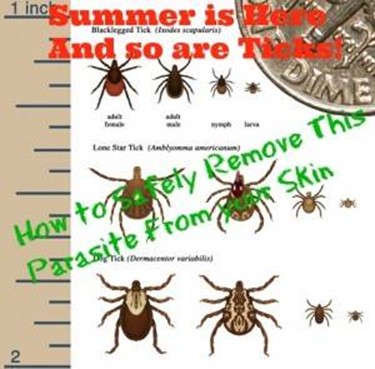
- Tick key
- Lanyard: part of a sling
- Electrical tape: It sticks to itself but not skin, making it great to hold gauze pads, splints, etc. in place for relatively short times
Non-Medical Emergency Items
Some items are just good to have in an emergency. These have many uses, including potentially being cut up.
- LED flashlight, preferably of the winding variety
- Neckerchief/handkerchief
- Silver emergency blanket
- Rain poncho
- Duct tape
- Lotion or oil – generally of the cooking oil variety, to help if a finger gets stuck somewhere it shouldn’t be
- Signal mirror
- Ear plugs: this is mostly because one of mine is very sensitive to loud noise
- Whistle: In an emergency like a tornado where a child could be trapped, this is useful for alerting emergency workers.
Stretch Items
There’s a good chance your school won’t allow these, but some may. It’s worth checking.
- EMT Shears – scissors that, realistically, are less likely to hurt someone than even kindergarten scissors
- Safety pins – small ones, not big horse blanket sized (although those are a great addition to a regular emergency kit or a car kit), although it’s possible schools will have an issue with this
- Tweezers
Finishing Touches
I bought 500 small plastic bags on Amazon. In addition to Lego, they have a ton of items in our First Aid Kits. I use a sharpie to label them, but it does sometimes wear off if it gets damp. For medicine, especially herbal remedies others may not know, I write instructions on the bags as well.
Now, put them all together in a bag. Personally, I currently favor something similar to a lunch box because, unlike a bright red First Aid kit, no one will ever even notice it, and my son loves eating school lunches. If your child is a regular lunch packer, you could simply use either an old lunch box or one they don’t like to help keep them from grabbing it by accident. Another option is a pencil box.
If you prefer, you can use one of little red First Aid bags you can pick up in any pharmacy section.
Voila! A first aid kit for your child, or for your travels.
Start now to make sure you are staying prepared.
Via: thesurvivalmom
 Follow