Category Archive: Tools

Free Homesteading, Cooking, Prepper, Survival eBooks & PDF’s for 07-11-18

Free Kindle Survival Homesteading Books

Free Homesteading, cooking, Survival, , and Prepping Kindle ebooks and PDF’s? Yes FREE Kindle ebooks and PDF’s!! Every now and then Amazon runs special offers on some of their Kindle ebooks and PDF’s, making them free for a limited time (usually just 24 hours).

I will check Amazon on regularly basis for their free Kindle ebooks in related subjects such as survival, homesteading and prepping etc. I will do all the leg-work for you so you don’t have to. You can just come back here regularly, so make sure to bookmark this blog.

These ebooks and PDF’s are only free for a limited time so if you are interested in one make sure you get it right away so you don’t lose out!

Remember you DON’T need a kindle to take advantage of these! There are FREE kindle apps for most major platforms!! iPhone, iPad, PC, Mac and Android. You can find those apps here!

Always check price before engaging, to make sure it hasn’t returned to full price.

imageimageimage

imageimageimage

imageimageimage

imageimageimageimageimage


Start now to make sure you are staying prepared.


Save pagePDF pageEmail pagePrint page

Free Homesteading, Cooking, Prepper, Survival eBooks & PDF’s for 07-09-18

Free Kindle Survival Homesteading Books

Free Homesteading, cooking, Survival, , and Prepping Kindle ebooks and PDF’s? Yes FREE Kindle ebooks and PDF’s!! Every now and then Amazon runs special offers on some of their Kindle ebooks and PDF’s, making them free for a limited time (usually just 24 hours).

I will check Amazon on regularly basis for their free Kindle ebooks in related subjects such as survival, homesteading and prepping etc. I will do all the leg-work for you so you don’t have to. You can just come back here regularly, so make sure to bookmark this blog.

These ebooks and PDF’s are only free for a limited time so if you are interested in one make sure you get it right away so you don’t lose out!

Remember you DON’T need a kindle to take advantage of these! There are FREE kindle apps for most major platforms!! iPhone, iPad, PC, Mac and Android. You can find those apps here!

Always check price before engaging, to make sure it hasn’t returned to full price.

imageimageimage

imageimageimage

imageimageimage


Start now to make sure you are staying prepared.


Save pagePDF pageEmail pagePrint page

Free Homesteading, Cooking, Prepper, Survival eBooks & PDF’s for 06-28-18

Free Kindle Survival Homesteading Books

Free Homesteading, cooking, Survival, , and Prepping Kindle ebooks and PDF’s? Yes FREE Kindle ebooks and PDF’s!! Every now and then Amazon runs special offers on some of their Kindle ebooks and PDF’s, making them free for a limited time (usually just 24 hours).

I will check Amazon on regularly basis for their free Kindle ebooks in related subjects such as survival, homesteading and prepping etc. I will do all the leg-work for you so you don’t have to. You can just come back here regularly, so make sure to bookmark this blog.

These ebooks and PDF’s are only free for a limited time so if you are interested in one make sure you get it right away so you don’t lose out!

Remember you DON’T need a kindle to take advantage of these! There are FREE kindle apps for most major platforms!! iPhone, iPad, PC, Mac and Android. You can find those apps here!

Always check price before engaging, to make sure it hasn’t returned to full price.


imageimageimage

imageimageimage

imageimageimage

imageimageimage

imageimageimage


Start now to make sure you are staying prepared.


Save pagePDF pageEmail pagePrint page

How To Build Your Own Snow Shoes

One of the tools you may have not have in your preparedness cache is a good set of snowshoes. In most cases, you probably won’t need some. But you don’t prepare like that, do you? You’re ready for whatever comes.

The good thing with snow shoes is the fact that you don’t have to spend a lot of money to get you and your family prepared. Even better, the process is fairly simple.

Materials you’ll need:
– 20 feet of 3/4 inch PVC pipe (3/4 inch)
– 3/4 inch T-Joint (4 pieces)
– Strong vinyl mat for decking (can be bought at fabric stores)
(Alternative decking- parachord)
– Parachord (or other strong/thin rope) for binding
– PVC Cement

Tools:
– Saw
-Tape Measure
-Heat Gun
-Utility Gun
-Hole Punch
-Lighter


Getting Started
Step 1- Cut the Frame
Cut the PVC pipe into following measurements:
– (2) 8″ pieces
– (2) 52″ pieces
– (2) 28″ pieces
This will create shoes that are about 36″. For smaller feet you can adjust accordingly.

Step 2- Attach and Mark
Attach the 4 T joints to both ends of the 8″ pipes.
Line up the longer pieces against the T joints and mark where you will need to bend the pipe. Mark the center of each 28″ piece and then mark 6″ from the end of each piece.
Mark the center of the 52″ piece and the mark 18″ from each end.

Step 3 – Heat and Bend
Heat the long PVC pipes starting from the center. Round them from the center out to form a half-circle. Stop when you get to the markings on each end.


Step 4- Attach
Attach each rounded piece to the straight center/crossbeam pieces using the T joints. It should look like this.

Step 5- Vinyl- Measure, Cut, Wrap
Take your vinyl sheets and measure them to fit around your PVC pipe. You should be able to stretch the material enough to wrap around the pipe and meet up on the other side.  Cut these in 2 separate pieces for each snow shoe, one for the bigger section and one for the smaller.

Step 6 – Measure and Poke
In this step you will poke holes in the vinyl to go around the snowshoes. For more secure snowshoes, each hole should meet up on the top and bottom of the snow shoe. Wrap the material around and measure to poke through both layers of vinyl. Poke holes around all pieces of vinyl.

Step 7 – Lace
Using parachord (or another strong, thin rope) lace through the holes to sew. Keep the same stitch going by always sewing through the top hole, pointing the rope down. To do this, poke your chord through both holes, then wrap the chord around the outside to bring it back up to top of the snow shoe to repeat the step. Pull the chord tight with each stitch.

Step 8- Create a Foot Anchor 
You have 2 options to anchor your shoe. You can use parachord to tie it down, or you can create your own shoe housing.


To create housing, use more vinyl to cut a T-shaped anchor for your feet. Punch holes on the bottom to attach with parachord to the vinyl base. On either end of the T shape, punch lacing holes to tie your feet into the anchor.


Step 8- Attach Shoes
Simply step into your new snowshoes and lace the vinyl flap tightly around your shoes. You’re set to snowshoe!

Here is an alternate video tutorial.


Whether it’s for recreation or for need, these PVC snowshoes will help you get where you’re going.


Special thanks to SurvivalKit.com for images and instructions.

 Start now to make sure you are staying prepared.

via:  thereadystore


Save pagePDF pageEmail pagePrint page

Free Homesteading, Cooking, Prepper, Survival Kindle eBooks for 02-27-18

Free Kindle Survival Homesteading Books

Free Homesteading, cooking, Survival, , and Prepping Kindle ebooks? Yes FREE Kindle ebooks!! Every now and then Amazon runs special offers on some of their Kindle ebooks, making them free for a limited time (usually just 24 hours).

I will check Amazon on regularly basis for their free Kindle ebooks in related subjects such as survival, homesteading and prepping etc. I will do all the leg-work for you so you don’t have to. You can just come back here regularly, so make sure to bookmark this blog.

These ebooks are only free for a limited time so if you are interested in one make sure you get it right away so you don’t lose out!

Remember you DON’T need a kindle to take advantage of these! There are FREE kindle apps for most major platforms!! iPhone, iPad, PC, Mac and Android. You can find those apps here!

Always check price before engaging, to make sure it hasn’t returned to full price.

imageimageimage

imageimageimage

imageimageimage

imageimageimage


Start now to make sure you are staying prepared.


Save pagePDF pageEmail pagePrint page

This nuclear-explosion simulator shows where radioactive fallout would go using today’s weather

image

(Missilemap)

  • Nukemap lets you simulate nuclear explosions on an interactive map.
  • A science historian created the tool years ago but recently updated it.
  • The new version uses real-time weather conditions to estimate a blast’s radioactive-fallout zones.
  • The new version can also export data to 3D mapping software like Google Earth.

Imagine a 150-kiloton nuclear bomb exploded in the city closest to you.

Do you know how the city, its surrounding region, and its inhabitants would be affected? If you can’t think of much more than “a lot of people would die,” you’re not alone.

“We live in a world where nuclear weapons issues are on the front pages of our newspapers on a regular basis, yet most people still have a very bad sense of what an exploding nuclear weapon can actually do,” Alex Wellerstein, a historian of science at Stevens Institute of Technology, wrote on his website, NuclearSecrecy.org.

To help the world understand what might happen if a nuclear weapon exploded, Wellerstein created an interactive browser app called Nukemap.

“Some people think they destroy everything in the world all that (sic) once, some people think they are not very different from conventional bombs,” he wrote. “The reality is somewhere in between.”

To illustrate that, Nukemap lets you build a hypothetical nuclear bomb and drop it anywhere on Earth. The software uses declassified equations and models about nuclear weapons and their effects — fireball size, air-blast radius, radiation zones, and more — to crunch the numbers, then renders the results as graphics inside Google Maps.

Preset options let you pick historic and recent blasts, including North Korea’s latest test explosion and Tsar Bomba, the most powerful nuclear device ever detonated. The tool can even estimate fatalities and injuries for a given weapon yield, altitude, and location.

The first version of Wellerstein’s tool came out in February 2012, but he upgraded it to version 2.5 this month. Users thus far have set off more than 124 million explosions in Nukemap.

Nukemap 2.5’s new features let you see where a cloud of radioactive fallout might drift based on local weather conditions. Fallout refers to the dirt and debris that get sucked up by a nuclear blast, irradiated to dangerous levels, pushed into the atmosphere, and sprinkled over great distances. The updated tool also lets you export your scenarios, load them into mapping software like Google Earth, and explore them in 3D.

“I hope that people will come to understand what a nuclear weapon would do to places they are familiar with, and how the different sizes of nuclear weapons change the results,” Wellerstein wrote on his site.

Picking a bomb and a target

We decided to test Nukemap 2.5 using its preset for the North Korean government’s underground test blast on September 3.

Some experts think that device, perhaps a thermonuclear bomb, yielded an explosion of roughly 150 kilotons’ worth of TNT. This was the country’s most powerful nuclear explosion to date — about 10 times as strong as the Hiroshima bomb blast of 1945, which caused some 150,000 casualties.

We started with San Francisco, since according to Missilemap — Wellerstein’s companion tool to Nukemap — the city is within the estimated range of Hwasong-14, North Korea’s newest and farthest-reaching intercontinental ballistic missile.

image

Misslemap 1.0/Alex Wellerstein

Blast effects

By default, Nukemap assumed a 150-kiloton-yield warhead would explode 1.03 miles above the city.

An aerial detonation maximizes a nuclear bomb’s destructive power by allowing the blast’s energy to spread. If a bomb were to detonate on the ground, the soil would absorb more of that energy.

image

Nukemap 2.5/Alex Wellerstein; Google Maps; Business Insider

The main effects of the nuclear blast display as four colored zones:

  • Fireball (0.56 miles wide): In the area closest to the bomb’s detonation site, flames incinerate most buildings, objects, and people.
  • Radiation (1.24 miles wide): A nuclear bomb’s gamma and other radiation are so intense in this zone that 50% or more of people die within “several hours to several weeks,” according to Nukemap.
  • Air blast (4.64 miles wide): This shows a blast area of 5 pounds per square inch, which is powerful enough to collapse most residential buildings and rupture eardrums. “Injuries are universal, fatalities are widespread,” Nukemap says.
  • Thermal radiation (6.54 miles wide): This region is flooded with skin-scorching ultraviolet light, burning anyone within view of the blast. “Third-degree burns extend throughout the layers of skin and are often painless because they destroy the pain nerves,” Nukemap says. “They can cause severe scarring or disablement, and can require amputation.”

Clicking the “radioactive fallout” option didn’t produce any exposure zones for this hypothetical explosion. A note toward the bottom of our Nukemap results explained: “Your choice of burst height is too high to produce significant local fallout.”

Casualties and radioactive-fallout zones

When we switched the height to “surface burst,” a very different picture emerged: The thermal and air-blast zones shrank, but the fireball nearly doubled in area, and the radiation zone nearly tripled.

We also enabled the new radioactive-fallout settings based on local weather. And to see the human effects, we ticked the “casualties” option, too.

image

Nukemap 2.5/Alex Wellerstein; Google Maps; Business Insider

Luckily, local winds in this hypothetical scenario were moving west-southwest, blowing most radioactive fallout into the Pacific Ocean. If a person were to stand outside in a 100-rad-per-hour zone for four hours, they would get 400 rads of radiation exposure, which is enough to kill 50% of people by acute radiation syndrome.

According to Nukemap’s casualty estimator, however, this blast would still kill about 130,000 people and injure 280,000 over the next 24 hours. The tool says this does not include radioactive-fallout effects, among other caveats.

“Modeling casualties from a nuclear attack is difficult,” it says. “These numbers should be seen as evocative, not definitive.”

Google Earth’s view

We were eager to try the export feature, but it appears to need some work.

For example, the fallout zone appeared in an area different from the in-browser calculation — almost due south of San Francisco, instead of west-southwest.

image

Nukemap 2.5/Alex Wellerstein; Google Earth

But it was still useful — in a gut-wrenching way — to see the size of a nuclear fireball (the yellow half-dome in the image below) in 3D as it related to a major city, engulfing entire neighborhoods.

image

Nukemap 2.5/Alex Wellerstein; Google Earth

You can create your own nuclear-blast scenario and explore Nukemap 2.5’s options here.

Wellerstein and others at Stevens Institute of Technology — based in Hoboken, New Jersey — are working on a related project, called Reinventing Civil Defense, which aims to “develop new communication strategies regarding nuclear risk that have high potential to resonate with a public audience.” The project was awarded a $500,000 grant and is expected to debut in 2019.


Start now to make sure you are staying prepared.


via:   americanmilitarynews


Save pagePDF pageEmail pagePrint page

16 Pioneer Tools You Need to Survive

No matter if you’re looking to become more self-sufficient or full on prepared for a natural or man-made disaster, these 16 pioneer tools are essential to survival. I also believe they’re essential in learning to get back to the old ways and skills our pioneer forefathers knew, and backing out of the fast-paced hectic life encroaching on society today. Call me a lover of all things old-fashioned and pioneer, because this modern day homesteader might need that painted on a piece of barn wood and hung by my front door.

16 Pioneer Tools You Need to Survive


  1. A fire starter. A fire is key for warmth, cooking, purifying water, and keeping wild animals at bay. Lighters run out of lighter fluid and matches must always be replaced. Learning how to start a fire with old-fashioned methods or a striker fire starter will benefit you for years to come. These can be taken on the trail, camping, and used at home.


2. Heirloom garden seeds. The pioneers didn’t have grocery stores to run to with pretty packages of garden seeds lined up on a rack. They saved their garden seed every year and would swap with neighbors if they spied a new or different variety of vegetable they wanted to grow.

They knew which seeds needed to be fermented in order to be viable the next year, which ones would cross-pollinate, and which ones could be saved as they were on the vine. There were no fears of GMO’s and commercial hybrid seeds that are generally unable to germinate, and if they do, revert back to one parent gene or the other, resulting in a different variety all together (and often not a very palatable one at that… ask me how I know).

Our family has been seed saving our own strain of Tarheel green bean seed for near over a hundred years as best I can tell. Want to learn how to save your own seed? Here’s how to save and store bean seed. 


3. A hatchet or ax. From splitting logs for a fire or falling trees to build a shelter, a hatchet or ax is an important part of every pioneer’s arsenal. In a pinch, you can even use the back side of a hatchet as a hammer.


4. Wheat grinder/home flour mill. The pioneers grew their own wheat and ground it into flour. If you own a wheat grinder, you can also grind up oatmeal, buckwheat, and other grains along with wheat to make different flours.

Ground flour has a short shelf life when we’re talking beyond six months. Wheat berries, when properly stored, can be stored for years. Plus, flour ground at home is healthier than the store because it contains all part of the wheat berry.

Knowing which home flour mill is right for you and your circumstances is important. If you want to be able to grind nuts and oily products, it’s important you get the right kind of mill. Here’s how to choose which type of flour mill is right for you and how to grind wheat.


5. Cast iron skillet. Cast iron cookware was something every pioneer home held. Cast iron can go from cook stove top, wood stove, oven, grill, and even the open fire. It’s durable and if taken care of, you’ll never have to replace it and can pass it down to your children and grandchildren.

Seasoning is key. When you’re done cooking, rinse out your pan with hot water (never pour cold water on a hot pan, it can crack), if food still remains, scour it out with some coarse salt. Rinse clean, dry, and rub a thin coating of oil into pan. Store in a dry location until your next use. Read about how to clean rusty cast iron here.

To season, smear a good layer of coconut oil or lard onto your pan. Preheat your oven at 400 to  500 degrees and place pan into the oven for an hour. Allow to cool and wipe off any oil residue. Seasoning allows the oil to soak into the nooks and crannies of the cast iron creating a smooth finish.


6. Dutch oven. A Dutch oven allowed the pioneers to cook anything they would in a regular oven while on the move or before an oven could be built or delivered from back east. We use our Dutch ovens all the time. I swear bread tastes better when baked in it.

A Dutch oven is also useful when you don’t want to heat up the house or your power goes out. We have Saturday night Dutch oven cook off’s while camping with family and friends. Everyone must cook in a Dutch oven and then we vote on the best dish. It’s often hard voting because everything tastes better when cooked outside.


7. Sourdough starter. That little packet of yeast you purchase in the store wasn’t invented until the 1940’s, plus, it expires or loses its punch… er, rise. Natural or wild yeast is what our ancestors used to bake bread. Been hearing about the health benefits of soaked flour?

That’s sourdough baby. You can purchase sourdough starters, but you can do it the pioneer way at home with just flour and water and few simple tips to ensure success. Here’s a free video to make your own sourdough starter and some recipes to get you cooking.


8. A good knife set. A sharp knife will serve you well. From a pocket knife for little chores to your kitchen knives. I recommend a good boning knife for filleting fish and cutting up a whole chicken. The pioneers also trapped or shot much of their own food, so a curved skinning knife is also one to consider. Make sure you have a whet stone or way of sharpening your tools.


9. Hunting rifle. Again, this one is going to require proper practical skill. You’ll need to take a hunter’s safety course and if you want your aim to be good enough to bring down an animal for food, you’ll need to practice often.

I know how important it is to go through training.


10. Dried herbs. Herbs were used for teas and medicinal purposes, from making tinctures to poultices when injury or sickness fell. Usually doctors were hard to come by when on the trail and the unsettled towns of the west. The pioneers knew which homeopathic methods helped them through various illnesses and would have brought dried herbs for their journey, with a bit of the seed to plant when they reached their destination. Their pharmacy was usually the garden outside their front door.

A few favorites are plantain and comfrey. Comfrey promotes healing and was often used as a poultice.


11. Bucket. A lowly bucket was used to carry water and could also be used as a makeshift wash tub. The bucket could be put to use carrying food or to help put out a fire. One of the most used tools on the wagon trains west was a bucket.

You can use a large branch to balance two buckets on each side creating a yoke, allowing you to carry heavier loads.


12. Basic sewing kit. A needle and thread were needed to repair garments and ripped seams. Scissors were needed to cut fabric and patterns to make new clothes. A needle and thread could also be used to sew up a wound as well as work a quilt to keep a body from freezing on cold nights.


13. Rope. A rope was important to tie things down during storms, use as a makeshift clothesline, or to drag something too heavy to carry. Rope could be used to make shelters as well.


14. Oilskin. An oilskin could be used to create a shelter or tent or used as a blanket in a storm. It can be spread on the ground to create a barrier as well, or to wrap around goods that are perishable when wet.


15. Alcohol. Many a good pioneer woman kept a bottle of alcohol to cleanse a wound and for medicinal purposes. It was also an excellent item for bartering. Alcohol is also an excellent item to use in preserving food.


16. Washboard. Clean clothes aren’t perhaps necessary to survival, but they definitely make it more pleasant for everyone. A washboard was used to scrub the clothes on. In a pinch, you could also use clean medium rocks, but a washboard could be hung or easily tucked against the boards of the wagon, making it something any pioneer woman would want to take with her.


Start now to make sure you are staying prepared.


Via: theprepperproject


Save pagePDF pageEmail pagePrint page

A Guide to Assembling an Off-Grid Carpentry Tool Box

Guest post by B.F.

——————-

I pre-ordered JWRs book Tools for Survival last year and have read through it twice now. It is a great guide for anyone preparing for a time when self reliance becomes more of a day to day necessity than it is today.

With that in mind, I wanted to add to the body of work by reviewing and commenting on the contents of two different tool kits that I have had a fair amount of experience with. Either one or both will serve well in an off-the-grid world.

The first one is the US Army Combat Engineer Carpenter’s Squad Tool Kit. The second is the tool kit assembled by my grandfather over his lifetime.

Today is probably one of the best times in recent history to put together similar tool kits at a relatively low cost. With few exceptions, most of these tools can be picked up for as little as a dollar or two at estate sales, farm auctions, and garage sales. They are so affordable that I have recently had to limit the number of tools I buy. High quality hand saws in particular with carved wood handles seem to be everywhere for $1. I tried to control myself by only purchasing those that were still sharp, and even then had to stop buying them after I accumulated somewhere around 20 saws. I am still a sucker for a pristine rip saw, though.

US Army Combat Engineer Carpenter’s Squad Tool Kit

Let’s start with the US Army Combat Engineer kit. These are issued in a box that measures about two feet by three feet and one foot high. A few years ago, the army upgraded the boxes these are stored in from traditional metal bound plywood boxes to newer (larger) Hardigg-style plastic cases. The older boxes hit the surplus market, and I picked one up for around $20. Look around; you can still find some for sale at flea markets, surplus dealers, Craig’s list, or gun shows. The great things about these boxes is that they store each of the tools securely in their own slot, making it easy to see if anything is missing that you need to go back out to pick up before it gets dark. It does this in a box that takes up relatively little space on a storage shelf, considering all that it holds. If my memory serves me correctly, when I was a Combat Engineer officer years ago in the Army I had a dozen or so of these on my property book.

The Engineer kit is intended to provide sufficient tools for two two-person teams to carry out basic carpentry activities. This does not mean they’re for building high-end furniture; it leans more towards basic carpentry, including construction and repair of sheds and buildings and making crates and storage boxes.

The contents include:

  • Two wrecking bars,
  • 12 hacksaw blades,
  • One box of blue marking chalk,
  • One-inch and two-inch framing chisels,
  • One box of blue and one box of red marking crayons,
  • 12″ double cut bastard file,
  • Two smooth cut 8″ files,
  • One hacksaw frame,
  • Two blacksmith hammers,
  • Four carpenter hammers, (though I went with two straight claw and two curved claw hammers),
  • A plastic mallet,
  • One file handle,
  • A spare hammer handle,
  • Two half hatchets,
  • One line level,
  • One plumb bob,
  • One smoothing plane,
  • Two pairs of lineman’s pliers,
  • One pair of slip joint pliers,
  • One wood rasp,
  • Two folding rules,
  • Two crosscut hand saws,
  • One rip saw,
  • Three flat tip screwdrivers with 1/4, 3/16 and 5/16 blades,
  • One carpenters square,
  • One try square,
  • One tape measure (100 ft.),
  • One 12-inch adjustable wrench (though I went with a 12-inch adjustable spud wrench),
  • Four rolls of masons twine, and
  • Four nailing aprons.

I have to admit that when I bought the tool kit box, I already had almost all of these tools sitting around, so I didn’t have to buy much. I think that with patience and some careful shopping, you could put together a toolkit like this one for $150 or less. All told, this kit weighs around 80 pounds when loaded.

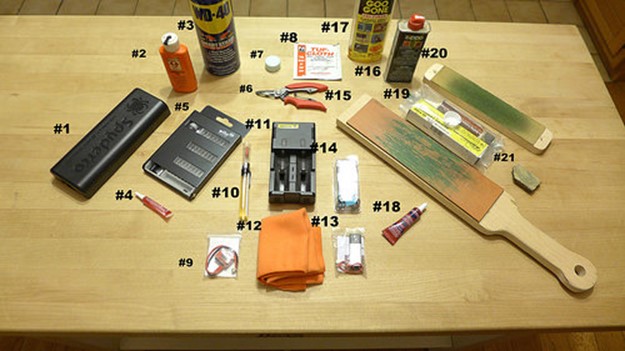
I also added a few additional tools, since there was room in the box. These included:

While there are a lot of tools that could be added, this is a good basic list of what you might want to consider keeping at your retreat location. I would add that the current version of the carpenter’s kit has quite a bit more in the way of tools and also weighs close to two hundred pounds. There is also a platoon level kit that is meant to augment the basic kit for larger jobs. The current version of the platoon kit includes a small generator and a whole raft of 18-volt saws, drills, bits, and blades. It weighs in at over three hundred pounds.

There is an online catalog showing these and a number of other toolkits that the supplier provides to the military. http://www.kippertool.com/media/pdf/military/EngineerSKO_sm.pdf While I like a lot of what is included in the larger tool kits the army has today, I think that the older tool kit listed above will handle most of the needs that a person will run across for quite a few years. Additionally, one person can manhandle it if need be, where the larger kits really need a squad to move them.

My Grandfather’s Tool Box

Now onto my grandfather’s box. Grandpa was born in 1889 in northern Iowa. He served in France during WWI as a locomotive engineer for the 13th Engineer Battalion. He retired after 52 years of service as an engineer on the Chicago Great Western railway, operating between North Central Iowa and Chicago. I also have his Soldiers Wife sewing kit that he used in WWI and that my father used in WWII. It still has both WWI and WWII uniform buttons in it, as well as buttons from my service.

One of his stories was of the Great Depression. On the outskirts of Chicago, families would send their boys down to the tracks to make faces at the train crews as they rolled past. The hope was that the train crews would be angry and throw coal at the boys, which they (the boys) would take home to heat their houses. The crews (knowing the game) always took the time to throw the biggest chunks of coal they could at the kids.

When not on the road, Grandpa Jim was an inveterate tinkerer. He had a cabin on a nearby lake that he built from four small farm houses he purchased that were hauled to the site with teams of horses. His tool selection was all high quality tools, with brands like Keen Kutter, Disston and Winchester dominating. With the assortment of tools he had, he could do anything from process raw timber into lumber to fine finish work. The tool box these tools fit in is a large wooden Keen Kutter box with a hinged lid. It measures 42 inches long by 12 inches wide and 14 inches tall with carrying handles on either end. The box lid is three inches deep and has storage fitted in the lid for four hand saws.

The tool box holds (in no particular order):

  • Two crosscut saws,
  • One fine tooth saw,
  • One rip saw,
  • Small back saw,
  • Saw vise and saw set to sharpen saws,
  • One jack plane,
  • Three box (or knuckle) planes, which are three-, four-, and six-inch lengths (These are incredibly useful for fitting things together, if you have never tried one.)
  • Keyhole saw,
  • Coping saw,
  • Hack saw,
  • Draw knife,
  • Three broad hatchets of varying sizes
  • One hand ax,
  • Two sharpening stones of different grits,
  • Oil can,
  • An assortment of metal files,
  • A couple of wood rasps,
  • Three file handles,
  • File cleaner,
  • Brace with screwdriver bit plus an assortment of 12 drilling bits,
  • Set of six countersinks for brace,
  • Adjustable bit for brace,
  • Extension for bit brace,
  • Yankee drill with bits,
  • Stanley crank drill with bits,
  • Stanley spiral ratchet screwdriver,
  • Screwdriver set,
  • Set of wood chisels and mallet,
  • 24-inch level,
  • Chalk line,
  • Set of gimlets (for starting wood screws),
  • A couple of one-inch putty knives made from broken butcher knives, (My grandmother said Grandpa was always on the lookout for her to break a knife.)
  • Three-inch putty knife,
  • Paint scraper,
  • Fourteen-inch pipe wrench,
  • Twelve-inch monkey wrench,
  • Offset slip jaw pliers,
  • Needle nose pliers,
  • Pipe reamer bit for brace,
  • Fourteen-ounce nailing hammer,
  • Mason line,
  • Inside and outside spoke shaves,
  • Compass (the kind for drawing circles),
  • Dividers,
  • Try square,
  • Sliding T bevel,
  • Marking gauge,
  • Friction tape,
  • Set of cold chisels,
  • Ball peen hammer,
  • Tack hammer,
  • Eight pound sledge hammer on short handle,
  • A quarter-inch electric drill, which still works despite being around eighty years old,
  • Drill bits for the electric drill,
  • Nail puller,
  • Two wrecking bars,
  • A couple of small C clamps,
  • Six foot folding rule, and
  • Twenty-four-inch boxwood folding rule.

Other tools that Grandpa didn’t have (or that Grandma got rid of) that I feel would make a valuable addition to an off-the-grid kit would include an assortment of gouges and carving chisels, mortising chisels, and a few more planes, such as bull nose, plow, and molding planes.

I think the key to getting value from tools like the ones listed above is to be sure to use them now. Don’t wait until the end of the world. All of them take some degree of skill to use right, particularly the hand saws and planes.

When my kids were young, I made extra money building doll houses. I frequently used a hand saw to rip sheets of particle board into one foot wide planks. Believe me, after a half dozen or so four by eight sheets of particle board, you know how to cut straight and efficiently with a hand saw. Even today, I find it is faster and easier most of the time to reach for a hand saw when I only have a few cuts to make than to get my circular saw, find an extension cord, and plug it all in.

The other thing you will need to accumulate beyond the tools is hardware. I won’t go into that in detail here, but you can pick up tremendous bargains on miscellaneous parts and fasteners at estate sales and auctions. I always look for the small plastic sets of drawers (parts bins) at estate sales. Usually you can get these, with a lifetime of accumulated contents, for a couple of bucks. Farm sales are likewise a great place to pick up quantities of fasteners. Coffee cans full of screws and half kegs of nails are often available at bargain prices.

On another point:

I’d suggest adding an assortment of mechanic’s tools to the “prep list.”

If one peruses estate sales one can often turn up mechanic’s tools– wrenches, screwdrivers, punches, files, pliers, et cetera– in fair to excellent condition at extremely reasonable prices. I never turn down the opportunity to pick up more. Having maintained my own vehicles and performed home repairs for decades I have a good idea what tools are necessary and what are perhaps not necessary but quite useful to have, and what are beneficial luxuries.

Since I’m quite familiar with my older vehicle, I have a rather complete set of tools specific to it in the vehicle, all of which would be useful on nearly any vehicle. The toolbox in the garage is much larger, as it contains copies of the vehicle tools as well as those tools I’ve found necessary, and handy, on tasks in the house and around the property and on the equipment. I won’t burden readers with a list of everything, since each should be familiar enough with their own needs to come up with a specific list, but I will suggest making sure you have wearable LED headlights, very good ones, and plenty of batteries for them (four words: Amazon Black Friday Sales).

Pro tip: buy batteries, in all the sizes you use, in bulk and replace them on a schedule to make sure you have light when you need it; this is especially true for those lights not used frequently. For me, New Year’s and July 4th work well as reminder dates. Some get replaced annually, some bi-annually, a few (my pocket light, for example) monthly. Rechargeables have their place, but I’m not a big fan of them for general use; they seem to always be low on charge when they’re needed. FYI on LED lights: incandescent flashlights will get dimmer as battery output drops, but LEDs will simply stop when battery voltage drops below the minimum LED input voltage necessary. “Simply stop” means “instant darkness”, which is why one replaces batteries on schedules.

A word on vehicle tool kits: Many people, faced with a worn or non-performing tool, will purchase a replacement and, not wanting to sacrifice the small remaining value in the old tool, “put it in the car or truck” for emergency use. This is an error. If one has to perform emergency vehicle repairs it will frequently occur at inopportune times and locations with few additional resources. You may find yourself under a vehicle, in the mud, well after sunset, trying to repair something with a tool that is nearly worn out, while your new, well-performing tool is at home in the garage, barn or carport, where you have a hard floor, lighting, a roof, and possibly even heat. Make life easier on yourself and keep the better tools in the vehicle. Worst case, if one is working around home and needs the “better” tool, retrieve it from the vehicle.

It also doesn’t hurt to expand the vehicle kit a bit. For example, your vehicle may be metric, but adding some SAE tools (or vice-versa) allows one to provide assistance on others’ vehicles, or perhaps perform work on other equipment or household items. Organization is the key. I use the medium (7″ X 13″) cloth electrician’s equipment zipper closure bags to keep sockets, ratchets, and extensions together, as well as to hold SAE and metric wrenches while keeping them separated.

As I accumulate surplus mechanic’s tools I package them in military-style canvas mechanic’s kit bags, occasionally adding to them with new tools and accessories purchased on sale at closeout prices. End-of-year sales at home centers have produced some very good values. The local Lowe’s, for example, was selling a very good socket, extension, and ratchet set, with both SAE and metric, for $39.95 leading up to Christmas. The last weekend of the year the few remaining sets in the display were marked down to $9.88 to get rid of them. I bought all three. Cheap (not just “inexpensive” but “cheap”) LED flashlights were available in a package of 6 for $10. That allowed adding a flashlight and two sets of batteries to each kit. Pro tip: when so doing, do not install the batteries in the flashlights. Instead, tape over the terminal ends with painter’s tape and put the batteries in a plastic freezer bag (or large pill bottle if you have one that size). This makes them easier to replace on a schedule, and if they deteriorate and leak they won’t ruin anything else.

When hard times come, there will be people with broken vehicles and equipment but no tools with which to repair them. Gifts of tool sets to family and friends will be welcomed and valuable as barter with others. I’m quite willing to trade a tool kit in which I’ve invested $15-25 for assistance, expertise, or other supplies


Start now to make sure you are staying prepared.

Via: survivalblog


Save pagePDF pageEmail pagePrint page

Finding Your Way Back Home Without a Map and Compass

When it comes to getting out of dodge, my hope is that I will never have to bug out. Ever. On the flip side of things, I also hope that I will never have to find my way back home following a major disruptive event.  Realistically, however, turning a blind eye to the realities of a disaster requiring a trek on foot to or from my home would be foolhardy.

The logical thing, of course, would be to have maps and a compass on board at all times. The first reality is that a disaster, whether wrought by Mother Nature or man, can happen when we least suspect it.  The second reality is that unless you are the exception to the rule, you probably do not have a compass and map with you at all times.


That begs the question: how do you go about finding your way back home without a map and compass?

Primitive navigation is not my thing.  I can find my way home with a chart and a compass rose, or an old Loran C (does anyone else remember those?) no problem.  And of course, a GPS is a cinch.  But I need to do better.

For this article, I called upon my friend and fellow blogger, Jim Cobb, to answer the question of finding our way back home when all we have with us is are wits and will to get there.

Primitive Navigation

by Jim Cobb

We’ve all been there at least once or twice.  Traveling through an unfamiliar area and realizing you have absolutely no idea where you are or how to get back on track.  It can be rather frightening, especially if you’re in a questionable urban area or perhaps out in the bush and the sun is setting.

Fortunately, over the past centuries mankind has learned a thing or two about determining direction using indicators found in nature.  We can use these naturally occurring clues to help us find our way.  We all know, or should know by now, that the sun rises in the east and sets in the west.  So, if it is early morning or late afternoon, you should be able to orient yourself that way, if nothing else.

Perhaps one of the easiest primitive navigation tips to start with is to learn how to locate the North Star.

Many of us were taught this when we were kids but perhaps have forgotten it over the years.  Find the Big Dipper, which is usually pretty easy.  Look at the two stars that make up the outer edge of the “cup” on the Big Dipper.  Draw an imaginary line connecting those two stars and extending out beyond the “open” end of the cup.  That line will lead you to the North Star, which is also the last star in the “handle” of the Little Dipper.

Knowing where the North Star rests in the sky will help you find all four compass directions.  But, that only works at night, what about during the day?

Find a reasonably straight stick and jam it into the ground.  If you’re in the northern hemisphere, the shadow created by the stick will point in a northern direction.  Not precisely north, of course, but with a little time, we can improve on this primitive compass a bit.  Place a golf ball size rock at the top of the stick’s shadow.  Come back in 15-20 minutes and you’ll see the shadow has moved a bit.  Place another rock at the new location.  Do the same thing 2-3 more times and you’ll have a line of rocks that follows a generally east-west direction.  The shadow still points north so the rock line to the left points west and the line to the right points east.

If you’re lost in an urban area, you might not want to take the time to find a good spot to jam sticks into the ground and wait an hour to figure out compass direction.  There are, however, a few tips and tricks you can utilize to at least get yourself to a better location.

For starters, and this is sort of a “duh” type of tip but bear with me, building numbers increase as you travel away from the city center.  Now, the “city center” might not be the exact middle as seen on a map, it depends on where they started their numbering system.  But, in general, the numbers go up as you travel toward the outside border of the city.  In many areas, though this isn’t any sort of rule that applies everywhere, three digit numbers indicate you’re within city limits, four digit numbers mean you’re in the city suburbs, and five digits mean you’re out in the sticks.  Again, there are a ton of exceptions to that but it follows true more often than not.

If you pass a cemetery, it might be useful to know that gravestones generally face east.  The reason for this is that in Christian doctrine, when Jesus returns He will do so in the east so those who are buried and will rise again will do so already facing in His direction.

Along those same lines, most Christian churches, especially the older ones, were built along a west to east line.  As one sits in the church and faces the altar, one is facing east.  Given that many churches are built such that it is a straight line from the front door to the altar, you can surmise that facing the front door means you’re facing east.

Most satellite TV systems utilize satellites that sit in geosynchronous orbit above the Earth’s equator.  Therefore, most satellite dishes in the United States will face in a southerly direction.  Might be southeast, might be directly south, might be southwest, but knowing that much might be just enough to get you moving in the right general direction.

Now, all of that is quite fun and interesting but is meaningless unless you know the compass direction in which you should be heading.  Therefore, it is important to have at least a general sense of where you are and where you’re going.  For most of us, this isn’t too big of an issue in the grand scheme of things.  In our regular daily lives, while we might be in a hurry to reach our destination, it is rarely ever a true life-or-death situation.

Lost in the woods, though?  That can go from worrisome to downright scary pretty quick.  Evacuating an urban area ahead of a coming danger and getting lost along the way could also be problematic.

Knowing how to find basic compass direction in either of those situations could be quite crucial.

A Compass is a Better Option

Having a compass and knowing how to use is always a preferable option.  I keep a mini-compass on my survival key ring, which, now that I think about it, I have not shared with you.


I also have a prismatic sighting compass in my Bug Out Bag but shame on me for not putting it to practical use.


The Final Word

I live on an island offshore the mainland US.  If a disruptive event happened here, I would be able get home without too much difficultly by following the shoreline.  Hopefully there will be roads.  But off-island?  That would not be as easy. Setting aside getting a boat ride home when the ferries are not running, finding my way along an unfamiliar route would be difficult at best and impossible at worst.


Finding my way from the mainland back home without a compass and a map will not be easy.
And now you know where I live!

 This summer, while hiking about, I plan to practice my primitive navigation skills plus bone up on the use a compass. Most assuredly, I do want to find my way home, no matter what.

Enjoy your next adventure through common sense and thoughtful preparation!
Gaye

Bargain Bin:  Below you will find links to the items related to today’s article including the items shown on my Survival Key Ring.


Military Prismatic Sighting Compass & Pouch:  I have owned this compass for a long time.  As I mentioned in the article, it is about time I learned how to use it.  This is why Hiking is Important!

Original Fox 40 Classic Whistle:  This pea-less whistle was my choice for my key ring.  It is smaller than theWindstorm (still a favorite) with no “pea” to stick and impede sound. The harder you blow, the louder the sound.

Streamlight Nano Light Keychain LED Flashlight:  This little flashlight is extremely small and light weight yet it will throw off a decent amount of super-bright light. At just .36 ounces and 1.47 inches long, it will take up a minimum of space in your pocket or bag.  It is the #1 bestseller on Amazon in the category Key Chain Flashlights.

Victorinox Swiss Army Climber II Pocket Knife: This is the Swiss army knife that both Shelly and I carry.  It includes the following: large and small blades, two standard screwdrivers, bottle and can openers, a corkscrew, a wire stripper, scissors, key ring, reamer, and parcel hook. In addition, there is a tweezers and a toothpick that pull out of the end.

Kingston Digital DataTraveler Flash Drive: I much prefer these metalized flash drives because the ring will not break.  Been there, done that.  These flash/thumb drives have really come down in price and are great for storing important documents.

Nite Ize DoohicKey Multi-Tool: This little tool comes in handy for all sorts of things. You can use it to pry things, screw or unscrew things, and as a measure.  It is well worth the $5 and weighs almost nothing on your key ring.

Compass and Thermometer: This is the compass I carry with me.  It is tossed around in my handbag and has suffered a lot of abuse along the way.  That said, nary a crack or scratch in the casing.

Bundle of 2 Premium 350 lb. Paracord Key Chains: The paracord key ring I own is no longer available on Amazon but here is a good alternative.  Pricewise, you get 2 for the price I paid for one.

~~~~~~~~~~~~~~~~~~~~

Jim Cobb is a recognized authority on disaster readiness. He has also been a licensed private detective for about 15 years. Previous to that, he spent several years working in loss prevention and security.

Jim’s books include Prepper’s Home Defense, Countdown to Preparedness, and Prepper’s Financial Guide (coming March 2015). He can be found online at http://www.SurvivalWeekly.com/ andhttp://www.DisasterPrepConsultants.com/. You can connect with him on Facebook athttp://www.facebook.com/jimcobbsurvival/.


Start now to make sure you are staying prepared.


Via: backdoorsurvival


Save pagePDF pageEmail pagePrint page

Cool Tools for EDC Maintenance


Source: Flickr

I have been asked for a long time to lay out all of my EDC maintenance stuff. This was done in a shorter form a long time ago, here. Over time I have refined and upgraded what I use. And then I found Kevin Kelley’s Cool Tools, and I starting thinking about this stuff more carefully. I tested and refined this set of things until I found the exact right tools for the job. For example, I tried out three or four different formulations of Loc-Tite. I did that so you don’t have to.

For reference, I tried to pin each number to the top and left of the given object. Hopefully it will be obvious what they are once I describe them.

#1: Spyderco Sharpmaker: There are a lot of expensive and automated ways of reprofiling an edge, but they basically do what the Sharpmaker does with a bit more precision or speed. For around $60 this will get you started, and once you add stropping to your knife maintenance regime, you probably won’t find a need for anything more.

#2: Hoppe’s #9 Lubricating Oil: I know lots of folks like Rem Oil, but this is pretty darn good. I don’t use it as much as I used to (you’ll see why in a minute), but for big or really stuck things, this works wonders.

#3: WD-40: I love the smell of WD-40. It smells so clean. Oh, and it also prevents rust from building up and lubricates parts. I like running some of this on a fixed blade before and after big cutting jobs, especially if the fixed blade is a high carbon model. Also, note the can; the spray/straw variant is very handy and easily worth the upgrade in price (of like $0.70).

#4: DeOxIt Red: There are a few variations of this deoxidizing liquid, but Red is the one you want. This will clean connectors in a flashlight, and you need only very smallest drop. Good thing too because it is exceedingly expensive. One hundred percent worth it, as it can fix lights that nothing else can, but be careful; a big squeeze is like $9 worth of red stuff.

#5: Wiha Micro Driver Set with Rotating Tail Caps: This is also expensive, but as I have mentioned before with the upgrade treadmill, buy good stuff right away and you will save money. I spent $70 over 5 years buying Kobalt, Craftsman, and Husky sets that all rounded off instead of buying this $60 set. Stupid, stupid, stupid. Be sure to get the ones with the rotating tail cap, that way you can apply pressure and still rotate the screw. $60 might seem like a lot, but when you strip a screw on a custom knife because of crappy drivers, you’ll wish you ponied up the cash.

#6: Split Ring Pliers: Over the years I have reviewed dozens of things with split rings, and some were really tough. These cheap pliers work exceedingly well. You can find them in the fishing aisle at Wal-Mart for $8. It’s definitely worth it if you have a tool keychain, a Swiss Army Knife, or any number of things that run annoying split rings.

#7: Silicone: Your lights all have o-rings, so once a year, grab some of this and coat them with it. It will keep them nice and rubbery. Dry o-rings can crack and lose their watertight seal. Use this and they won’t.  It’s cheap and takes about 3 minutes to do a dozen lights.

#8: Tuff Cloth: This is a great rust inhibitor designed specifically for knives, tools, and firearms. It’s pricey, but a few packs in a backpack can keep your blades looking nice over a long camping trip.

#9: Cotton Picker’s Micro Battery Charger: For those uber-tiny cells, no other arrangement will do. The Cotton Picker design is great. In a pinch it can charge RCR123as. Opt for the metered version, as it is not much more money and allows you to leave a battery to charge and only momentarily check on it.  Otherwise you should probably sit and wait. Lithiums and overcharging don’t mix.

#10: Nano-Oil in Needle Tip Applicator: Hoppe’s, WD-40, and the like all pale in comparison to this miracle liquid. Like the DeOxIt, this stuff is uber-expensive, but it is 100% worth it. The needle tip applicator is an absolute must. Don’t bother unless you can get this feature. Otherwise, you will waste a lot of liquid and you won’t be able to get in to the nooks and crannies you need to to make this stuff really work. This is probably my favorite thing in this picture as it can rescue stuck pivots and change below average pivots into “I swear this is on bearings” smooth.

#11: i2 Intellicharger: It’s not ideal, but it’s the best out there right now for under $100. This dual well charger can take everything from RCR123as all the way up to 18650s. It can’t do super small cells, hence #9, but it does everything else. I really like the fact that you can put two totally different batteries in the charger at the same time. So many of my lights are single cell lights that I don’t often need to charge to identical batteries. I wish it weren’t so finnicky about battery placement, but every other model out there is just as bad or worse.

#12: Microfiber Cloth: Just 100% essential. They are great for cleaning a knife or polishing a flashlight lens. Simple, cheap, and awesome.

#13: Cotton Picker Volt Meter: This is a handy little thing to have but probably not essential. It’s helpful with super small cells because most regular volt meters have a hard time getting around their tiny structures.

#14: Spare O-Rings: Uber cheap and handy to have around, o-rings are a necessity if you like flashlights. Invariably something will dry out and break or get sliced in a dreaded cross threading accident.

#15: Home Made Strop: This is made from an old barber’s strop; it’s two pieces of leather mounted on pressboard, a void free form of Baltic Birch plywood. One side is coarse and the other side is smooth.  Strops are just too good. Since using them I have basically stopped using the Sharpmaker. Regular stropping is all you really need. This was free. A leather belt with some Tripoli compound would work too.

#16: Naphtha Lighter Fluid: I don’t smoke, but I do use this to clean parts and it works very, very well. It is also dirt cheap; this bottle was $2 at a cigar store.

#17: Goo Goo: When naphtha can’t be used because of the smell, this does the job. I think it works a little better, but I have no evidence of that. It is, however, not as cheap, so if you can only get one, get the naphtha.

#18: Loc Tite Blue 242: After trial and error I think this is the perfect formulation for our needs. I use it to lock in pivot screws that like to walk around, and in that application it works fine. Any stronger and it is hard to undo, and any weaker and it doesn’t work as well. The Goldilocks Principle makes this the right choice.

#19: Stropping Compounds: Get the black Tripoli compound for coarse and the green compound for fine. If you have the ability, finish it off with white compound. Be sure to keep them in a ziplock as they can dry out and lose their effectiveness (they won’t stick to the strop, crumbling on the surface instead).

#20: Secondary Strop: This will eventually be converted to white compound only, but for now it is a suede leather surface with green compound. The suede makes it a little softer on the steel and you can get a pretty nice polish with it just by using an even, quick motion with your hands (god that sounds terrible, but you know what I mean).

#21: Sandstone: This is what I use to sharpen my BK9 when I am away from the house. It’s very flat and very coarse, but in a jam it can put an edge back on the beast. Sandstone works well as the coarse sharpening stone and granite would work well in the fine slot, provided it is smooth and flat. You’d be surprised at how good of an edge this can put on a knife. Don’t buy one when you can find a field sharpening stone pretty easily.

There you have it: a relatively complete, time tested kit for maintaining your gear. For multitools, flashlights, and knives, this will get you a very, very long way.

One thing I also use that I couldn’t get in the picture: an air compressor. It blows gunk out of a knife or multitool quite well. Just don’t use it to dislodge a stuck battery in a flashlight. That’s also called an air gun.  I have a AAA shaped dent in my workshop bench to prove that this is dangerous.


Start now to make sure you are staying prepared.

Via: alloutdoor


Save pagePDF pageEmail pagePrint page