Tag Archive: 72 Hour Kits

5 Easy To Carry Foods For Your 72-Hour Kit

Today is a guest post from Chett over at FoodInsurance.com.

—————————

When something unexpected happens and your family needs to evacuate your home, either by car or on foot, a proper 72-hour kit can provide everything you need to sustain yourself for up to three days.  Many people tend to overburden their kits with food—forgetting that they are for survival, not gourmet dining.

Because 72-hour kits must be packaged in containers small enough to be carried, such as a backpack or plastic tote, it’s important to choose food that is both easy to carry and nourishing. Remember to include food items that you and your family will actually eat, and don’t underestimate the power of a few comfort foods to ease stress during what could be a difficult and traumatic time.

Here are five long-lasting, easy to carry foods essential to a lightweight 72-hour kit:

1. Beef jerky: Long-lasting and delicious, beef jerky is a survival kit staple. It has a long shelf life, doesn’t require cooking and is packed with flavor. As an added bonus, jerky contains high levels of protein and zinc. Jerky is also high in sodium, however, which can increase your thirst, so eat it sparingly.

2.  Canned foods:  Adding canned foods to your 72-hour emergency kit gives you a range of meal options, such as tuna, soup, stew, chili or pasta with sauce. Look for low sodium options with high nutritional value. Don’t forget to include a can opener. Some traditional canned foods are even available in vacuum-sealed pouches—so look for variations of tuna, stew and other ready to eat foods packaged this way for a lighter weight alternative.

3. Energy bars: Whether you invest in high-calorie survival bars or the basic granola bars, these can give you a burst of energy when you need it most. Choose those bars with higher protein and calorie content and put in a range of flavors for variety, such as coconut, peanut butter or banana nut. Make sure the bars are individually wrapped for maximum storage advantage.

4. Trail mix: Buy commercial trail mixes or make your own, but the best blends for survival kits mix dried fruits (such as raisins or cranberries), sweets (small chocolate chips or candy-coated chocolate) and nuts (such as almonds or peanuts). Trail mix provides you with several nutrients and lots of calories in a salty-sweet blend of crunchy goodness. Portion out homemade blends into doubled-up, zippered plastic sandwich bags for easy portability.

5. Drink mixes: Gain extra physical and psychological advantages with a range of drink mixes. Ideas include packets of hot chocolate mix, cider mix, instant tea, fruit drink mix, powdered milk and breakfast shake powders. You’ll need to stay hydrated in an emergency situation, and these mixes can entice you to keep on drinking, plus provide much-needed calories.

Cycle through your 72-hour kit every six months to check that your food items haven’t expired and replenish where necessary. When an emergency occurs, you’ll be glad you prepared your 72-hour kit with all the items you’ll need to survive and thrive during the next few days.

This guest post is written by Chett Wright of Food Insurance, a supplier of emergency food storage supplies. Get your own food storage plan together by visiting FoodInsurance.com.


Start now to make sure you are staying prepared.


Via: shtfblog


Save pagePDF pageEmail pagePrint page

A Written Plan for Your Preparedness

I am an active prepper. I do have sort of a retreat but not a great bug-out vehicle (yet), but I do what I can for bugging-in and preparing for emergencies. I have extensive food and water preps, tactical supplies, and all of the other trappings of modern-day prepping. Although my family is aware of my prepping, and support my efforts, they are not “in the loop” with how to do what, when to do it, and what to do it with. I have come to realize that many of my preps will be useless if anything happens to me. A good example of this is my emergency comm gear. It’s good gear, easily accessed, and will work well, but there are no user-friendly instructions on how to use the gear. Another example would simply to list where everything is located, as my preps are spread throughout the home, vehicles, and remote locations. There are many, many things that I can do with the gear, but might be a stretch for my wife and children, simply due to the lack of instructions.

To this end I have begun documenting all of the needed information regarding our preps. This is being done in plain text, and then a printed copy will be hidden, and a copy given to my wife. Digital versions on the thumb drive are encrypted with a password that we all know well. The docs begin with a detailed inventory that gives location, quantity, and a short description. After the inventory I have started writing how-to docs for each area of need, and the level of detail is just deep enough to get the job done. As is the case with most such articles on preps, bug-out-bags, etc., I begin with water, food, shelter, protection, safety, communications, and lastly, comfort. I have kept the technical jargon to a minimum, and intend to solicit feedback from my family to clear up any points that need it.

With regard to each are of prepping, in some short discussions with my family that safety and security are two areas where considerable discussion was required before writing my docs. The reason is very predictable, my family consists of my wife and two teenage daughters. While they are all very sharp, and quite capable, some aspects of safety and security are difficult for them to accept. An example is the need to hide the bulk of our preps, while leaving a substantial quantity of food and water out in the relative open. I think this is needed because looters WILL come, and they can more easily dealt with if they are not coming up empty-handed. The other reason may be obvious, they might give up looking once they think they have taken all they can find, so the bulk of our preps will be secure. My family thinks that there will no looters, and that if I think there will be, then we should hide all our preps. Another example is dealing with strangers. My family of females is not as callus as I am, and will want to lend aid much too readily. After having lengthy discussions with my family, I was careful to re-state my concerns for security in the related docs. Mainly, be cautious and suspicious at all times. We should always be ready to lend aid and be charitable, but individual safety comes first. My rules are simple, in an emergency situation, no one outside the family is allowed in the house, and if we are providing any sort of aid the recipient will remain at least twenty-five  feet from the door until it is closed and locked, no exceptions.

In creating my docs, I have tried to write instructions as I perform a task, at least mentally. I have found that when I describe how to do things, I leave out small details that I take for granted. Don’t do this! Be exacting when it counts. We don’t want to bog-down anyone with too much detail, but overlooking a small but critical detail could be disastrous. A prime example is the fact that my gun safe key must be turned before dialing-in the combination or it wont open. It’s a key feature of the safe, and a detail I have long since just taken for granted. Although a tiny detail, this could easily hinder my family in my absence. I’m sure you can all think of dozens of small things similar in this respect.

Another aspect of preparing these docs is the printed version. Digital copies are valuable, I store mine on a pair of thumb drives, but printed copies are mandatory. If there is no computer to read the docs, they are useless. I have started printing my docs on waterproof paper, using larger than normal (14 pt) bold type font. They are then placed in zip-loc bags with moisture absorbers  and stored in a predetermined location, high above the water line of any potential flood. My wife thinks putting a copy in a fire safe is a good idea, I may agree with her. (it’s so hard admitting she’s right!). I have read articles about encoding printed docs, but it seems to be a dangerous practice, except maybe for very sensitive information, and the need for that kind of secrecy is far outweighed in my mind by the need to get the information quickly in an emergency situation. We’re talking about how to start the generator here, not nuclear launch codes!


I believe that the digital copies of these docs should be written and saved in a simple .txt format whenever possible, even if encrypted. You never know what sort of device or program you might have to open them on. The more universal the format, the better. If you have diagrams or pictures, consider using a PDF format for those. The PDF format is widely supported on computers, phones, tablets, just about any digital device available. If you will be printing docs that must contain actual photos, try and use high-contrast black and white in all of your images. In the long run, these images will last longer and will maintain readability better under adverse conditions, and the high contrast will make them easier to read under low-light conditions. Regarding storage of the printed docs, I found some surplus Army signal flare tubes that seem to fit the bill perfectly for this task.  I also put a chemical light stick in the tubes with the docs. This way we have a ready light source if needed to read them in the dark. I found the tubes at a local gun show, but I bet there are millions of these things out there on Ebay and military-surplus outlets. Another idea would be just to make your own tubes with PVC pipe and screw-on caps. If the tube does not fit your docs, there are countless waterproof containers out there. You might even consider fireproof containers in addition to waterproof containers.

So far my family has been supportive in giving me feedback on my docs and it’s going well. I expect that will change some as we get into more sophisticated activities like setting the channels up on a 2 meter hand held radio, or setting the bait hook on a small game trap. In the end, I believe that my preps will be complimented well by a good set of documents and procedures. My original thought was to provide the needed information to my family in the event that I was not here, for whatever reason. After several weeks of typing, I am keenly aware that there were some things I needed to brush up on as well. Now more than ever, I think it’s true: you don’t know how to do anything well until you can tell someone else how to do it. I strongly suggest that you use this opportunity to use and test gear and practice using tools and techniques, having found many times that some things were much easier to do in my memory than they currently seem to be. It can also be a great opportunity to get your family more involved in the practical side of preparation. We live in the deep south east where hurricanes are quite common, and I love the thought of my family knowing how to take care of themselves in the event of any emergency. It also gives me a chance to spend more time with my kids, and that’s always good.

So to recap my thoughts here:

  1. Make a good inventory of all of your preps.
  2. Write a detailed how-to document for each prepping item.
  3. Make no assumptions, where needed be very thorough.
  4. Store digital copies in an encrypted file.
  5. Use a safe but easy-to-remember password on your files.
  6. Make printed copies on waterproof paper.
  7. Store multiple copies of digital and printed versions in safe locations.
  8. Review the docs with the people that will be using them.
  9. Use the docs to practice using tools and techniques.
  10. Setup a periodic review and update schedule for updating your docs.

I hope others find this informative, good luck with all of your preps, I hope you never need them!

For more in depth information on encryption, see the Wikipedia page on encryption software.

And this link will take you to the free encryption software that I use:
http://download.cnet.com/TrueCrypt/3000-2092_4-10527243.html

Some really good sources for waterproof paper can be found using these links:
http://geology.com/store/waterproof/paper.shtml
http://www.igage.com/mp/wpp/igage_weatherproof_paper.htm
http://www.waterproofpaper.com

Or, you can waterproof your own paper.


Start now to make sure you are staying prepared.


Via: survivalblog


Save pagePDF pageEmail pagePrint page

Emergency Meal Plan

Planning your emergency meals sets apart a manageable crisis from an outright disaster. Although many of us have our 72-hour bags packed and ready to go, take a second look at your pack to ensure that the food you plan on taking will realistically sustain you during that 3 day ordeal.

In a bug out situation, put thought into the situation you could find yourself in. You will be in a high stress environment where you may be on foot walking for long periods, or for that matter walking up and down hills. The foods we will carry will make all the difference in the world in terms of maintaining energy levels, and nutrition. Many preppers underestimate how much food they will need for their 72 hour bags. They believe that living off of survival bars for a main source of nutrition for 3 days will give you the optimum nutrition. This just isn’t so.

When you are preparing your bug out bag, you want your diet to give you ample calories, carbohydrates, protein, vitamins and some fats. Keep in mind that ages and genders will play a role in calorie consumption.  As mentioned, you will be operating in a high stress and high energy environment, therefore your body needs to be running as efficiently as possible. With this in mind, you should plan to eat small meals every 2-3 hours.

Create a Menu

The best approach to ensuring you have enough food for 72-hours is to sit down and create an emergency menu based on your family’s preferences and map out the nutrition needs that the chosen foods provide. This will help you stay organized for the disaster and will also help you create a shopping list for bug out supplies. Your menu should be realistic in the sense that it will provide your body with the necessary energy needs.

The Nutrition Breakdown

In your bug out bag, make sure that the foods you store for this short lived emergency will have the sustaining energy sources that will burn slowly. Finding foods that are high in complex carbs and dietary fiber are more efficient from a dietary standpoint and will keep you feeling “fuller” longer.

Some energy efficient food sources to consider are:

  • Fruits/Vegetables – Obviously, having these dehydrated will lighten the load and give you something nutritious to snack on. Keep in mind  that dehydrated foods can last for 12 months or longer, provided they have been stored properly. Pack fruits and vegetables that are the most calorie dense. Look for small boxes of dried fruits for easy meal assembly.
  • Whole vs. White – We all know that whole grains are better for you. But did you know that they keep you fuller longer. Also, whole grain breads with seeds and nuts can provide added nutrition. Look for whole grain pancake mixes, crackers, pastas and bread to get good sources of whole grains.
  • Nuts – This food source is one of the most nutrient dense foods and is also full of fiber to help you stay full longer. Due to the high protein count of these lightweight nutrition powerhouses, can be an efficient meat replacement. Look for non-salted nut varieties to keep you hydrated longer.
  •  Meat Source – Protein sources are imperative during an emergency and can also cut down on stress. The amino acid in meat, specifically Tryptophan, binds to protein and becomes a precursor for the neurotransmitter serotonin. Increased levels of serotonin may help you cope with stress. Freeze dried meats or TVP (textured vegetable protein), dehydrated meats or canned meats of beef, chicken or tuna would be good choices to add to your pack.

According to the FDA, for a normal adult’s 2,000 calorie meal plan, 45 to 65 percent of your daily calories should come from carbohydrates, 20 to 35 percent of your calories should come from fats, and 10 to 35 percent of your daily calories should come from proteins. This chart can help in researching caloric needs based on gender and ages. Keep this in mind and adjust your dietary intake accordingly to maintain proper energy requirements.

Below is a list of suggested meals a person could carry in their bug out bag. This is not meant to be comprehensive but a guide to show what types of foods you should consider for your diet. These foods are light weight, easy to prepare and will provide essential calories and energy.

Day 1

Breakfast – 2 cups oatmeal with raisins and 1 cup reconstituted dry milk powder
(calories: 568, fat: 8 g, carbs: 108 g, protein: 28 g)   

Snack: 2 bars Datrex 3600 survival bar (you can make your own but only about 2000 calories)
(calories: 400, fat:, 17.4 g, carbs: 49.4 g, protein: 5.6 g)   

Lunch – Chicken flavored Ramen noodles with dehydrated vegetables
(calories: 246.7, fat: 4.7 g, carbs: 27.3 g, protein: 9.3 g)  

Snack – 1 package of whole grain crackers and peanut butter with dried apples
(calories:  310, fat: 9 g, carbs: 23 g, protein: 5 g)

Dinner – 2.5 cups chicken and rice a roni casserole, rehydrated
(calories: 545.8, fat: 9.2 g, carbs: 75 g, protein: 40.8 g)  

Total Daily Nutrition of Day 1:

calories: 2,070.5, fat: 48.3 g, carbs: 282.7 g, protein: 88.7  g

Day 2

Breakfast – 1 cup dry raisin bran cereal with reconstituted dry milk powder and 1 ounce of walnuts
(calories: 390, fat: 11 g, carbs: 66 g, protein: 14 g)  

Snack –   8 graham crackers with 4 tbsp peanut butter and 1 box of raisins
(calories: 646, fat: 35.2 g, carbs: 69.6 g, protein: 19 g)

Lunch – 1 pouch of StarKist Chunk Light Sandwich Ready Tuna Salad, 15 Kashi wheat crackers
(calories: 230, fat: 6 g, carbs: 26 g, protein: 16 g)

Snack – Luna fiber bar and Carnation Instant Breakfast drink 
(calories: 440, fat: 10 g, carbs: 67 g, protein: 23 g)

Dinner – Dehydrated bean chili and cornbread , reconstituted and and 2 soft oatmeal cookies
(calories: 605, fat: 64 g, carbs: 106.8 g, protein: 15 g)

Total nutrition of Day 2:

calories: 2311, fat: 126.2 g, carbs: 335.4 g, protein: 87 g

Day 3

Breakfast – “Just add water” whole wheat pancakes, 1/4 cup of dried blueberries, 2 maple syrup packets, hot chocolate with reconstituted dry milk powder
(calories: 506.7, fat: 3.7 g, carbs: 113.2 g, protein: 11.7g) 

Snack – 1 ounce walnutsdried apples and 8 graham crackers
(calories: 400, fat: 13 g, carbs: 36 g, protein: 4 g)  

Lunch – 1 pouch of StarKist Chunk Light Sandwich Ready Tuna Salad, 15 Kashi wheat crackers
(calories: 230, fat: 6 g, carbs: 26 g, protein: 16 g

Snack: 2 soft oatmeal cookies and Carnation Instant Breakfast drink
(calories: 560, fat: 10 g, carbs: 66 g, protein: 16 g

Dinner – Canned Stew  and 14 Kashi crackers
(calories: 370, fat: 14.5 g, carbs: 44 g, protein: 18 g)

Total nutrition of Day 3:

calories: 2,470, fat: 47.2 g, carbs: 285.2 g, protein: 65.7 g  

Don’t Forget These Considerations

Bear in mind that beverages are not listed and adding powdered drink mixes or vitamin powders to water, will increase your calories and some  daily nutritional content. Above all, you must have water and/or a means to filter it as many of the meals will require some sort of water for preparation.

Did you know that a staggering thirteen vitamins are considered necessary to perform crucial functions in the body?  Ensure your body is getting an adequate amount of vitamins through your food source or play it safe and pack a few multivitamins in your pack.

Another  point to consider is to make sure the meals you pack are realistic and can carry you through 72 hour period. Practice or run a 72 hour drill to see how long you can last on your bug out rations. After all, you want to feel confident in the preps you have.

Although your main priority is to keep the weight of your 72 hour bag down, you want to  have a way to prepare meals. This can be as simple as having a folding stove, a camping stove or if you plan on cooking over a fire, a way to light the fire.

To conclude, the best way to prepare for a disaster is to plan for it. Research the nutritional aspects of the foods you want to pack and get a list together of what items you need. Once you do this, make a point to put them in or near by your bug out bag. The only way you will feel confident in a bug out situation is to know that you have all you need to survive.

Start now to make sure you are staying prepared.


Via: readynutrition


Save pagePDF pageEmail pagePrint page

Emergency Evacuation Checklist

Time is of the essence when an emergency evacuation is concerned. You may only have a matter of minutes to escape your home, and if you aren’t prepared, then crucial information and supplies could be left.

Whether you are evacuating due to a wildfire or hurricane, having a checklist to run through will keep things organized and running smoothly so you can evacuate swiftly.

Before You Leave

Fill your gas tank.

Charge your mobile phone.

Take cash, checkbooks and credit cards.

Take a back-up of your hard drive or computer files.

Get a map of your emergency route and have a plan B in case the orginal route is blocked.

Identify stopping points on your emergency route (gas stations, restaurants, etc).

Contact your emergency contact.

Take your G.O.O.D manual.

Take your 72 Hour Kit.

Evacuation Disaster Kit

Have These Items Inside the Car:

Emergency phone numbers

Drivers license or ID card

Insurance information

Updated pictures of all family members

Passport

Money and credit cards

Proof of residence (utility bill, home deed, etc).

Prescriptions or medication

Flashlights

Mobile phone charger or car adapter

Food and drinks (extra water just in case).

Glasses

Things to keep children busy (puzzles, books, drawing pad and pencils).

Papertowls in case of a spill.

If You Have Not Prepared a Vehicle 72 Hour Kit, At Least Have These Items In The Trunk:

Batteries

Clothing for the season

Toiletries (toilet paper, soap, razors, etc).

First aid kit

Bedding

Paper products

Tool kit

Fix-a-flat

Disaster food supply

Battery operated radio

Papertowls in case of a spill.

10 gallons of gasoline


Start now to make sure you are staying prepared.


Via: readynutrition


Save pagePDF pageEmail pagePrint page

EMP Threat: ‘Within One Year 9 Out of 10 Americans Would Be Dead’

A spokesman for the Center for Security Policy says that the threat of Electro Magnetic Pulse (EMP) is real. With Iran developing multi-stage Space Launch Vehicles (SLV) the possibility of such an attack will become even more probable than ever before:

From WND:

And experts forecast if such an attack were a success, it effectively could throw the U.S. back into an age of agriculture.

“Within a year of that attack, nine out of 10 Americans would be dead, because we can’t support a population of the present size in urban centers and the like without electricity,” said Frank Gaffney, president of the Center for Security Policy. “And that is exactly what I believe the Iranians are working towards.”

A recent launch of an SLV by Iran has sparked renewed concern of an attack that could send an electromagnetic pulse powerful enough to wipe out computer controls for systems on which society has come to rely, officials say.

As the G2 Bulletin reported last week, Ronald Burgess, director of the U.S. Defense Intelligence Agency, revealed that Iran successfully launched a multi-stage SLV, the Simorgh. The device ultimately could be equipped with a nuclear bomb, which the U.S. intelligence community assesses Iran is developing.

Officials also report Iran has been testing detonation of its nuclear-capable missiles by remote control while still in high-altitude flight. The development makes a potential EMP attack on the U.S. more probable.

An enemy of the United States, be it Iran, North Korea or a terrorist organization, does not need to detonate a nuclear weapon on the ground.We believe this is the only reason why Iran would be testing SLV’s with in-flight detonations. With this kind of weapon, Iran (or anyone else) would simply need to strike first. Once the weapon goes off, it would be difficult to determine from where it came and to respond appropriately, as all forms of traditional communication would be wiped out.

A small-scale, five to ten kiloton weapon detonated 200 miles above Nebraska, or a few weapons detonated 50 miles or so above the eastern, western and central United States would do the job.

The effects would be nothing short of disastrous – literally the end of the world as we know it.

All unprotected and unhardened electrical devices would be left useless.

This means that everything, from the refrigerator in your kitchen to the semi-trucks that carry food across the country, would be non-functioning.

If an enemy of the USA wants to bring America to its knees without rendering the land completely useless, they could do so with an EMP weapon.

We’ve always believed that a mainland invasion of the United Stated would be difficult, if not impossible. But, if an EMP weapon were to be used, our country could effectively be invaded within a matter of months, as most of the population would be wiped out and the government and military infrastructures in disarray.

We consider EMP as one of the most significant threats out there. The recovery period from a collapse of this magnitude would be counted in decades, not years, thus, for those who are “prepping” for a worst-case scenario, consider long term sustainability planning when planning for an EMP SHTF scenario.

Recommended Research:

One Second After by William Forstchen

Jericho TV Series (Available on iTunes)

Patriots by James Wesley Rawles


Start now to make sure you are staying prepared.

Via: shtfplan


Save pagePDF pageEmail pagePrint page

How To Tie A Butterfly Knot

It occurred to me the other day that I use the butterfly knot very frequently. In truth, it’s one of my favorite knots. I use it for everything from securing a ridgeline for a shelter to making an improvised traction splint to treat a broken femur.

The butterfly knot, or butterfly loop as it is also called, forms a fixed loop along the length of the rope. It will handle tension in all three directions and doesn’t jam very easily. One of the more unique uses of this knot is in isolating a damaged section of rope.

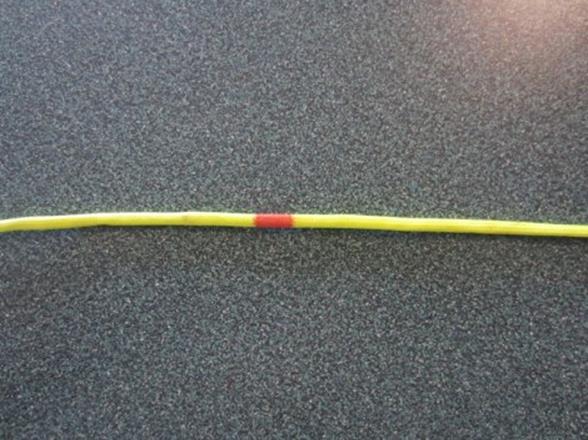
It’s not very difficult to tie, so why not learn this handy knot right now? I’ve colored a piece of the line red to help you keep track of how the knot is tied.


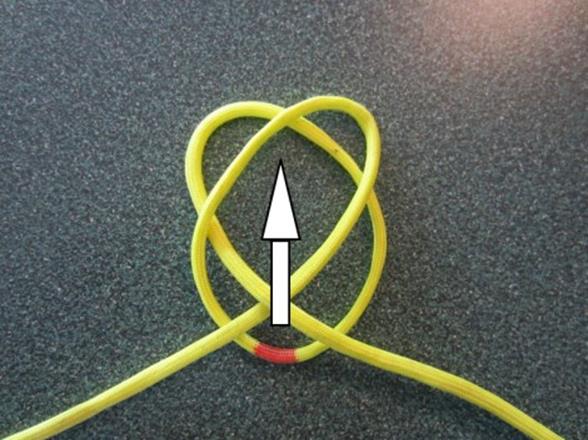
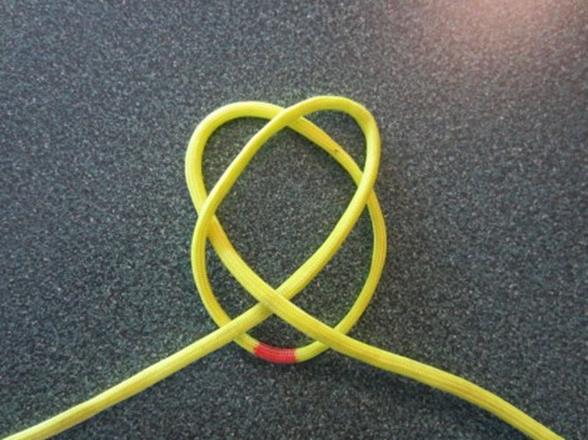
The first thing you need to do is turn the line twice, in the same direction, forming a figure 8.


Now fold the top loop down, behind the rest of the line.


Now pull the red portion of the line up through the center.


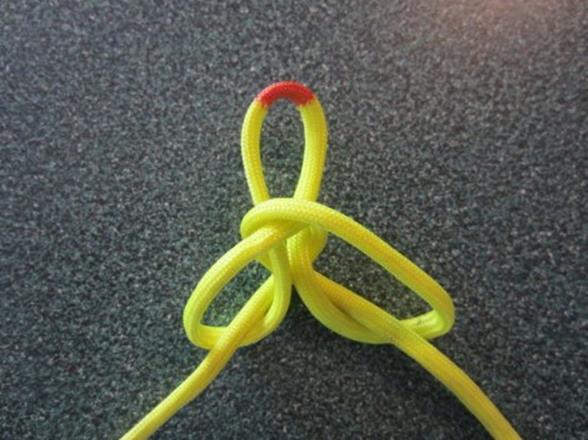
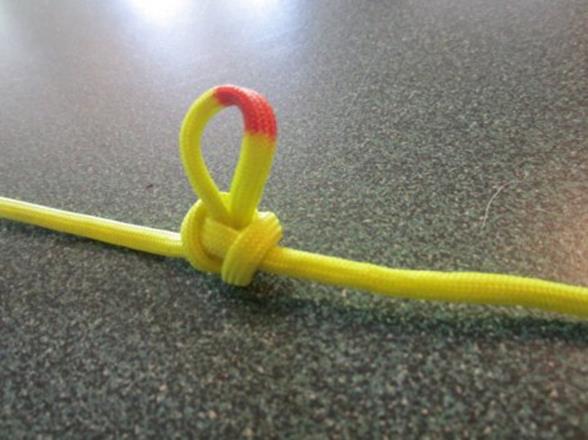
Which should look like this…


Finish the knot by pulling the line taught on both sides.


And there you have it! There are other ways to tie this, but this is the way that I’m most familiar with.


Via: survivormedic


Save pagePDF pageEmail pagePrint page

Simple Care and Prevention for what Everyone Gets – Blisters

There is a single vicious ailment that can kick even the toughest outdoor athletes out of the woods and back into their homes, defeated and frustrated. Friction can be man’s worst enemy in multiple activities and in many ways. We won’t get into them all, but it is important to talk about one of friction’s most aggravating results: Blisters.

Anybody who has had to deal with deep blisters knows how incapacitating they can be. Whether your whole foot has been a raw, pus-filled mess, or you’ve had a small, freckle of a blister that caused you immeasurable pain, following the simple steps listed below will help alleviate and hopefully prevent the friction bubbles we fear so much.

Picking The Right Shoes

Blister care starts with prevention, and the most important thing in preventing blisters is having the right shoes. For many years, popular belief was that a fortified tank of a book will prevent exposure from the elements ant thereby preventing blisters. But if you’ve ever worn waterproof, leather boots on a long hiking trip, you know this isn’t entirely true. Instead, choose a more light-weight shoe that allows your foot to do what it was designed to do, and unless you’re climbing to the peak of a glacial mountain, consider not going water-proof, and instead, give your feet some air. Above all, never wear cotton socks, and never enter the woods with a pair of shoes that still have the price tags on, you’ve got to break those suckers in!

Lube ’em Up

Once you’ve carefully selected your foot-ware, given it some action, and softened the interior a bit, you may still want to take some precautionary measure to avoid developing any hot-spots. It’s a good idea to apply some petroleum jelly, bag balm, or lubricant-of-your-choosing to your entire foot before putting on your socks. It feels gross, and your feel will be greasy for quite a while, but this easy step will make any movement within your shoe well-oiled instead of rough and irritating.

Popping

Sometimes you do everything you can in order to prevent unwanted pain only to be burdened with a bulbous, red bubble of raw skin making you limp at every step. Once you realize that you’ve got to take care of an existing blister, you have to be very careful; Not because it hurts to pop them (don’t be a wimp!), but because if you do it improperly, you can infect the blister, which is a much bigger problem. You’ll need to relieve the pressure of the blister by draining the puss (it can be nasty). To pop a blister, use a needle, or if you don’t have one, use the tip of your knife. Sterilize the needle by holding it in a flame or with your handy hand sanitizer, then make a grimace and stab yourself in the foot (carefully though, on the side of the blister). You want to make a small, shallow hole by which to push the puss through.

Wrap ’em Up

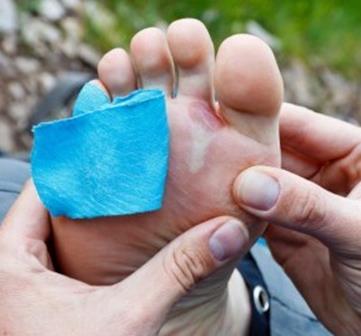
To prevent infection, it is important to properly cover up your foot-wounds. There are many products on the market that are designed to cover and care for your developed blisters. Moleskin blister pads are widely used as the go-to blister treatment. Moleskin is a thick tape that is place around the affected area with a hole cut in the center. It is effective by elevating the surface around the blister so that the blister itself has less contact with the inside of the shoe. If you don’t have moleskin in your first-aid kit, a Band-Aid will usually do the trick. Just remember to put some antibiotic ointment on the blister first and when you’re done, wrap them up with extra medical tape or duct tape. You don’t want anything getting in there!

Via: wengerna


Save pagePDF pageEmail pagePrint page

Prepper Priorities–Feet

As preppers we often spend hours upon hours putting together our bug out bags and battle plans in the event we need to rely on them in a SHTF situation. However when it comes to discussing prepper priorities, one of the first areas we should consider is our feet. Taking care of our feet should be at, or close to, the top of the prepper priorities list. Many of us have plans in place that include bugging out via automobile or by some other method of transportation, a bicycle, a horse, or what have you. Even though this is what we would like to use as our primary method of evacuation, several problems could arise that compromise the original escape vehicle and/or route, in which case we will undoubtedly be left to forge forward on nothing more than our own two feet. When all else fails, our feet, our desire to survive and our ability to function will be the only things we have available to us to get us to where we want to be.

BIN:

“Living and thinking on your feet also means knowing how to look after your feet. In the army, foot protection and hygiene is taken very seriously. Even something so small as a blister can incapacitate a man and leave him unable to walk for days – or even weeks if the wound gets infected. This is something which a prepper simply cannot run the risk of. Without the use of our feet we will become vulnerable to attack, and will be less able to find food and shelter, let alone escape from hazardous situations.”

As a former member of the U.S. Armed Forces I can attest to the fact that feet are a top priority for any and all infantrymen and soldiers. Although these individuals may not subscribe to a survivalist mentality in the same sense that we do, this aspect is still at the top of their prepper priorities list. The military has learned over the course of history and battlefield environments, that a soldier with bad feet is an ineffective tool for winning a war. As part of your prepper priorities it would be wise to develop a care program to take care of those little piggies.

BIN:

“Looking after your feet in an emergency situation will be much easier if you’ve developed the habit beforehand. Make caring for your feet part of your daily routine – invest in clean socks, wash your feet daily and make sure that you are wearing shoes which support both your feet and ankles. This won’t weaken your feet. Instead, it will help to ensure that your feet and ankles don’t sustain any injuries which might slow you down when the SHTF.”

Your feet should be looked at as if they were the only option available for ensuring your safe passage from home to safe haven. You may have other prepper priorities you consider to be important and rightfully so, but your feet are what is going to keep you mobile in the worst of situations, so start taking care of them now.

Via: survivalist


Save pagePDF pageEmail pagePrint page

How to Treat Minor Injuries Without a First Aid Kit

Everyone should have a first aid kit somewhere in their house and/or car if possible. However, if you find yourself in extenuating circumstances, there are certain things you should still be prepared to do.

It’s worth pointing out that nothing stated here is an acceptable substitute or a replacement for having proper first aid gear and training. Treating burns, broken bones, or bleeding without proper equipment should be the backup of your backup of your backup plan. That being said, planning for every contingency is just good practice. So if you find yourself in the middle of the woods without your first aid kit, and obvious exits are North, South, and Dennis, here’s what to do.

Stop Bleeding Without Bandages


If you’re dealing with smaller cuts and scrapes where blood is flowing, the first order of business is to clean the wound. Wash it off with any clean water source you have available. Next, you’ll want something to soft and absorbent to place on the wound. Paper towels and napkins can do, as well as strips of clothing if they’re clean. It’s important to make sure you don’t infect the wound you just cleaned. For tiny cuts, you can also use super glue to quickly seal the fleshy fissure.

Also, if you’re in a pinch, you can use tampons in place of cotton balls. In what may be one of the most obvious-once-you-think-about-it hacks, tampons happen to be very good at soaking up blood. They’re also useful for nosebleeds if you don’t have any other options laying around.

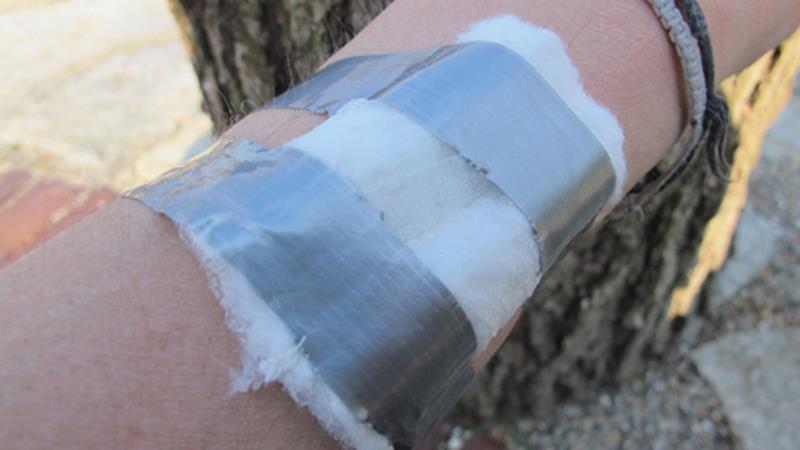
Once you’ve found a good absorption pad, you can use any form of tape to adhere the pad to the wound. If you don’t have any tape, tie a piece of cloth tightly around the wound. Be careful not to cut off circulation, or make the knot too tight.

For larger wounds, you’ll want to skip cleaning the wound, as it’s more important to stem the loss of blood, rather than preventing infection (though both are important). With heavy blood loss, keep the wound elevated above the heart to slow down the flow, apply an absorption pad or your hands if nothing is available directly to the wound, and use pressure points to slow the flow of blood.

It’s extremely important to know when to use a tourniquet. Using one should be a last resort option as it’s designed to prevent death from loss of blood. Improper or inappropriate use of a tourniquet can result in damage to the cut off portion of a body and, depending on how long it’s on, may even result in the need for an amputation. Keep this in mind before applying one.

Stabilize a Broken Bone


Broken bones can be extremely tricky, because you can cause more damage than you fix if you treat it improperly. For closed broken bones—that is, injuries where a bone is broken, but does not break through skin—the first thing to do is stabilize the wound. Do not try to straighten the bone if you can avoid it. While this needs to be done to heal, the bones inside the body are very sharp and can cut blood vessels, muscles, and cause all manner of nasty damage if you try to set the bone wrong.

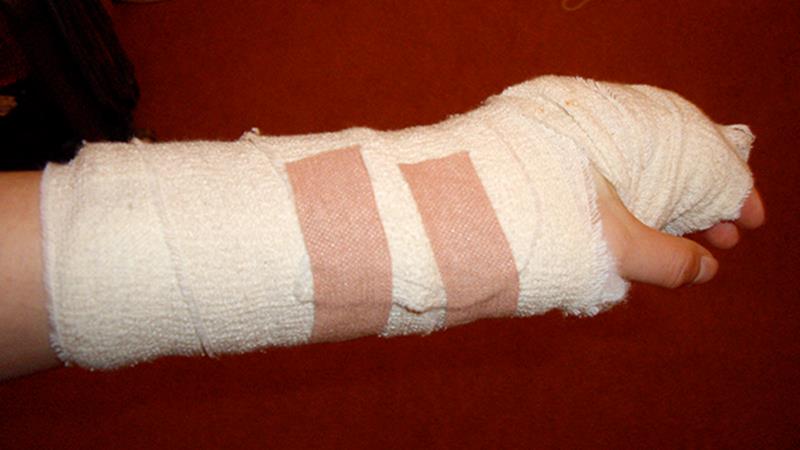
Instead, keep the bone steady. Don’t let it move if you can help it. Try to find something to stabilize the bone. If you’re able to keep the person still and wait for help to come to you, try to keep the wound elevated above the heart to help prevent swelling. When you’re far from civilization, you may need to create a splint using straight and sturdy sticks, fastened with rope or fabric to keep bigger breaks steady.

As much as possible, try to ice the break. This will help keep swelling down and prevent further internal damage. Place ice in a bag—never directly on the skin—and keep it on for twenty minutes, then off for twenty. Rinse and repeat. Rinsing optional.

Soothe Burns

For minor burns, the first thing you want to do is cool the affected area. Burns retain a lot of heat (for very obvious reasons) so the first thing to do is reduce the heat before more damage is done. Run the burned region under cool (but not freezing) water.

Once the burn has cooled down, you’ll want to wrap it in something protective that won’t stick. You want to give the burn enough air to breathe and keep any loose fibers or foreign objects from getting in it. Gauze is ideal, but you don’t have any on you, right? In place of that, again paper towels or a clean cloth will work.

For second-degree or higher burns, try to get professional medical help as quickly as possible. Very small second-degree can be managed without help, but anything larger than a couple inches should be treated professionally as soon as it can. If you’re dealing with a chemical burn, also be sure to clean off the burning chemicals. Use like methods to do the cleaning, too. If it’s a dry powder, use a dry brush to clean it off. If it’s a wet chemical, run it under water to rinse it off.

Relieve Pain Without Medication

Pain relief is going to be a very subjective case. Without medication or sedatives, treating pain for things like broken bones won’t be very feasible. For minor pain like headaches or soreness, there are ways to minimize pain, or just generally keep your body healthy enough that it stays out of pain in the first place.

For starters, stay hydrated. It should go without saying, but we need plenty of water to live well. When you don’t get enough fluids, muscles dry out, joints get creaky and your whole body gets tense. Water isn’t a pain reliever in the same way aspirin is, and you can’t just chug a gallon to make your sore back go away, but by getting into the habit, you can reduce long-lasting pain.

Another alternative is copious amounts of vitamin C. Several studies examining cancer treatments found that high concentrations of vitamin C can help reduce pain. Consuming extra vitamin C can sometimes help. A lack of vitamin D can also cause some pain, so look into eating some food rich in vitamin D as well.

Keep in mind, you’re not popping pills to immediately reduce pain, you’re treating underlying causes to make your body more healthy. If you’re in pain, you might be able to get some small relief immediately, but more than anything you’ll be helping your body be in a better condition to feel better overall.

Of course, if you’re reading this now and no one around you is bleeding, in pain, or has broken bones, chances are you have time to prepare properly. There are plenty of guides out there for putting together first aid kits, so take a look at those. Also, the Red Cross offers an app with plenty of emergency first aid instructions and contact information, so download it and keep it handy.

Via: lifehacker


Save pagePDF pageEmail pagePrint page

How to set a broken bone in an emergency

Obviously, if you have a broken bone, you’ll want to go to a professional to have the bone reset.

However, imagine that you are out hiking or are in an emergency situation, and you break a bone. What can you do to set the bone or at least hold it in place until you can get some help?

Fractures
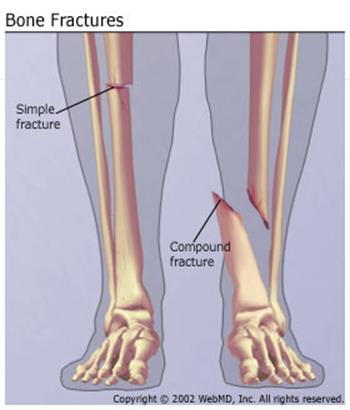
There are two types of fractures – open and closed. Open fractures typically have a bone protruding through the skin and includes an open wound. A closed fracture has no open wound.


If you have an open fracture, it is recommended that you manipulate the injury as little as possible. This is due to the fact that you can mess up nerve and blood vessels.

If you notice that there is a lot of swelling, numbness or discoloration below the break, this may be a sign that a major blood vessel has been severed. If this is the case, you’ll need to control the internal bleeding, allow the person to rest and provide them with lots of fluids.

If you feel that you need to quickly place the bone back in position you can use a tree notch to assist you in holding your arm in place while you adjust.

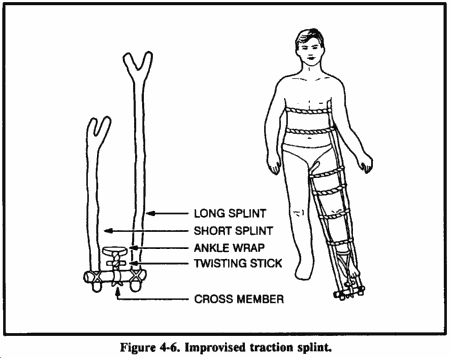
If the broken bone is in a very muscular area (ie. thigh), you’ll need to create a splint until you can get some help. Here is an example of a splint that you can make in the wilderness:

  • Get two forked branches or saplings at least 5 centimeters in diameter. Measure one from the patient’s armpit to 20 to 30 centimeters past his unbroken leg. Measure the other from the groin to 20 to 30 centimeters past the unbroken leg. Ensure that both extend an equal distance beyond the end of the leg.
  • Pad the two splints. Notch the ends without forks and lash a 20- to 30-centimeter cross member made from a 5-centimeter diameter branch between them.
  • Using available material (vines, cloth, rawhide), tie the splint around the upper portion of the body and down the length of the broken leg. Follow the splinting guidelines.
  • With available material, fashion a wrap that will extend around the ankle, with the two free ends tied to the cross member.
  • Place a 10- by 2.5-centimeter stick in the middle of the free ends of the ankle wrap between the cross member and the foot. Using the stick, twist the material to make the traction easier.
  • Continue twisting until the broken leg is as long or slightly longer than the unbroken leg.
  • Lash the stick to maintain traction.

Note: Over time you may lose traction because the material weakened. Check the traction periodically. If you must change or repair the splint, maintain the traction manually for a short time. (Courtesy of Wilderness Survival.)


Dislocation
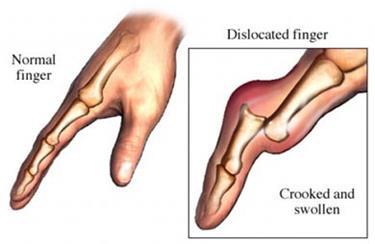
Dislocated bones are when bone joints have been separated. They can be very painful. They can push against nerve and blood vessels causing nerve tenderness and your circulatory system to have trouble.

You can tell if you have a dislocated bone because it will be tender along the joint, have swelling, discoloration, limited range of motion and sometimes deformity.

You can use simple weights to pull the bones back into place. If done properly, the pain should decrease and allow for natural function and circulation.
After you place the bone back in place, you should leave it immobilized for a few days. You can create a simple splint – holding the area in place to ensure proper healing.
Video


Please remember that these techniques can be used in extreme situations and we recommend that you seek out professional assistance if it is available.

Via: thereadystore


Save pagePDF pageEmail pagePrint page