We have an abundance of milk and eggs on our farm due to our milk cow and flock of laying hens. Production slows down a bit in the winter, but in the summertime we run two fridges just to keep up with it all!
I’m desperate to turn my second fridge into a cheese cave, so I began trying to find some different ways to preserve the precious bounty that would free up my fridge and also tide us over in the winter months.
To Freeze, Can, or Dehydrate?
I focused on freezing, canning, and dehydrating to preserve eggs and milk. Instructions for completing each method, pros and cons, my recommendations, and pictures of some of the results are below. This way, you can decide which method would be best for you and your family, and your food storage needs. Even if you’re not trying to free up a second fridge, you never know when there will be a power outage. Not depending solely on your refrigerator is important!
Freezing: Takes up a lot of space in the freezer, but prep is quick and easy
Freezing is the least time-consuming method for long-term storage, but it is also the most energy dependent one. Eggs and milk can be frozen in many different containers: freezer bags, jars, plastic freezer containers and they perform much like the fresh version when thawed and used. If you are using farm fresh raw milk, freeze the cream separately. Once thawed, the cream will sit on top of the milk in flakes and the two will not mix together, no matter how hard you shake the jar!
To freeze milk, simply pour it into your chosen container, leaving room for the milk to swell. My container of choice are Ziploc freezer bags. I pour 1/2 gallon of milk in a 1 gallon freezer bag and lay flat in the freezer until frozen solid so they will be easy to stack.
Preparing eggs to be frozen is also extremely quick and easy. Simply break them into a bowl, beat to combine the yolks and whites or push through a strainer and pour them into your container and freeze. To save space, I pour the eggs into an ice cube tray and, once frozen, remove them from the tray and place in a freezer bag.
1 “egg cube” = approximately 1 egg
3 tablespoons frozen, thawed egg = 1 whole fresh egg
2 tablespoons egg white = 1 egg white
1 tablespoon yolk = 1 egg yolk
Canning Milk and Eggs: Works great for milk, but eggs turn green
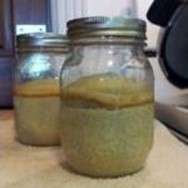
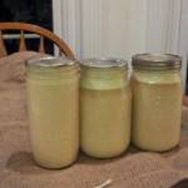
I have canned milk for quite a long time and used it with much success; the result is most like the evaporated milk that you can purchase at the grocery store. It has a slight caramel color and tastes most like fresh milk when diluted 1/2 and 1/2 with water.
Canned Eggs
I was, however, very leery about canning eggs. I’d never even heard of canned eggs! When I started doing some research, I found some references to them and pieced together some basic instructions for both water bath and pressure canning eggs. Those instructions warned that the eggs will swell quite a bit while processing and will turn green after sitting on the shelf, and, yes, they do. In fact, they turned green while they were canning, much like over-cooked hard-boiled eggs.
Not knowing how much they would swell, I only filled my jars about half full to make sure they didn’t overflow while canning. As a result, I couldn’t can them in a water bath; the jars had too much headspace and floated to the top of the water in the canner.
If canning eggs was the only method of preserving available to me, I would might experiment with different pressures in the canner, different head-space levels, etc. to get it just right, but, to be honest, I just don’t think I will use this method in the future.
Because there are no safety guidelines for canning eggs, and I cannot recommend it. Eggs can be pickled, which is another option if you have lots of eggs. Here is some basic information about preserving pickled eggs.
The instructions below for canning milk are basic and require some canning knowledge to complete:
How to Can Milk in a Pressure Canner:
-
Fill pressure canner to fill line with tepid water. Do NOT pre-heat the canner, leave the stove off while you prepare the jars.
Canned Milk
- Pour milk into sterilized jars, add warmed lids and rings. (It isn’t necessary to warm the milk before adding to the jars.)
- Place jars of milk in pressure canner and attach canner lid. Turn the stove onto a med-high heat and allow the canner to heat and the steam to vent for ten minutes.
- To safely can your milk, refer to this chart for proper altitude adjustment. For my altitude, less than 1000 feet, I place the 10lb weight on my canner and let pressure build just to 10 lbs.
- Turn the stove off and let the canner de-pressurize naturally. Remove jars and set on a towel on the counter to cool.
- After 24 hours, remove rings and check seals.
Dehydrated Milk and Eggs: Great Long-term Storage Option Using Minimal Space
Powdered eggs don’t sound appealing, but when reconstituted, have a taste and texture very similar to fresh or frozen eggs. You can beat the eggs together and dry them or dry the whites and the yolks separately. Reconstituted eggs can be used the same as fresh eggs. You can even use the dried egg whites to make a nice fluffy meringue!
I dried a dozen eggs and blended them into crumbles and they fit into a 12 ounce jar. If I had blended them even more, into a powder, I’m sure I could fit that whole dozen into a 1/2 pint jar. That would be 4 dozen dehydrated eggs per quart jar. Great use of space!
The only downfall to this method is the amount of heat that the dehydrator puts out. In the hot summer months, it might be a better idea to freeze the eggs and then thaw and dehydrate them when it is cooler outside (especially if you don’t have an air conditioner in your house).
1 tablespoon powdered egg + 1 tablespoon hot water = 1 egg
I have not attempted to dehydrate milk at home, but before we had our milk cows I always kept a couple boxes in my pantry for emergencies.
How to Dehydrate Eggs:
- Line the trays of your dehydrator with parchment or wax paper, folding up all the edges to form a tray so the liquid eggs won’t slide off and make a mess.
- Break your eggs and stir to combine, or separate them and dry the whites and yolks on two different trays.
- Slowly pour the egg onto the tray, moving your bowl around so as not to pool them in the middle. I also used a spoon to spread the eggs to the edges of the tray. You will want a very thin layer so they dry evenly.
- Dehydrate at 135 degrees for 6 to 8 hours or until no moisture is left. It took about 6 hours for a dozen eggs on one tray to fully dehydrate in my Excalibur 9 tray model. I stirred about halfway through as a skin had formed on the top and the outside edges.
- Once dried, you can crumble the eggs up and store in a jar with a tight-fitting lid or grind or blend the crumbles into a powder. I put the egg crumbles in the blender and ground them up.
- To use, reconstitute with hot water then cook as normal. When using for baking, simply add the powdered eggs with the dry ingredients and add the same amount of water with the wet ingredients.
Which Method Will You Choose?
After my experimentation with all of these different methods to preserve eggs and milk, I will most definitely continue to can my extra milk in jars. However, as soon as I can keep our 2nd fridge free of the over flow, I will start cheese-making again. Dehydrated eggs are my choice for putting those up. I can’t say that I will want to eat them as scrambled eggs in the winter all of the time, but I am really excited about having an abundance available for all of my holiday baking!
There may be links in the post above that are “affiliate links.” This means if you click on the link and purchase the item, I will receive an affiliate commission, which does not affect the price you pay for the product. Regardless, I only recommend products or services I use personally and believe will add value to my readers.
Start now to make sure you are staying prepared.
Via: thesurvivalmom


 Follow
Leave a Reply