Monthly Archives: June 2014

Knockout Game Popping up Again throughout Country: Gangs attacking Innocent people on the Streets

A disturbing and brutal game, that became popular among teenage gang members in urban cities last year, is sweeping the streets again as teenage thugs target innocent victims across the country.

Last week in Upper Darby, Pa., four teens viciously attacked a 58-year-old homeless man and then posted the video to Facebook, a disturbing trend that has the so-called “knockout game” popping up again throughout the country.

The crime, which was originally connected to gang initiations, has spread outside of the gang world with people now seeking fame by posting videos of these vicious attacks on social media. With social media and other forms of video sharing, teens with no gang affiliation are now taking part in this disgusting trend.

The Knockout Game gained notoriety last year as teenage thugs began stalking innocent people on the streets and then viciously attacking them in an attempt to knock them out with a single blow. The game, which was responsible for numerous deaths last year, has taken on an even uglier aspect with many now taking to social media to brag about their crimes, and post videos of their vicious attacks.

After two “Knockout Game” attacks left a number of people in Baltimore, Maryland seriously injured this month, the city’s mayor Stephanie Rawlings-Blake is calling for parents to become more involved in their kids’ lives.

She told reporters today that, “They don’t understand the consequences, if you knock someone out, you could think it’s a joke and you’ll hurt somebody — that person could die. And then your life is ruined for some stupidity that you and your friends think is fun. It’s just not worth it.”

Sadly – something politicians like the mayor of Baltimore fail to understand – is I believe these kids know exactly what they are doing; they just don’t care about the consequences. We are living in a time where a large portion of this country’s youths don’t value life or care about the consequences of their actions. In fact, they’re so proud of what they’re doing they’re now using the internet to tell everyone about it.

Protecting yourself from these types of attacks:

Consider carrying a firearm: In my opinion, these types of crimes highlight the very real need to carry a firearm. When you have a whole generation of people not only entertaining themselves by watching these videos online, but also taking part in the attacks so they can gain some sort of fame, we have a problem that’s not going to get better anytime soon.

Study the art of Self Defense: Being prepared means being able to defend yourself from an attack, and thanks to our wonderful society it also means knowing how to survive an attack that may come from a number of attackers at the same time.

Situational Awareness: Being able to protect yourself begins with having a good sense of what’s going on around you. That means putting down the phone and paying attention to your environment. As I suggested in a previous article, about protecting yourself during a flash mob situation, being keenly aware your environment is one of the most important safety precautions you can take in any situation.


Start now to make sure you are staying prepared.


Via: offgridsurvival

Iraq: From Bad to Worse – Crisis Creates Unprecedented Threat to America

Iraq: From Bad to Worse,
U.S. Poised for Military Action

June 28, 2014

Between June 24-26, 2014, AlertsUSA issued the following
related Flash messages to subscriber mobile devices:
6/26 – DoD reports armed US drones now flying over Iraq for troop protection. 2nd Marine amphibious assault ship with hundreds of addl troops headed to Persian Gulf.

6/24 – BBC reports (and Pentagon denies) launch of new air strikes in Iraq. Indicates ISIS positions attacked by US drones near the Iraq-Syria border. Developing..

What You Need To Know
On multiple occasions this week AlertsUSA subscribers have been notified via text messages to their mobile devices regarding new expanding U.S. military efforts in the Middle East. Late Friday the Pentagon announced that armed U.S. drones have returned to the skies over Iraq, at least initially, to provide protection for hundreds of U.S. troops on the ground. In addition, a second Marine amphibious assault ship (USS Bataan (LHD-5)) with more than 1000 U.S. soldiers, attack aircraft and helicopters is underway towards the Persian Gulf.

Russia and Belarus Provide Fighter Aircraft

Iraq’s Prime Minister Nouri Maliki blasted the U.S. this week over delays in the delivery of fighter jets previously ordered for the new Iraqi Air Force, saying that the process of buying US jets had been “long-winded” and that the militants’ advance could have been avoided if air cover had been in place.

Out of frustration and perhaps some desperation, the government of Iraq has moved forward with the purchase of used fighter jets from Russia and Belarus to battle Islamist militants. Their arrival is expected within days.

Syria Attacks Targets in Iraq

U.S. officials report that Syria has launched air strikes on ISIS targets in western Iraq earlier in the week in an attempt to slow the al-Qaida-inspired insurgency fighting both the Syrian and Iraqi governments. Conversely, BBC Arabic reports the U.S. also launched air strikes from drones. The Pentagon de

Iran Expands Presence, Masses 10 Divisions on Border

Additionally, Iran’s involvement is also increasing. In an interview this week with several media outlets, Senator Saxby Chambliss of Georgia, a ranking member of the Senate Intelligence Committee, stated that Iran is “playing in a big way in Iraq.” Defense officials state that Iran has massed as many as 10 divisions of regular and Quds Force troops on the Iran-Iraq border and are ready to engage rebels if the Iraqi capital is imperiled or Shiite shrines are seriously threatened. They have also established command, control and signals intelligence units at al-Rasheed airbase in southeast Baghdad to coordinate activity, intercept electronic communications of ISIS fighters and to carry out their own drone operations.

As reported in last week’s issue of Threat Journal, the Iran-Iraq partnership comes about as they are the two primary Shia dominated Muslim countries in the world.

al Qaeda Joins Forces with ISIS, Targets U.S.

Islamist websites are reporting this week that the Syrian wing of al Qaeda known as the al Nusra Front has taken an oath of loyalty to ISIS, as well as formed an alliance with al Qaeda’s Yemen affiliate. U.S. intelligence officials indicate they believe the Syrian-Yemeni partnership is an effort to spread specialized bomb-making knowledge to the many hundreds of rebels fighting in Syria and Iraq holding U.S. and EU passports, possibly with an underlying goal of targeting passenger aircraft.

Readers are reminded that al Qaeda’s Yemen affiliate, formally known as al Qaeda in the Arabia Peninsula (AQAP), is responsible for multiple attempted attacks on commercial aircraft, including the failed Christmas 2009 attempt to bring down an airliner near Detroit by underwear bomber Umar Farouk Abdulmutallab, as well as the October 2010 plot to bring down cargo aircraft using bombs built into printer toner cartridges. In the 2010 plot, two bombs were discovered on two separate aircraft.

Dangerous Ironies

At this point, we hope readers are keying into the multiple dangerous ironies unfolding for the U.S. in the Middle East. On one hand, U.S. military forces are returning to Iraq to assist in the fight against ISIS rebels, many of whom were previously trained and armed by the U.S. for the fight to overthrow the government of Syrian President Bashir Assad. On the other hand, Congress has been asked to provide another $500 million for training and arming even more so called “moderate” rebel fighters rebels in Syria in the fight to overthrow Assad, who is himself ordering air strikes on ISIS rebels in Iraq.

Then there is Russian President Vladimir Putin publicly offering complete support to Iraqi Prime Minister Nuri Maliki, including immediately sending fighter aircraft for the battle against ISIS rebels, while the U.S. government publicly expresses a complete loss of confidence in the [ U.S. installed] Iraqi Prime Minister, saying that he has “got to go,” as well as delaying delivery of fighter aircraft already purchased.

Then there is America’s quasi arch enemy Iran who now has military forces operating in Iraq on a parallel track in the fight against ISIS rebels, as well as islamists in Syria, (some of whom have likely received training and arms from the U.S.), joining forces with al Qaeda in Yemen to develop a new ways to attack the American homeland.

Are you confused as to the overall grand strategy here?

WHAT TO EXPECT

WAR. ISIS now effectively controls at least 1/3rd of the land area of Syria and Iraq with Jordan now being threatened. Far too much hangs in the balance for the U.S. to simply remain in “hands-off” mode. None of this takes into account growing tensions between the U.S. and Russia, or the U.S. and China.

Terrorism. While it is popular to claim that al Qaeda is a CIA creation established with the goal of keeping Americans in a constant state of fear, one thing the CIA did NOT create is radical Islam. The fact remains that this twisted belief system is on the rise worldwide, global domination is their goal, and their weapons of choice are violence and terror. With the epicenter of this belief system located in the Persian Gulf region, and given the increasing number of U.S. and European Muslims responding to the call to join in the jihad, combined with increased sharing of fieldcraft and expertise in asymmetric warfare, it is an inescapable conclusion that there will be more attempted terrorist attacks within the U.S., as well as on American citizens and interests abroad.

None of the above takes into account the impact of weak border security policy on the safety of the homeland… Readers should stand in awe of the fact that the U.S. has not yet experienced additional attacks.

AlertsUSA
continues to monitor developments in the region and will immediately notify service subscribers of changes in the overall threat environment, or additional U.S. involvement, as events warrant.


Start now to make sure you are staying prepared.

Via: alertsusa

3 Ways Prepping Saves Me Money! Prep Without Going Broke!

It’s easy to get overwhelmed by all the new gadgets and gizmos out there tempting you to buy them – and the preparedness industry is no exception. If you’re not careful you could be talked into spending $5000 for a year supply of food, $15,000 for solar panels, and even $36,000 for your very own survival shelter!

Nothing is wrong with any of those things, but it can leave many people ready to give-up before they even start. Too many times we make the mistake of focusing on how expensive prepping is or, even worse, go broke trying to get there.

It doesn’t need to be that way – you can prep without going broke! In fact, it can actually cost you more if you don’t prep! Prepping saves money!

Since our family decided to prep, prices for everything have gone up, but our bills have gone down. We’ve been able to spend less and save more – something that has always been very difficult for us to do.

Prepping can save you money too, and lots of it. Here are 3 of the ways I’ve noticed it’s made a difference in our wallets.

3 Ways Prepping Can Save You Money:

1- Become a Do-It-Yourself Person

I never considered myself a do-it-yourself person, but when you realize you can pay $100 to have someone do something for you, or $1 to do-it-yourself, it just makes sense!

I’ve realized that preppers, on the whole, are very much about learning how to do things for themselves. That’s just part of being prepared. You never know if you’ll need a doctor, mechanic, or a handy-man, or even if they’ll be available if the time comes. You don’t have to wait until a worst-case scenario to use the skills you learn – you can start using them now! This will help you save big, because if you’ve been to the doctor or mechanic lately, they aren’t cheap!

Other than skills, learning to make & fix things can help you too! I’m constantly impressed with all the DIY projects I see people do. There are too many to name, but if you’re interested in making something instead of buying it, I’m sure there is a tutorial out there for you!

Some of my favorite DIY projects
we’ve done include making a rocket stove, building a bow, & even sewing our own poo wipes.
I told you there are tutorials for EVERYTHING!!!

2- Get Huge Savings at the Store

Out of all the areas, the money I save from shopping (or more like NOT shopping) is the biggest! When I say I don’t go to the store often, I’m not talking about only going twice a month, but I’m talking about only going twice a year!

Stocking-up, which most preppers do, can really help you save big! Here are a few ways how:

  • Buy in Bulk – When you’re stocking up on food and supplies you can buy in bulk – and bulk pricing is usually significantly less than buying in smaller quantities.
  • Buy at the Best Prices! – If you’re only buying things a few times a year, you can buy when the prices are at the lowest. Therefore, you’re not stuck playing the grocery store game. You can play the coupon game instead.
  • Save on Gas – When you have everything you need at home, you’re not having to make last minute trips to the store for little things. Depending on how far away you live from the store, this can add up to a lot!
  • Not buying Extra Stuff! Maybe you have control over yourself and your kids when you go shopping, but sometimes I give in – I let them talk me into new shoes or a bag of Cheetos, and I usually find a cute necklace or something for the house. Even those these purchases may be small, they add up when you look at the entire year! Since I rarely go the store now, I’ve noticed my extra spending category has decreased quite a bit. Now if I could just figure out how to stay off Amazon I would be set!

3- Live a Self-Sufficient Lifestyle (instead of a Self-Indulgent One)

One surprising thing I noticed when striving to be more prepared: I stopped caring about keeping up with the Jones’. My priorities and focus definitely took a turn – I believe for the better.

No longer was I working towards a bigger house, nicer cars & more vacations, but instead I started spending extra time and money on starting a garden, learning new skills, and teaching my kids how to prep. One of our new mottos is…

“Use it up, wear it out, make it do, or do without!”

I feel striving towards a more self-sufficient lifestyle helped me to embrace my cheap side and be proud of it! I’m fine with the fact that we don’t have the nicest things and my kids aren’t being spoiled to the max. I feel our society is becoming an entitled one, and I hope to not add to it.

Besides my focus changing, striving to be self-sufficient opened up a whole new world to me. There were so many things that never even occurred to me I could do for myself – grow my own food, raise chickens, make my own soap and laundry detergent, and so much more!!!


Start now to make sure you are staying prepared.

Via: thesurvivalmom

TRU-BORE 12 GAUGE CHAMBER ADAPTER


There is little doubt in anyone’s mind that when it comes to the one-gun prepper arsenal, the shotgun reigns supreme. King of the hill, my boomstick, baby!

If you scroll through the comments, you probably will find mention of a specific item that increases a shotgun’s versatility exponentially – the chamber adapter. Essentially a slug of metal that has been machined into the profile of a shotgun shell, it has a chamber for one of many, many calibers bored out of the middle. It allows you to chamber a different caliber – from .22 Short all the way to a smaller shotgun shell size, say .410 in a 12-ga – and safely fire it in your larger-bore shotgun. There are also chamber adapters for rifles; my brother has one that allows him to shoot .25 ACP out of a .250-3000 Savage. The caliber choices are extensive; pretty much all your standard pistol-caliber rounds are covered, as well as this company making a kit that allows you to shoot .223/5.56mm, 7.62x39mm, and even .308 Winchester in your 12 gauge. Prices range from a few bucks to over $100, depending on if you want a long-“barreled” sleeve-type adapter that’s rifled, or the style that I got, the “snubnose”, if you will.


I’d been wanting to try one of these babies out for some time, so I basically stopped hemming and hawing and grabbed one off Amazon on the cheap. After all, if it sucks, you probably shouldn’t pay a lot for the suck, right? Right. I ended up purchasing a 12 gauge-to-.38 Special/.357 Magnum adapter from Tru-Bore on Amazon. With shipping, it showed up at my door a few days later, for the paltry sum of just over $31. I didn’t expect much, and once I opened that package, I’m glad I didn’t: at first glance it wasn’t terribly impressive. A nicely machined piece of steel, but that was about it. I secretly had hoped it would be rifled, but I knew deep down it wouldn’t be, and I was right. It’s a smooth bore, and it measured out at .360″ inside the bore. Hmmm…a standard .357/.38 bullet is .358″. Sounds to me like an unstabilized bullet….the bullet has .002″ of wiggle room in the bore of the “barrel” of the adapter.


Yup, definitely a smooth-bore! .002″ may not sound like much, but it’s enough to make that bullet bounce around down that bore like a BB in a coffee can, de-stabilizing the projectile. More on that later.


The back of the “shell” is recessed for the rim of the .38/.357 cartridge. It has a little extra room around the rim for a fingernail, knife blade, or some other plucking accoutrement to retrieve the spent empty cartridge from the adapter. (Unfired cases drop in and out with ease, but fired cases expand and stick inside the chamber of the adapter.)

My trusty digital calipers mic the length of the adapter at 2.7315″. With a Winchester .357 Magnum 125-grn JHP measuring 1.5650″, that leaves a “barrel” length of 1.1665″, or just over 1 5/32″. That isn’t much; the average J-frame Smith & Wesson barrel length is about 2 inches. So don’t expect rip-snorting velocities out of the adapter. Sadly, my chronograph is currently being borrowed by a friend, so I couldn’t clock bullet velocities. Future report, I guess; my apologies.


Upon initial inspection, one of the first things I noticed is that the leading edge of the “shell” is very sharp; I took a touch of emery cloth to take the edge off so it wouldn’t scar up the innards of my shotgun. For the first test, I broke open my Winchester 101 over-under shotgun to see how the adapter fit. THUNK…dropped right in the chamber satisfyingly. I went to close the action, and, what do you know? The action wouldn’t shut. I sat there playing with it, and couldn’t come to any real satisfying conclusions as to why it wouldn’t shut. I can only imagine the ejector system may have been causing the problem; break-open guns I tried it on with no ejectors worked fine. It also chambered pleasingly in my Remington 870; I didn’t try it through the action, though, because the weight of the shell plus the sharp edges might have made it catch in the action or jam up. I didn’t feel like disassembling an 870 in a sandpit, so I made a decision to just use it single-shot. It’s not like you’re going to fill the magazine up with these things; the unfired cartridges slide right out without any effort and would surely bind in the magazine and action. This baby is relegated to break-open style guns or single-shot use out of a repeating shotgun.

RANGE REPORT

I couldn’t wait to try this thing out on the range. Reviews I’d read said not expect much in the accuracy department; I didn’t. Lots of factors effected this in my mind: lack of rifling was the biggie, along with the short barrel length, and the lack of precise aiming equipment on the shotgun; all I have on my test 870 is a Meprolight tritium bead. Not exactly a 12 power Leupold…


…but it would have to suffice. With a pistol-caliber cartridge like the .357 Magnum, you have to be realistic: you’re probably not going to be making 100-yard head shots on running antelope. I envision the use of this to be close-range defense to be used in lieu of precious shotgun shells, putting down a nuisance/sick animal perhaps, or one you have in a trap or snare. Maybe with bigger calibers that pack more horsepower, you could hunt deer at close ranges in my mind. But that depends largely on how it performs on target.

My son and I loaded up the gear, and a target stand and some targets, along with a handful of the aforementioned Winchester 125-grn JHP rounds, and a box of .38 Special +P handloads: a 158-grain lead semi-wadcutter (LSWC) at about 850-900 feet per second. After setting up the target stand with targets and getting everything and everyone ready for a hot range, I paced off 10 paces, about 30-32 feet, depending on how sprightly I feel. I slipped in a .38 handload, dropped the works in the chamber of the 870, and closed the action. Everything locked up fine, the shotgun went fully into battery.

I lined up a steady 6 o’clock hold on the target (putting the aiming point of the target directly ABOVE the bead. It makes aiming more precise when your sighting device covers the target) and slowly pressed the trigger. Pop! The round went off, with practically no recoil. It was pretty underwhelming, actually…but hey, there was a hole in the target, surprisingly close to the bullseye, as well! Interesting. I slowly opened the action – the adapter engaged the extractor on the bolt just fine and the ejector popped it out of the ejection port with no fuss.

The fuss came when I tried to use my fingernail to extract the spent case. NOPE. A stiff shake. NOPE. Finally I pulled the felt-tip pen that I was using to mark the target out of my pocket (never did like prying with the point of a knife) and pushed it down the muzzle end of the adapter. With a tap, the .38 case dropped out. Folks, this is definitely not a rapid-fire setup. We eventually settled on a locally-sourced (read: the ground at my feet) free-range organic stick to pop the empties out of the adapter. I will say that after about 50 rounds, the empty cases usually dropped out with a firm shake or a tap on a rock…maybe a little bit of firing residue made the difference?

I repeated the process two more times for a three-shot, 10-yard group:


You’ll notice two things about this group: #1: actually pretty damn good accuracy; far better than I’d expected. The black Shoot-N-C target is 6 inches in diameter, making the 3-shot group under two inches. That’s not terrible, folks: that’s minute-of-rabbit and possibly squirrel if you can get either to sit still long enough to draw a bead and really concentrate on trigger control with crappy shotgun triggers.

The big thing you should notice, though, is that the bullet holes aren’t round. If you look carefully, the bottom two are pretty much exact outlines of the profile of a .38 Special bullet. Yep, they struck the target SIDEWAYS. These bullets are “tumbling”, or spinning end-over-end due to improper stabilization from an oversized bore and no rifling. At 30 feet, this isn’t too much of an issue, however, accuracy will almost certainly degrade very quickly as the range increases. It also means that the bullet will not strike the target nose-on, which is the way bullets are designed to strike; hollow-point bullets only expand if they push into target substrate hollow-point first; same with jacketed soft point bullets. So, you certainly will not get the terminal effectiveness that you could get with a properly-oriented bullet. I COULD make an argument that tumbling bullets will continue to tumble through target flesh and bones (the 5.56mm military cartridge was supposedly designed to do this to help make up for its small diameter), but if I have a dedicated high-performance hollow-point bullet, I’d like it to work as intended. However, knowing that the bullets tumble, I will in the future use heavier, longer full-metal jacketed or all-lead bullets that will be more terminally effective with tumbling. Work with what you got, right?

We stepped back to 15 yards and I let my son give the setup a go.


He thought the whole idea was pretty cool, and really enjoyed the adapter. His groups at 15 yards were almost as good as mine at 10:


Again, a nice consistent tight group, and again, more tumbling. But the accuracy was really far better than I’d hoped for by a long shot. I’d expected the group size to increase exponentially, but it was staying clustered together nicely. So we stepped back to 25 yards, and I got behind the 870 again. I loaded up the Winchester 125-gran JHPs. Holy crap; three shots went into almost the same hole at 25 yards! So, we went back to 40 yards to see how things worked at what I’d previously considered to be “yeah, right” distance. I was getting a bit more optimistic, I will admit.

This time, I sat down to make sure I was getting consistent accuracy with a solid seated position. Again, 6 o’clock hold, really working the trigger produced better than expected results. I fired 5 shots this round.


You can see the .357 25-yard group at upper left; the 5-shot 40-yard group is laid out in thick magic marker outline. We were now getting to be the outside edge of the practical range for the adapter. The group was about 8-9″ across at its widest point; the vitals area of a mature whitetailed deer is generally considered to be about that size. I was very pleased with the group, however. I’d fully expected to be off the paper completely at this distance; yet rather I got a useful-sized group that shows decent consistency reasonably close to the point of aim.

For yuks ‘n’ giggles, we opened up at a large prominent rock at the opposite bank of the sandpit.


Yeah, forget about it. The bullets hit the ground about 6-10 feet in front of the target, and then bounced into the bank in a depressingly huge pattern. Even with the proper holdover to get the bullets to impact the target area, you’d be lucky to hit a 15-passenger van or a literal barn door at 125 yards. At 75 yards you’d be lucky to hit a normal-sized entry door to a house.

CONCLUSIONS

I must say, I was very surprised by this milled-out hunk of steel. I went in expecting this to be a close-to-useless range toy or conversation starter, but ended up walking away thinking there was actually some utility to this chamber adapter.

Granted, you have an envelope to work inside: I’d say 40, 45 yards MAXIMUM is the effective range of this adapter in .357 or .38 Special. Its limiting factor is the short “barrel” length and complete lack of rifling to stabilize the projectile. Sights (or lack thereof) MAY have been holding back the accuracy a bit, but not much. At 45 yards, the bead of a shotgun at a 6 o’clock hold worked reasonably well – and I’d be willing to bet that most prepper-utilized shotguns will have a standard bead-type sight. I have plans in the works to mount a red dot electronic sight to a shotgun soon; I’ll post a report (with velocities) eventually to see if it actually helped.

If all I has was my 12-gauge, you can bet sure as hell that I’d have these adapters in a couple common calibers, such as .22 LR, 9mm, .38/.357, and maybe something like .45 ACP or .44 Magnum. With every adapter you purchase, you increase ammo availability exponentially. Sure, you won’t have a rapid-fire tactical shotgun, but for the guy who owns a farm or who only wants one gun that’s not a “black gun” so he doesn’t cause a stir, this is a great way to increase your effectiveness with a single firearm. I can see the maximum effectiveness with these adapters coming from a break-open type shotgun with no ejectors; if you only have one adapter, you don’t want it to go flinging over your shoulder at high velocity in the woods after you take a shot at the only meat you’ve seen in days. Keep it captive in the chamber (a rubber O-ring system would really help here…hint, hint, Tru-Bore) and have a small flat headed screwdriver or dedicated prying tool to pop the empties out and you’ll up your fire rate quite a bit. This adapter would work out beautifully for the man with a double shotgun: a side by side or over/under. One barrel would have a standard shotshell in case of a flying bird, the other a chamber adapter with a caliber that offers more punch and precision in case of a deer, coyote, or badguy pops up.

There’s really no down side to having one of these and a handful of pistol-caliber cartridges in your shotgun kit. For 31 bucks, it was worth every penny in my book. I reload for the .357 Magnum, and have several handguns in that caliber – and it’s a very popular caliber here in rural Maine, so ammo should almost always be around or at the very least not a hassle to obtain or load for.

Bottom line: Chamber adapters increase the utility and versatility of your shotgun, and therefore your survival probability in a SHTF situation. I’m getting more. If you have a shotgun, you’d have a hard time making an argument to NOT get one or two to keep with your survival kit.

As a side note: you love shooting, right? So why wouldn’t your kids? Be sure to take your children (or, if you don’t have children, take your nephews, nieces, neighbors, whomever!) to the range with you. Teach them to respect the power of the firearm, and how to handle one with the utmost safety and concern for human life. If you start young and teach them properly, you’ll have someone who’s with you all the time who you can trust with a firearm, and a hunting/foraging buddy whose company you’ll always enjoy, and will help you drag game out of the woods, or just provide quality companionship while plinking empty soda cans with .22s at the range. I started my son when he was 7, and now, many years later, he is a fine shot and a respectful, safe young man with a firearm; I couldn’t be prouder.

So get out there, have fun, train, and BE SAFE!


Start now to make sure you are staying prepared.


Via: shtfblog

Texas Man Told to Take Down American Flag Because It “Threatens” Muslims

A Texas man was told to remove the flag he had flying from his apartment patio because management at the apartment complex said it was “threatening” to the safety of those Muslims in the community.

The El Dorado Apartment complex in Webster, Texas even issued a press release regarding their request, saying: “[While management] admires our resident’s patriotism,” they must “maintain the aesthetics of our apartment community and provide for the safety of all residents.”

Duy Tran, who rents from the apartment complex, said he will not be taking his flag down anytime soon. “I’m gonna leave my flag there, as an American, until she shows me proof that I don’t have the right to leave my flag there,” he said. “I have friends that died for this country.”

Tran is an American citizen, and he is understandably confused how flying his own country’s flag could in any way be found offensive by others.

“What really stunned me is that she said it’s a threat towards the Muslim community,” he said to KHOU. “I’m not a threat toward anybody.”

This disturbing incident reflects the growing trend of limiting free speech in America.

In another recently reported story, it was shown that Muslims in some parts of the country are attempting to have city ordinances passed that would limit any speech that attacks religious leaders and their radical viewpoints.

And it has been documented elsewhere in the U.S. that one can’t even display American flags on certain ethnic holidays for fear of offending non-Americans or people of different ethnic groups.

Startlingly, there’s very little recourse granted to Americans who want to vocalize their God-given right to free speech, and it seems to be getting worse every day.


Start now to make sure you are staying prepared.


Via: preservefreedom

Tornado Preparedness: 11 Crucial Items List

With a number of areas across the country being plagued by tornadoes recently, there has been a renewed interest in tornado preparedness tips. Here are some things you can do to increase your odds of surviving one of these storms.

Plan A Tornado Escape Route

Tornadoes tend to strike without warning, which is why you should have a plan of action far in advance. Think of areas you visit often, and then try to determine how you would react if a tornado were to happen while you were there. Knowing where you would go and what you would do can ensure your safety and help you avoid a panic situation.
The ideal place to go would be a specially designed tornado shelter. If one isn’t available, head to the basement or lowest point of a building. Get underneath a table or other heavy piece of furniture in order to protect yourself from falling debris. You can also place mattresses or cushions around you to soften the blow of falling objects as well.


Seeking A Tornado Shelter While Driving


Tornadoes can be especially dangerous if you are in a vehicle when they strike, because they can easily pick up a car and carry it for several miles. As such, you should seek shelter immediately whenever there is a tornado warning. Should you find yourself on the road, exit your vehicle and get into a low-lying ditch or underneath a bridge if possible. Avoid ditches directly underneath power lines. Do not attempt to outrun a tornado, as funnel clouds can move quickly, and may even change direction without warning.

After a Tornado Happens

You should make absolutely certain that a tornado has passed before exiting your shelter. When leaving, observe the area carefully for signs of falling debris, downed power lines or puddles of water containing wires. Use a flashlight to help you see, since tornadoes can sometimes cause fuel tank or natural gas line leaks.
Check those around you to see if there are any injuries. Render aid only if you can do so without being physically harmed yourself. Notify emergency personnel if extensive medical treatment is required. Contact utility companies to let them know about any downed power lines or outages you encounter.

Advance Tornado Preparedness


Your preparedness plans should include a stockpile of supplies that would help you survive without electricity and water for three to five days after the storm. Some things you should keep on hand include:

  • Battery powered radios and flashlights, with spare batteries
  • Non-perishable food
  • Water
  • Hand-operated can opener
  • Plastic utensils, paper plates and Styrofoam cups
  • Generator
  • Pet food
  • Heat source such as a wood-burning stove or kerosene heaters
  • Fully-charged cell phone and car charger
  • Medicines
  • Diapers and formula

Tornadoes can be among some of the most devastating natural disasters known to man. Planning ahead of time how you will survive one can make the difference between whether or not you actually do.


Start now to make sure you are staying prepared.


Via: survival-center

3 Ways to Preserve Eggs and Milk for Long-term Storage

We have an abundance of milk and eggs on our farm due to our milk cow and flock of laying hens. Production slows down a bit in the winter, but in the summertime we run two fridges just to keep up with it all!

I’m desperate to turn my second fridge into a cheese cave, so I began trying to find some different ways to preserve the precious bounty that would free up my fridge and also tide us over in the winter months.

To Freeze, Can, or Dehydrate?

I focused on freezing, canning, and dehydrating to preserve eggs and milk. Instructions for completing each method, pros and cons, my recommendations, and pictures of some of the results are below. This way, you can decide which method would be best for you and your family, and your food storage needs. Even if you’re not trying to free up a second fridge, you never know when there will be a power outage. Not depending solely on your refrigerator is important!

Freezing: Takes up a lot of space in the freezer, but prep is quick and easy

Freezing is the least time-consuming method for long-term storage, but it is also the most energy dependent one. Eggs and milk can be frozen in many different containers: freezer bags, jars, plastic freezer containers and they perform much like the fresh version when thawed and used. If you are using farm fresh raw milk, freeze the cream separately. Once thawed, the cream will sit on top of the milk in flakes and the two will not mix together, no matter how hard you shake the jar!


To freeze milk, simply pour it into your chosen container, leaving room for the milk to swell. My container of choice are Ziploc freezer bags. I pour 1/2 gallon of milk in a 1 gallon freezer bag and lay flat in the freezer until frozen solid so they will be easy to stack.

Preparing eggs to be frozen is also extremely quick and easy. Simply break them into a bowl, beat to combine the yolks and whites or push through a strainer and pour them into your container and freeze. To save space, I pour the eggs into an ice cube tray and, once frozen, remove them from the tray and place in a freezer bag.

1 “egg cube” = approximately 1 egg

3 tablespoons frozen, thawed egg = 1 whole fresh egg

2 tablespoons egg white = 1 egg white

1 tablespoon yolk = 1 egg yolk

Canning Milk and Eggs: Works great for milk, but eggs turn green

I have canned milk for quite a long time and used it with much success; the result is most like the evaporated milk that you can purchase at the grocery store. It has a slight caramel color and tastes most like fresh milk when diluted 1/2 and 1/2 with water.


Canned Eggs

I was, however, very leery about canning eggs. I’d never even heard of canned eggs! When I started doing some research, I found some references to them and pieced together some basic instructions for both water bath and pressure canning eggs. Those instructions warned that the eggs will swell quite a bit while processing and will turn green after sitting on the shelf, and, yes, they do. In fact, they turned green while they were canning, much like over-cooked hard-boiled eggs.

Not knowing how much they would swell, I only filled my jars about half full to make sure they didn’t overflow while canning. As a result, I couldn’t can them in a water bath; the jars had too much headspace and floated to the top of the water in the canner.

If canning eggs was the only method of preserving available to me, I would might experiment with different pressures in the canner, different head-space levels, etc. to get it just right, but, to be honest, I just don’t think I will use this method in the future.

Because there are no safety guidelines for canning eggs, and I cannot recommend it. Eggs can be pickled, which is another option if you have lots of eggs. Here is some basic information about preserving pickled eggs.

The instructions below for canning milk are basic and require some canning knowledge to complete:

How to Can Milk in a Pressure Canner:

  1. Fill pressure canner to fill line with tepid water. Do NOT pre-heat the canner, leave the stove off while you prepare the jars.


    Canned Milk

  2. Pour milk into sterilized jars, add warmed lids and rings. (It isn’t necessary to warm the milk before adding to the jars.)
  3. Place jars of milk in pressure canner and attach canner lid. Turn the stove onto a med-high heat and allow the canner to heat and the steam to vent for ten minutes.
  4. To safely can your milk, refer to this chart for proper altitude adjustment. For my altitude, less than 1000 feet, I place the 10lb weight on my canner and let pressure build just to 10 lbs.
  5. Turn the stove off and let the canner de-pressurize naturally. Remove jars and set on a towel on the counter to cool.
  6. After 24 hours, remove rings and check seals.

Dehydrated Milk and Eggs: Great Long-term Storage Option Using Minimal Space


Powdered eggs don’t sound appealing, but when reconstituted, have a taste and texture very similar to fresh or frozen eggs. You can beat the eggs together and dry them or dry the whites and the yolks separately. Reconstituted eggs can be used the same as fresh eggs. You can even use the dried egg whites to make a nice fluffy meringue!

I dried a dozen eggs and blended them into crumbles and they fit into a 12 ounce jar. If I had blended them even more, into a powder, I’m sure I could fit that whole dozen into a 1/2 pint jar. That would be 4 dozen dehydrated eggs per quart jar. Great use of space!

The only downfall to this method is the amount of heat that the dehydrator puts out. In the hot summer months, it might be a better idea to freeze the eggs and then thaw and dehydrate them when it is cooler outside (especially if you don’t have an air conditioner in your house).

1 tablespoon powdered egg + 1 tablespoon hot water = 1 egg

I have not attempted to dehydrate milk at home, but before we had our milk cows I always kept a couple boxes in my pantry for emergencies.

How to Dehydrate Eggs:

  • Line the trays of your dehydrator with parchment or wax paper, folding up all the edges to form a tray so the liquid eggs won’t slide off and make a mess.
  • Break your eggs and stir to combine, or separate them and dry the whites and yolks on two different trays.
  • Slowly pour the egg onto the tray, moving your bowl around so as not to pool them in the middle. I also used a spoon to spread the eggs to the edges of the tray. You will want a very thin layer so they dry evenly.
  • Dehydrate at 135 degrees for 6 to 8 hours or until no moisture is left. It took about 6 hours for a dozen eggs on one tray to fully dehydrate in my Excalibur 9 tray model. I stirred about halfway through as a skin had formed on the top and the outside edges.
  • Once dried, you can crumble the eggs up and store in a jar with a tight-fitting lid or grind or blend the crumbles into a powder. I put the egg crumbles in the blender and ground them up.
  • To use, reconstitute with hot water then cook as normal. When using for baking, simply add the powdered eggs with the dry ingredients and add the same amount of water with the wet ingredients.

Which Method Will You Choose?

After my experimentation with all of these different methods to preserve eggs and milk, I will most definitely continue to can my extra milk in jars. However, as soon as I can keep our 2nd fridge free of the over flow, I will start cheese-making again. Dehydrated eggs are my choice for putting those up. I can’t say that I will want to eat them as scrambled eggs in the winter all of the time, but I am really excited about having an abundance available for all of my holiday baking!

There may be links in the post above that are “affiliate links.” This means if you click on the link and purchase the item, I will receive an affiliate commission, which does not affect the price you pay for the product. Regardless, I only recommend products or services I use personally and believe will add value to my readers.


Start now to make sure you are staying prepared.

 
Via: thesurvivalmom

Camping Safety

Here’s another great article from our friends Dr. Bones and Nurse Amy.


CAMPING SAFETY

The school year is ending, and families are planning the summer’s camping trip. Camping trips are a great way to create bonds and memories that will last a lifetime.  A poorly planned camp out, however, can become memorable in a very bad way, especially if someone gets injured. A few preparations and an assessment of everyone’s limitations will help you enjoy a terrific outing with the people you care about.

KNOW YOUR LIMITS

If you haven’t been camping much, don’t start by attempting to hike the entire Appalachian Trail. Start by taking day trips to National Parks or a local lake.   Set up your tent and campfire. See how it goes when you don’t have to stay in the woods overnight.  If the result is a big thumbs-up, start planning your overnight outings.

Whatever type of camping you do, always assess the capabilities and general health of the people in your party. Children and elderly family members will determine the limits of your activities. The more ambitious you are, the more likely the kids and oldsters won’t be able to handle it.  Injuries are the end result of overdoing it.

PLANNING

An important first step to a safe camping trip is knowledge about the weather and terrain you’ll be encountering. Talk with park rangers, consult guidebooks, and check out online sources. Some specific issues you’ll want to know about:

  • Temperature Ranges
  • Rain or Snowfall
  • Trails and Campsite Facilities
  • Plant, Insect or Animal Issues
  • Availability of Clean Water
  • How to Get Help in an Emergency

COMMON MEDICAL RISKS 


Probably not appropriately dressed for the climate…

A very common error campers make is not bringing the right clothing and equipment for the weather and terrain. If you haven’t planned for the environment you’ll be camping in, you have made it your enemy.

Although Spring and Fall have the most uncertainty with regards to temperatures and weather, you could encounter storms in any season. Conditions in high elevations lead to wind chill factors that could cause hypothermia. If the temperature is 40 degrees, but the wind chill factor is 20 degrees, you lose heat from your body as if it were 20 degrees out. Be aware that temperatures at night may be surprisingly cold. Even summer rain can lead to a loss in body temperature if you’re drenched.

In cold weather, you’ll want your family clothed in layers. Use clothing made of tightly woven, water-repellent material for protection against the wind. Wool holds body heat better than cotton does. Some synthetic materials work well, also, such as Gore-Tex.

If you’re at the seashore or lakefront in summer, your main problem will be heat exhaustion and burns. Have your family members wear sunscreen, as well as hats and light cotton fabrics. Plan your strenuous activities for mornings, when it’s cooler. In any type of weather, keep everyone well-hydrated.  Dehydration will cause more rapid deterioration in physical condition in any type of stressful circumstance.

The most important item of clothing is, perhaps, your shoes. If you’ve got the wrong shoes for the outing, you will most likely regret it. If you’re in the woods, high tops that you can fit your pant legs into are most appropriate to provide

protection against snakebite. If you go with a lighter shoe in hot weather, Vibram soles are your best bet.

Special Tips: Choosing the right clothing isn’t just for weather protection.  If you have the kids wear bright colors, you’ll have an easier time keeping track of their whereabouts. Long sleeves and pants offer added protection against insect bites that can transmit disease, such as Lyme disease.

YOUR CAMPSITE

Real estate agents’ motto is “location, location, location” and it’s true for camping safety too.  Scout prospective campsites by looking for broken glass and other garbage that can pose a hazard.

Look for evidence of animals/insects nearby, such as large droppings or wasp nests/bee hives.  If there are berry bushes nearby, you can bet it’s on the menu for bears. Berries that birds and animals can eat are often unsafe for humans to eat.  Advise the children to stay away from any animals, even the cute little fuzzy ones.


Bear Droppings! Camp somewhere else…

Learn to recognize poison ivy, oak, and sumac.  Show your kid pictures of the plants so that they can look out for and avoid them. The old adage is “leaves of three, let it be”. Fels-Naptha soap is especially effective in removing toxic resin if you suspect exposure. The resin can stick to clothes, so use it for washing.

Build your fire in established firepits and away from dry brush. In drought conditions, consider using a portable stove instead.  Children are especially fascinated by fires, so watch them closely or you’ll be dealing with burn injuries. Food (especially cooked food) should be hung in trees in such a way that animals can’t access it. Animals are drawn to food odors, so use resealable plastic containers.

If you camp near a water source, realize that even the clearest mountain stream may harbor Giardia, a parasite that causes diarrheal disease and dehydration.  Water sterilization is basic to any outdoor outing.  There are iodine tablets that serve this purpose, and portable filters like the “Lifestraw™” which are light and effective.  Boiling the water first is a good policy in any situation, although time-consuming.

GETTING LOST

Few people can look back to their childhood and not remember a time when they lost their bearings. Your kids should always be aware of landmarks near the camp or on trails.  A great skill to teach the youngsters is how to use a compass; make sure they have one on them at all times as well as a loud whistle that they can blow if you get separated.  Three consecutive blasts is the universal signal for “help!”. If lost, kids should stay put in a secure spot.  Of course, if you have cell phone service, consider that option as well.

INSECT BITES

Even if you’ve clothed the kids in protective clothing, they can still wind up with insect bites.  Carry a supply of antihistamines, sting relief pads, and calamine lotion to deal with allergic reactions.  Asking your doctor for a prescription “Epi-Pen” is a good idea if anyone has ever had a severe reaction to toxins from insect bites or poison ivy.  They’re easy to use and effective, and few doctors would refuse to write a script for it.

Citronella-based products are helpful to repel insects; put it on clothing instead of skin (absorbs easily) whenever possible. Repellents containing DEET also can be used, but not on children less than 2 years old.   Don’t forget to inspect daily for ticks or the bulls-eye pattern rash they often cause; as mentioned earlier in the article, they can transmit Lyme Disease.  If you remove the tick in the first 24 hours, you will rarely contract the disease.

YOUR CAMPING FIRST AID KIT

Besides the usual equipment, insect repellants, and a way to sterilize water, you will want to carry a medical kit to deal with common problems.  This should contain:

  • Antiseptics to clean wounds (iodine pads are good)
  • Bandages of different types and sizes: butterfly, roller, pads, moleskin, elastic (Ace wraps)
  • Cold packs to reduce swelling
  • Splints (splints and larger conforming ones)
  • Burn gel and non-stick dressings like Telfa pad
  • Nitrile gloves (some people are allergic to latex)
  • Bandannas or triangular bandages with safety pins to serve as slings
  • A bandage scissors
  • tweezers (to remove splinters and ticks)
  • topical antibiotic cream
  • Medications:     Oral antihistamines (such as Bendadryl)

Pain meds (Acetaminophen, Ibuprofen, Aspirin, also good for fever)

1% hydrocortisone cream to decrease inflammation

BZK (Benzalkonium Chloride) wipes for animal bites

Your personal kit may require some additional items to handle special problems with members of the family that have chronic medical issues.  Take the above-listed  items and add more to customize the kit for your specific needs.

In an emergency, the most important thing to do is to simply stay calm. You’re armed with the materials you packed in your first aid kit; use them!  Don’t fail to take a first aid course, so you’ll have the knowledge needed to be a medical asset.  If you do this, you’ll have the best chance to have a safe and (happily) memorable camping trip with your family.

Joe Alton, M.D., aka Dr. Bones


Start now to make sure you are staying prepared.


Via: doomandbloom

A prepper encyclopedia for your smart phone: the Proclivus phone app

Whenever life takes me away from home for hours or days on end, my smartphone has become my computer for whenever I’m on the road.

A big advantage of the smartphone is the multitude of apps available, and recently I downloaded a particularly helpful one, Proclivus. Proclivus is a clever new app that aggregates the best prepper and survival information from across the internet and puts it all in one place, your iPhone or iPad. It’s far handier than using your phone’s browser to check out one site after another. Why bother with all that browsing when everything is right there on Proclivus, and it’s free?

With the Proclivus phone app, you can quickly scroll through a multitude of articles, over 1000 on some days. With a quick glance, you can decide if the article is of interest. There is also the option of selecting categories as a way to seek out only the information you are interested in right now. Sorting through numerous categories helps a great deal when it comes to staying focused on what you want to learn now, and since that information comes from multiple sources, you can learn a great deal, indeed.

Proclivus updates its feeds every 15 minutes, so throughout the day there is always something new to read. The most recent articles will be presented first, and typically, articles remain on the app for 90 days. The 150 feeds are constantly searching for newly posted articles, and you may find yourself addicted!

See something you want to share? Proclivus has an easy sharing feature which allows you to share via email, texting, Facebook, and Twitter. If you find something that is worth saving, it can be saved to a separate free app,  Pocket, which allows you to save things you find while browsing. These saved articles can be read offline or at a later date. With Proclivus and Pocket (not affiliated with Proclivus), you can create your own personalized survival library.

When I began using Proclivus, the first thing I noticed is that it was similar to Pinterest, but focused solely on survival and preparedness topics. In fact, one new feature of Proclivus now brings in Pinterest feeds. You’ll find it at the bottom of the Categories menu. There’s a vast resource on Pinterest of survival related material, so this is a nice addition. Some prepper Pinners have tens of thousands of followers, and this is a feature I would love to see enhanced on Proclivus.

Currently, Proclivus is available only for iPhones and iPads. Writing the app for the Android platform requires a complete re-write of code, unfortunately. An Android version is not out of the question, though, and based on the success of Proclivus, that version may become a reality sooner rather than later.

You can download Proclivus from iTunes or go to this website for the download and
instructions for utilizing this app. Enjoy!


Start now to make sure you are staying prepared.

Via: thesurvivalmom

Family Disaster Planning

“Poor Prior Planning Produces Pitifully Poor Performance”, or a similar version known as the “Six P’s”, is the mantra of this document. Plan ahead and you can survive most disasters.

Disasters come in all shapes and sizes. In trying to put together a plan, it is best to have a plan that would “basically” fit any disaster by addressing the complications brought on by a disaster. These complications include loss of power, hampered communication, compromised safe location (temporary or permanent housing), limited resources (food, water, and clothing), financial hardship (separated for obvious reasons), lack of security, lack of transportation, reduced emergency services (outside of security), loss of personal data, and a breakdown in our ability to take part in miscellaneous activities (entertainment, stress release activities, and the like).

Several of the suggested items will not be feasible for some. Depending on your living conditions (apartment vs. house), you may not have the space to take advantage of some of these suggestions. While the financial burden placed on each household to prepare is substantial, it is worth it. Remember, once you make a purchase, you should not need to replace most of these items. After you make a purchase, make sure you are ready to use the item in the event that you need to, by using what’s practical to use and reading about what’s not practical to use. Know how to use the item properly.

Keep in mind that these are suggestions. Assess your household needs and let that be the driving force for what you do/get. While the cost of these items will seem a bit much, remember that you do not have to get everything at once. Prioritize and act accordingly. If you are to use a hub site, please stock this site as well with items you will/may need. Keep a list of all items you have and cycle those items which should be cycled to keep fresh supplies as best as you can. Remember, there is no need to stock items you will not use. If you or your children don’t like certain foods, don’t waste your time or energy. While it’s true that we eat for sustenance, we all know that taste plays an important role in what we eat.

Our family plan should be three tiered. The first tier is based on a single family household structure and covers everyone who lives in a particular house. The second tier is based on an assembly at a hub site. There should be more than one hub with members designated to go to a certain hub. The third tier is based on a backup site. If you are unable to make it to your primary hub, a backup should be designated as part of the plan.

Those members who are designated to use a site as a primary hub are responsible for storing resources (pitching in to keep resources) at the hub. Family members should not be responsible for keeping items at the secondary/backup hub. In addition to this, the primary occupant of a designated hub should not shoulder the responsibility to care for all the needs of all those designated to use their home as an assembly site. As they are volunteering the use of their home, they would coordinate how it is used and have full authority of what goes on in their home.

In all that you do, be mindful of the environment. Do not dump waste into drains, leave trash to blow around the neighborhood, create unhealthy sanitary conditions for yourself or your neighbors, or create conditions that could cause a fire. Keep your home and surroundings as clean as possible to prevent the spread of germs. Take part in activities that build relationships with the whole family as well as your neighbors. Know your neighbors. Stay in touch with family members, even if you don’t like them. Together we stand; divided we fall.

Relocation, Evacuation, Extraction

The best plan for any disaster is to not be in the location where the disaster takes place. While technology has given us the ability to foresee some natural disasters, such as hurricanes, floods, and tornadoes, chances are you will be caught totally off guard in the event that one strikes. Plan for the worst, hope for the best.

Relocation is the best plan one can have in the event of an imminent disaster. The plan should be to relocate until the danger has passed. This could be a hotel out of the danger area, a hub site, a friend’s home, or whatever you designate in your relocation plan. The important thing is to have a plan. With relocation, you have the time to take whatever you deem necessary. Think of it as taking all the same steps you would take if you were going on vacation.

Evacuation plans are a must. You should not only have a plan, but you must practice it once or twice a year. With an evacuation, you take only the essentials. You may only have time to secure your home (see security), taking what you need and going. In the event you have to evacuate, remember, everyone in your area will be doing the same. The sooner you get started, the better off you will be.

Included in your evacuation plan should be instructions on how to evacuate your home and where to meet. There should be two (2) designated places to meet in your plan, both near the house. If your home is more than one story, have evacuation ladders in the bedrooms and practice going out the window. This is very important with small children who may be too scared in the time of an emergency to go out the window. If you practice, this should ease their fears. Keep a fire extinguisher in the master/adult bedroom to assist getting to your child’s room(s).

Extraction is a last resort, and it requires that someone risks their life to come in and get you out. Yes, there should be a plan for this as well. With this plan, you take what you can easily carry and nothing else. Your hands must be free to maneuver. Your body weight should not be more than what you carry on any given day. In the event that the extractor has to physically assist the extractee, do not burden them with added weight.

Each of the above plans should include taking your personal data. An ID, SScard, and birth certificate should always leave with you when you have a disaster take place. If you can get a passport, that is even better. Place these items in a water tight bag and keep it on your person, not in a bag or backpack, but literally on you.

Relocation, Evacuation, Extraction Plans should be written as a detailed subset of a Disaster plan and should be written for each household. Each member of the family should have everyone else’s plans so you know what and where people should be. Extraction plans should have a team designated to perform the extractions. This team should meet and train regularly. This may seem like it’s way out in left field, but if the need ever arose, you will be very happy that you covered the whole field and not just the bases.

You would be surprised at the types of activities which would qualify as training for other activities. Fishing actually helps an extraction team with navigation, teamwork, and battling the elements (depending on the weather when you go fishing). Camping will assist anyone with outdoor living.

Financial Hardship

Financial hardship can arrive in a number of ways, one being the loss of a job. If your place of employment is effected, and you are out of work, government assistance will be initially hard to come by. It all boils down to money. What you can and cannot do depends on how well you have planned and how you have budgeted for your plan. Do yourself a favor– have a budget and stick to it. If you spend wildly in everything you do, at least save for a rainy day.

If you put money away for your disaster plan, do not spend it on other items. Research the best products to spend your money on and make every cent count. Even if you budget 3% of your earnings (that’s $3 out of every $100 you make), you are way ahead of most people.

Start with the essentials: three days of food and water, a first aid kit, a crank radio/flashlight combo and candles. Build upon this by getting a little bit more as you are able. Soon, you will have most of what you need. If you can pool resources to raise money (see Family Business) do so. Sacrifice, what you can do without, to get what you need.

While not everyone can afford to stay at a hotel during a disaster, at least have some money set aside to offer to whomever your plan calls for you to stay with. Don’t wear out your welcome by being lazy and not contributing. Pitch in, and that means more than just financially.

It is very important to have some form of money available for immediate emergencies. This could be a credit card, a prepaid card you only have for this reason, a debit card tied to an account you only use for emergencies, cash, or travelers checks. If you put something aside, make sure it does not expire, lose its value, or becomes stale. Most check items are considered stale after six (6) months. One should never hold a check for longer than it takes to cash it. That includes company checks. You never know when those funds will not be available. If need be, cash the check and get a cashier’s check or money order. If you are really concerned about an emergency fund, remember that cash is king.

Loss of Power

This is probably the most prevalent outcome of any major disaster. It is also the easiest to rectify. Remember the “Six P’s”.

What do we need power for? It keeps food fresh, runs our entertainment items, and keeps the car going, lights on, et cetera. First things first. Have a backup to replace your lost power source.

It is imperative that a portion of your power be dedicated to essential items. With that, your power grid should be segregated. It is also important that you reduce your power consumption to an absolute minimum, in order to conserve this very valuable resource.

Create a list of all items in your home and how much energy each item consumes. Segregate that into what’s essential and what’s simply desired. Use your good judgment to determine what’s best for your needs in what should be powered and what should not. Design your power grid with a source or sources that best fit your needs and budget. The possibilities include any combination of the following:

Power Generator. This has to be big enough to run your essentials for an extended period of time. This includes enough propane, gas, and/or diesel fuel. Multi-fuel generators are a good idea.

Propane. This is a good power source, but you run into the issue of storage. Most people will only have small bottles, which will have to be refilled often. This will become a problem over time, as the ability to get propane decreases with the length of the disaster.

Batteries. While many items run on batteries, one has to store a lot of them to keep the power on for any length of time. For larger power needs, marine batteries work well. They are built to be used in this capacity. Provided there is a means of recharging them (see below), you can’t really go wrong with this option. Again, make sure the essentials are taken care of before you move on to the non-essentials.

There are several different categories with several types of batteries per category. We discuss a few battery types here:

  • crank (for starting motors, i.e. your car battery),
  • deep-cycle (for actually running equipment). It is very important that you use deep cycle batteries, as you are looking for a sustained power source.
  • gel cell and flooded acid batteries differ in the consistency of the acid in the battery (very basic description of the difference). Gel cell batteries have several vulnerabilities, that and the fact that they are more expensive make them the lesser desired choice of the two.

Crank. There are very few items running on a crank, with flashlights being the most prevalent. However, a crank generator can be built out of an old motor, a bike, and batteries. Having the plans readily available with the parts is a good idea; having a built generator is a great idea. Building it and testing it every now and then is a wonderful idea! (Take a look at this site for small basic unit: http://www.econvergence.net/electro.htm .)

Solar. This is a great power source but requires a bank of batteries for extended use (after hours when there is no sunlight). A basic setup can cost under $500.

Wind. Here’s another great power source, but it requires a bank of batteries. Although wind power is normally available in many locations, it should not be relied on as an exclusive power supply unless you live in a very windy area. You’d do better to couple it with solar power, if possible.

Candles. These serve as a great replacement for electric lighting. They should be kept in ample supply. There are some extended life candles, which last at least 100 hours.

Glow sticks. These lighting replacements have lighting applications that extend beyond those of a candle and sometimes even that of a flashlight. Also keep in mind that they are expendable. Place them far off and leave them there to illuminate an area for surveillance, mark off distance, or even find your way back. They can be used by a child to enable the child to see and be seen without risk of burn or fire, especially if carrying his/her lighting.

Communications

This will be one of the biggest items of concern. No one can or should attempt to live in a vacuum. It is imperative that family members stay in touch to coordinate shared resources and movement, while keeping each other informed of opportunities and dangers. Care should be taken in what is discussed on any telecom device or in public for that matter.

A phone list should be developed and maintained. At least one (two would be best) out-of-state person(s) should be designated as the contact for everyone. In most disasters it is easier to make long distance calls than it is to make local calls. Have everyone contact this person with their whereabouts and plans. The hubs should call this person (people) to make and get updates daily.

Using a HAM radio is by far the best option. HAM radio is basically free, and with it you can communicate with people all over the world. As long as you have power, you can communicate. (Your HAM radio certainly qualifies as an essential item for power usage!) All you need to do is search the dial, like tuning in to your favorite radio station, and start talking. There are rules and protocols associated with the use of such equipment. This requires several people learn how to use the equipment. For best results, it should be placed in a central location.

Satellite phones are a great source of communication. You don’t have to worry about traffic on the air waves as sat phones use a different system. Even if HAM Radio is used (and especially if it is not), sat phones should be kept at each hub. They are extremely economical these days. One thousand dollars will get you a good phone with a $600 min/yr plan. If you are only using it in the event of an emergency, it is well worth the investment.

Cell phones are the communication device of choice, but everyone will be on them jamming the air waves and wrecking havoc on this particular choice. If you have one and it’s all you have, use it. If you have other options, go with the other option.

Land line phones are there. Almost everyone has a house phone, and everyone has a phone at work. If it’s all you have, use it.

Walkie talkies have a number of usages. They can be used in conjunction with HAM radios or as the primary mode of communication for your household. These days the cheap ones ($70 per unit) have a 16 mile range. If possible, an investment should be made into high end units with security features. If this is not possible and you do use them, make sure you do not discuss sensitive information on them.

Housing

Housing will be a major concern in any disaster. Temporary housing in central locations is a must. You should have what your family needs to make it through the ordeal. Not just tents, cots, and blankets but a plan. The first thought (after a disaster has occurred) is to stay where you are if you can. If that cannot take place, the next step is to get to a designated location.

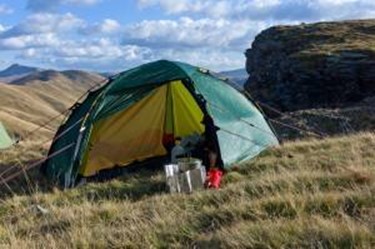
Local temporary shelter. Have a tent, cots or sleeping bags, blankets, portable stove, fuel, eating utensils, and so forth to cover each member of your household. Know how to use your equipment. Consider using your equipment and staying in your own yard, if your home is uninhabitable and your yard is not flooded. Have a map handy, in case you have to relocate to locally/government-sponsored temporary housing and to be able to find your way around in general. Locally-sponsored housing raises huge security concerns. Avoid it, if at all possible. It is probably better to be extracted than to go to one of these facilities. If you must go, stay in large numbers (especially true for women and girls). Even if you don’t know the people you are gathered with, stay together for security reasons.

Relocation housing. Plans should have a designated place to meet, and each member of your household should know this place. In the event the family is split up, know your meeting place. Locally-sponsored shelters setup on the fly should be your last resort. There are far too many security, logistical, and sanitation issues associated with them.

Hub temporary housing. Have enough equipment to house those members of the family designated to use the hub as an assembly point. It is not the responsibility of the person living at the hub to supply those who will be using the hub. Store your own supplies there in the event of an emergency.

A great way to test the living conditions is to have those who are designated to use the hub (or maybe a few extra) stay the night. It’s probably best to try this over a holiday, when the family is at the house anyway. This is actually an excellent reason to move holiday functions from one house to the next, testing our ability to live together. While it is over a shorter period of time and tempers are not flaring, like they would in an emergency, we should try a test as best as we can. A test is necessary.

Backup Hub. In the event that you are unable to make it to your primary hub, the backup site is now your destination. As is always the case, communication is the key. Keep people informed of your whereabouts, what you are doing, and where you are going. Once you have made it to your backup hub, you may be able to be transported to your primary site.

We must do our best to keep families together. Children should not be split between hubs, if we can help it. Please keep in mind that these actions, if taken, are the result of an emergency. There will be a lot going on, so please try your best to get along with each other and alleviate any issues as quickly as possible.

In the event someone has to use a backup hub site, please be understanding and share your resources. Again, if transportation can be secured to get people to primary sites, that would be great. If not, please act accordingly.


Start now to make sure you are staying prepared.


Via: survivalblog