Category Archive: Build it yourself

Texas – ERCOT warns of tight electrical grid conditions

Texas officials warn of tight electrical grid conditions while temps soar, urges Texans to conserve energy as demand could outpace supply.


Supplemental Info:


June 14, 2021


Tight grid conditions expected due to high number of forced generation outages


Grid operator requests energy conservation


AUSTIN, TX, June 14, 2021 – The Electric Reliability Council of Texas (ERCOT) is asking Texans to reduce electric use as much as possible today through Friday, June 18. A significant number of forced generation outages combined with potential record electric use for the month of June has resulted in tight grid conditions.
Generator owners have reported approximately 11,000 MW of generation is on forced outage for repairs; of that, approximately 8,000 MW is thermal and the rest is intermittent resources. According to the summer Seasonal Assessment of Resource Adequacy, a typical range of thermal generation outages on hot summer days is around 3,600 MW. One MW typically powers around 200 homes on a summer day.


“We will be conducting a thorough analysis with generation owners to determine why so many units are out of service,” said ERCOT Vice President of Grid Planning and Operations Woody Rickerson. “This is unusual for this early in the summer season.”
According to generation owners, the number of outages should decrease throughout the week.


Wind output for today is expected to be 3,500 to 6,000 MW between 3 and 9 p.m. This is roughly 1,500 MW lower than what is typically available for peak conditions. Wind output is expected to increase as the week goes on.


Today’s peak load forecast may exceed 73,000 MW. The peak demand record for June is 69,123 MW set on June 27, 2018 between 4 and 5 p.m.


Please take these simple actions to help reduce electric use:

  • Set your thermostat to 78 degrees or higher – every degree of cooling increases your energy use by six to eight percent.
  • Turn off lights and pool pumps and avoid using large appliances like ovens, washing machines and dryers.
  • If you don’t need something – we are asking you to turn it off and unplug it if possible.

Visit the Power to Save website or your electric provider for more ways to conserve.


How to track electricity demand

  • View daily peak demand forecast, current load and available generation at http://www.ercot.com .
  • Follow ERCOT on Twitter (@ERCOT_ISO) and Facebook (Electric Reliability Council of Texas).
  • Sign up for the ERCOT mobile app (available for download at the Apple App Store and Google Play).
  • Subscribe to the Emergency Alerts list on http://lists.ercot.com.

Consumer assistance
Public Utility Commission of Texas Hotline – 1-888-782-8477

-end-

View Original:

http://www.ercot.com/news/releases/show/233037


Start now to make sure you are staying prepared.

Via: threatjournal


Save pagePDF pageEmail pagePrint page

3 DIY Emergency Heaters That Will Keep You Warm This Winter

image

image

Whether It’s a Small Shed, a Garage, or Your Whole House, These Do-It-Yourself Heaters Really Deliver – But Be Careful.

Winter is here, and in spite of your best efforts, there’s always that one room that is too cold. Electric space heaters are the usual option, but they have some downsides. For one, they really burn up the watts. Most space heaters run at 1500 watts on their high setting, and our electric bills tell the tale.

They’re also dependent on electricity. That can mean running extension cords to an out-building like a shed or detached garage, assuming it’s a reasonable distance from a power source.

There’s also the possibility of a power outage–which could last anywhere from a few hours to a few weeks–and that’s when alternative heat sources are no longer just convenient, but absolutely critical.

Many people depend on wood-burning stoves or pellet stoves to keep up the heat, but most of these heat sources are centralized to living areas rather than out-buildings. There are ways to distribute wood or pellet-fired heat to other areas in a house, but some spaces in a home just don’t seem to get enough.

Fortunately, there are some easy-to-make alternatives that can allow you to keep any space warm. These DIY heaters are simple and can often be assembled from materials you already have on hand.

They tend to be most effective in smaller spaces, but a lot has to do with temperatures that are tolerable rather than toasty. Even the smallest DIY heater can maintain a relatively comfortable temperature of 50° Fahrenheit. That’s sweater weather and it beats freezing.

In larger spaces, you may need a few of these improvised heaters. Just remember, the more open flames you spread around in any space, the greater the risk.

We’re going to explore three DIY heaters, but before we get into the materials and assembly details, we should cover a few points on fuels, fumes, safety and heat exchange.

Fuels

Two primary fuels are used for the heaters we’re going to cover. Candles and a 70% solution of Isopropyl alcohol. A third possibility is a gasoline additive known as HEET, but it can produce an odor if the heater is not burning properly and is more flammable than a 70% solution of isopropyl alcohol.

Candles

image


The candles should be made with unscented, undyed wax. The smell of vanilla might be pleasant for an hour or so but can become a bit overwhelming as the hours wear on. We’re going to use plain white tea candles because they burn for 4 to 5 hours. The small metal cups surrounding the candle at the base also add a safety factor.

Isopropyl Alcohol

image

Isopropyl alcohol can be bought in most any pharmacy and many hardware stores. The proof varies across basic concentrations ranging from 50% to 91%. A 70% solution is ideal because it burns clean and will keep a steady, hot flame. Goldilocks will be the first to tell you that 50% is too low while 91% is too high, but 70% is just right.

A wick is used to draw the alcohol to the flame and this wicking catalyst is usually fireproof insulation material or, believe it or not, toilet paper.

Fumes

Anything that burns gives off various gases. Smoke is the most noxious and usually the result of burning carbon-based fuels. Fortunately, isopropyl alcohol and candles give off little if any smoke and the fumes are relatively harmless.

The one caution has to do with the consumption of oxygen within an enclosed space. Any flame needs oxygen to burn, and a flame that starts to dim for no apparent reason is telling you something. It either needs more fuel or more oxygen.

It seems contrary to the idea of keeping the cold out, but some degree of ventilation is recommended even if all it means is opening the door now and again.

Safety

Open flames present obvious problems, so common-sense and due diligence are necessary here. It’s fair to say that many of us burn candles from time to time without harm, but the heaters we’re talking about will potentially be burning with an open flame for some length of time.

That’s why the location of your DIY heater is so important. It should be away from walls, drapes, beds, and any other flammable materials. It should also be in a location where it won’t be knocked over.

You should also develop a good insulating layer between the base of your heater and any surface, especially a wood surface. Temperatures in some of the spaces in these heaters will range from 200 to 400° Fahrenheit. Paper bursts into flame at 451° F, and 400° is getting close.

Typical insulating materials include brick, tile, or a layer of stones underneath the heater. A double layer of these materials beneath the heater is also wise as it will further disperse the heat.

Heat Exchange

One of the concepts that increases the heat for one of these DIY heaters is a simple heat exchanger. A furnace works on the same principle.

A large slab of metal or ceramic is heated and then air is forced over the hot material to cause a heat exchange. As you’ll see in one of our homemade heaters, we’ll be using terracotta flowerpots to exchange heat with the surrounding air.

A good example of basic heat exchange can be found on the iron tops of wood-stoves. They’re often decorated with cast-iron objects in various shapes to allow the heat from the iron firebox to transfer to the cast-iron decoration and to the surrounding air.

If you ever see an iron duck resting on top of a wood-burning stove, you’d be wise to avoid grabbing it. It’s very hot, and heat exchange is the reason why.

DIY Emergency Heaters

1. The Tin Can Heater

image

This DIY heater is simple to assemble, it’s easily and safely stored, and it kicks out a lot of heat. It produces a fairly large flame, so location is critical. It’s also a potential hazard if it’s knocked over. There is isopropyl alcohol in the can and any spill will burst into flame, so be careful with this one.

You’ll also find that an alcohol flame is difficult to see in daylight.

image

Make sure everyone knows what’s going on so they don’t accidentally touch or knock over the heater because they couldn’t see the flame.

The can is a 1-quart paint can and should be a new, empty can. You can buy them at most hardware stores for about $3. Don’t use a can that has any residual paint in it. The paint will give off toxic fumes while the heater is burning.

Splurge and spend the three bucks to get a clean, new can. A 1-quart can will burn a little over an hour until it needs to be refilled. Don’t refill the can until it has fully cooled.

image

An option is a metal soup can or another tin can. The can should be well rinsed, and the paper label and the line of glue removed as well. From there, the principle is the same as the paint can except you won’t have a tight sealing lid for extinguishing, storage, and future use.

Materials and Tools:

image

  • 1 empty 1-quart paint can with lid or empty food can
  • 1 roll of toilet paper
  • 1 bottle of 70% isopropyl alcohol
  • A flathead screwdriver
Assembly:

image

  1. Use a screwdriver and your hands to remove the cardboard tube from the center of the toilet paper roll.
  2. Once the tube is removed, squeeze the roll so it collapses in on itself.
  3. Slowly insert the toilet paper roll into the can.
  4. As you approach the end of the roll, you might need the screwdriver to get it past the rim.

image

  1. Make sure the toilet paper is below the rim of the can.

  2. A large tile at least 1-foot square should be placed under the can.

  3. Slowly pour the isopropyl alcohol onto the toilet paper wick until it is saturated.

  4. Light the top of the can,f but be careful if you place the can in a bright area. The flame can be difficult to see.

image

Place the can in a safe location. The can will get very hot, so extinguish it and let it cool before touching. The lid can be slipped over the top to put out the flame. Seal the lid with light taps from a hammer and store where you store other flammable materials like kerosene, gas, oil, and propane. Before using again, top off the can with more isopropyl alcohol.

It may surprise you, but the toilet paper will not burn. It acts like a wick drawing alcohol from the bottom of the can. However, if too much alcohol burns off, the toilet paper could begin to char. When the alcohol level gets low, extinguish the flame, let the can cool completely, and refill to the proper level.


2. The Flower Pot Tea Candle Heater

image


It seems absurd to think that one tea candle could produce enough heat to heat a room, and you’re right. It takes 4 to 6 tea candles to do the job. What makes this tea candle heater work is the heat exchange concept. Terracotta flowerpots fulfill the role of heat exchanger, and over 20 to 30 minutes, they will get significantly hot from the small flames of a few tea candles.

This is another DIY heater that needs to be located carefully. The good news is that if it’s knocked over it won’t spread flaming alcohol, but melted wax is highly flammable and open flames are open flames.

Materials:

image


  • 1 4-inch diameter terracotta pot

  • 1 6-inch diameter terracotta pot

  • 4 to 6 plain white tea candles
  • A large tile to isolate the heat from any surface and support the candles
  • Smaller tiles or bricks to support the flower pots

  • A quarter to seal the drain hole in the smaller pot when inverted
Assembly:


image

  1. Build up the smaller tiles on the large tile so they can support both flower pots and create enough air-space to keep the candles burning under an inverted pot.

  2. Center the candles and light.

  3. Invert the smallest pot so it is over the candles.

  4. Cover the hole in the bottom of the smallest pot with the quarter. Do not do this with the second, larger pot.

image

  1. Invert the larger pot over the smaller pot.

In 20 to 30 minutes you will begin to feel significant heat from the sides of the large pot and from the open hole at the top. To extinguish, blow out the candles, but be careful with the pots. Internal temperatures have been measured up to 400° Fahrenheit in the small, inner pot. Give them sufficient time to cool before handling.

There are backup alternatives to flower pots. Maybe the best is a cast-iron Dutch Oven inverted on the tiles or bricks in place of the flowerpots. You won’t have the convection that a flower pot within a flower pot creates, but the cast-iron will definitely get hot.

3. The Soda Can Jet Burner

image

This heater is an alcohol burner on steroids. Due to its compact size, it can be used in place of tea candles in the Flower Pot heater. One of these heaters under a flower pot will do the trick, and two will double the heat. However, this heater will also give off heat on its own, so flower pots are optional.

The assembly is a little complicated compared to the other two heaters, but the materials are very easy to find around the house.

Materials and Tools:

image


  • 3 empty and rinsed aluminum soda cans

  • A handful of fireproof insulation or pipe wrap insulation

  • 1 bottle of 70% isopropyl alcohol
  • A penny

  • Kitchen shears
  • A pushpin for punching the holes

  • A small hammer of anything that can be used to pound the pushpin through the thin aluminum

  • Work gloves to protect your hands from the sharp edges of the aluminum

  • Permanent marker

  • A small piece of a 2×4 to guide the marker on the can before cutting

  • Needle nose pliers
Assembly:

image

  1. Put the can down with the bottom up and using a nail, carefully drive the nail through the center of the bottom of the can.

  2. Using a pushpin, make 4 holes around the nail hole. Use the small hammer to help drive the pushpin into the aluminum.

  3. Use the same pushpin to make 16 evenly spaced holes around the ridge at the bottom of the can. To do this, start with one hole and go to the opposite side of the can for the second hole and continue in this way to create evenly spaced holes.

  4. Split the difference between the two holes and punch again. Keep splitting the difference until you have 16 evenly spaced holes.

image

  1. After the holes are punched, rest the can against the 2×4 with the board lying flat. Hold the tip of the permanent market against the edge and slowly rotate the can to draw an even line around the circumference of the can. Repeat with the other can.

  2. Cut a starting cut on the can using a razor knife.

  3. Use the kitchen shears to cut the can along the line around the circumference.

  4. You now have the top burner section complete.

image


  1. Repeat with the other can and, using the needle nose pliers, twist and crimp the can every half-inch to make it easier to insert into the top portion of the burner.

  2. Once you have both cans’ bottoms cut and the top punched, you’re ready for the insulation wick.

  3. If using pipe wrap insulation (which is a cheap way to pick up some insulation), cut it the long way to the height of the base can.

  4. Roll the insulation and stuff into the base can.

image

  1. Carefully place the top can over the insulation filled base to fit together.

  2. Press the top down gently until the cans are tightly joined. Pour the 70% isopropyl alcohol into the top and allow to percolate into the can. You could also use a gasoline additive like HEET, but you’re probably better off with the alcohol. You’ll have to repeat this filling step numerous times. Lift the can from time to time to assess the amount of alcohol it’s holding.

  3. Using your kitchen shears, cut the bottom base off of the third can along the rim.

  4. This bottom rim can now be used to extinguish the flame.

image


  1. To get the can kick-started, pour a little of the fuel around the base of the heater to raise the temperature of the metal and encourage rapid evaporation. Remember to have a slab of tile to protect any surfaces from the flames. Light the top of the heater and the fuel around the base. If necessary, repeat the lighting process a few times to get the burner started. Wait until any flames are out before adding any alcohol to the heater or the tile base. You should also be careful to watch for any phantom flames. Alcohol burns with a dim, blue flame and can be very hard to see.

  2. Once the can is starting to flame through the perimeter holes, let it burn for a few minutes. Some holes will not be lit but they should catch flame soon.

  3. When a good number of the rim, perimeter holes are flaming, toss the penny onto the can to seal the center holes. Center it in place with a screwdriver.

image

The heat from this tin can heater can not only be used to heat a space but to cook with a setup that will support a pot or pan. It also works very well with the terracotta flowerpot setup.

Points to Ponder

These DIY heaters work, but they can be dangerous. Here are some tips for managing an open flame.

Location
  • The floor is a really bad place for an open-flame heater. It can be easily knocked over by a careless step, an over-anxious pet, or someone knocking something over and into it.

  • Think about how you currently manage open flames in your home.

  • Most people understand the importance of a fireplace screen in front of an open fire.

  • Gas ranges isolate the blue flame at waist height in an environment typically surrounded by metal.

  • Candles usually occupy the center of a table or in sconces on the wall.

  • Even space heaters are usually set up away from walls or furniture and really shouldn’t be placed on a rug.
Ventilation
  • Be mindful of ventilation. Open flames burn up oxygen rapidly. However, many of us cook over gas range tops with no apparent effect, but if your paint can heater is burning for a long duration it might be time to think about opening a door or window.

  • Don’t go to sleep with one of these open-flame heaters blazing away. Anything can happen, although the tea candle and flowerpot setup may be the most benign if properly placed and insulated from any surface.

If you’re planning to use these heaters on a regular basis, you might want to think about stockpiling things like cans, isopropyl alcohol, tea candles, terracotta flowerpots, and a piece of fireproof insulation.

Hopefully, you’ll only use them for a short-term trip to the shed or the garage in winter, but if they become your only source of heat, you’ll want to be ready.

Start now to make sure you are staying prepared.


Save pagePDF pageEmail pagePrint page

How To Make Yeast For Long-Term Storage

Bread, beer, and wine are all foods that have been part of history for eons, but they all require yeast to make.


What if SHTF? Packaged yeasts are great, but they have a shelf-life and in order to make your own bread daily, you’d have to stockpile way too much to get you through. Isn’t it better to know how to make your own?


Read on, and you’ll have the yeast to make bread, alcoholic beverages and other goodies no matter what happens!


What is Yeast?

First, you need to know what yeast is. Essentially, it’s a leavening agent that made with “good” fungus during a separation and fermentation process. Yeast spores live on most plants so vegetables, fruits and grains can be used to obtain yeast for a variety of uses. Different yeasts are used for bread and alcoholic beverages – baker’s yeast and brewer’s yeast – and they’re not interchangeable.

Brewer’s yeast is and inactive (dead) yeast used to encourage the fermentation of fruits or vegetables into alcoholic beverages. Baker’s yeast is an active (live) yeast used for leavening. It’s what makes bread rise and gives it that fluffy lightness.

Salt and sugar are both necessary to make yeast but too much of either is a bad thing. The salt acts as a preservative. The sugar is actually the food that feeds the yeast. Once it’s consumed, the byproducts are carbon dioxide and alcohol in different proportions depending upon the strain of the yeast.

Baker’s yeast is made from yeast strains that make more carbon dioxide so that the bread rises. Brewer’s yeast is made from strains that make more alcohol.


Making Baker’s Yeast

There are a few different ways that you can make baker’s yeast. If you have a pack of dry yeast, you can use it to make a starter that you can keep going. To me, that seems to defeat the purpose of learning to making yeast from scratch, so we’ll concentrate on other methods.

I’ll include a recipe for using yeast, just so you have it if you want it, but let’s concentrate on doing it without the crutch! Finally, you may want to check out this article about making bread once you’ve got your yeast made.


How to Make Yeast from Potato Water

This is probably the easiest kind of yeast to make, because potatoes are always around. The yeast is great for making a nice loaf of bread, hot rolls, or even cinnamon rolls. Plus, it’s easy to keep as a starter so you don’t have to start from scratch every time you want to make bread. There are a couple of ways to do this.


Potato Yeast Method 1

All you need is potato water, flour, and sugar.

Cook your potatoes as you usually would, except save 3 cups of the water. Divide the water in half. Stir a tablespoon of sugar and about a cup of flour into a cup and a half of the water, or until the mixture is sort of stiff. Cover and leave overnight in a warm place and it should be bubbly and yeasty-smelling the next morning. If not, you’ll need to start over. This is why you should save some of the water back.


Potato Sourdough Yeast – cheater method
  • 1 pkg. (1 tbsp.) dried yeast

  • 1 cup warm (110-115 degrees F)

  • 1/2 cup sugar

  • 3 tbsp. instant potato flakes

Mix ingredients in a jar and cover loosely, then let it out at room temp for 24 hours. If you close it too tightly, you’re making a yeast bomb. OK, maybe not that bad, but the jar can crack or blow the lid off because of all the carbon dioxide that’s going to be released.

Refrigerate for 3 or 4 days. On the fourth day, stir in 1/2 cup sugar and 3 tbsp. instant potato flakes and a cup of water. Leave it at room temp for another 24 hours and take out a cup of it to make your bread. Feed it with another 1/2 cup sugar, 3 tbsp. potato flakes and a cup of water. You need to remove a cup of starter and feed it once a day if you leave it out or every 4 days if you refrigerate it. It just comes down to how often you want to bake.


Potato Starter 3

This is another take on the first starter but it uses the whole potato instead of flour.

  • One medium potato, peel on

  • 4 cups water

  • 1 tsp sugar

  • 1 tsp salt

Boil the potato in the water until it’s soft. Mash it well then add the sugar and salt.

Cool til it’s just barely warm, then add to the water.

Cover and put it in a warm place so that it can ferment. If it doesn’t ferment, you can cheat and add a packet of dried yeast. If you don’t want to do that, give it a day or two and if you still don’t get fermentation, you’ll have to start over. This makes enough starter to make a few loaves of bread.


Grain Starter

Yeast is present in all grains and this starter was used for centuries by people who couldn’t run to the grocery store and buy a packet of yeast. Fresh ground grain is, of course, the best to use but regular unbleached all-purpose flour will work, too.

  • 1 1/4 cup all-purpose flour (white or wheat)

  • 1 cup warm (not hot) water

Mix the flour and water then pour it into the jar. Cover and let stand in a warm place until it starts to bubble and rise. Depending on the temperature and humidity, this may take anywhere from 1-7 days. Take out a cup of starter for each loaf of bread, then add back in equal amounts of water and flour. You can toss dough scraps back in, too.


Grape Starter

Grapes are a great fruit to use to make yeast but you can use just about any fruit or peels to do it as long as it’s unwashed and organic. You can also use organic unpasteurized juice.

  • 3-4 cups grapes

  • 2 cup unbleached wheat flour

  • 1 cup water

Crush the grapes well and put the juice, pulp, and peels in a jar and cover with cheesecloth or a coffee filter. Put it in a warm place and leave it alone for 3 days. It’s kind of fun to check it every day because you’ll see the bubbles start to form. That means that the yeast is growing.

On the 4th or 5th day, strain the mixture and discard the peels and pulp. Don’t put them on your compost pile. Stir 1 cup of whole wheat flour into the juice. Let the starter set for 24 hours. Take out one cup and add another cup of flour and a cup of water. Leave it in a warm place for a couple of days. By this time, you should have a bubbly starter.

Remove up to 2 cups (enough to make 2 loaves of bread) and leave at least 1 cup as a starter. Feed it with another cup of water and cup of flour. Let is sit for at least 24 hours before removing more, and as long as you always leave a cup behind and add the feed, you’ll always have bread starter!

Just a side note: according to my sources, you can use fruit juice to make yeast starters for making alcoholic beverages, too. Yum…wine! Read this article to learn how to make wine.

9 Tips to Successful Yeast Making and Drying

  1. Don’t use too much salt or sugar when working with baker’s yeast. Both are necessary but too much of either, especially salt, will dry out the yeast.

  2. Make sure that all of your equipment is clean to the point of sterility. Any stray bacteria will ruin your yeast.

  3. To dry your yeast, simply spread your starter in a thin layer on baking sheet and dry either in the sun, in a warm (NOT HOT!) oven – about 100 degrees will do, or use your dehydrator. Don’t let it get too hot or you will kill the yeast.

  4. Store the dried yeast in an airtight container.

  5. To substitute your yeast for store-bought yeast, use 1 cup of wet starter for 1 pack of yeast, or twice the amount of homemade dried yeast as what’s recommended in the recipe.

  6. Do not put yeast or starter in your compost pile because the bacteria can grow out of control and upset the delicate balance of your pile.

  7. When you feed your starter, which we will explain in a bit, you need to throw away one cup of the original starter to keep the ratios even. That is, unless you feel like making a delicious loaf of bread or some cinnamon rolls instead of wasting it!

  8. Don’t wash your fruits or vegetables because you’ll wash off the yeast spores. Just take off any stems or leaves.

  9. Use homegrown or wild fruits or veggies because the store-bought ones will likely have chemicals. At the very least, they’ll have gone through a washing process which will have washed off the yeast. The exception here is a potato. Still, use organic to avoid the chemicals.

So you have one more recipe to add to your survival TO DO list, next to pemmican, lard, and other basic survival foods that our ancestors used to cook.


Start now to make sure you are staying prepared.

via:  survivopedia


Save pagePDF pageEmail pagePrint page

How to Make Your Own Mask for a Pandemic

How to Make Your Own Mask for a Pandemic

It didn’t take long after the coronavirus hit the world before medical masks sold out in the United States. I’m not sure if they sold out before the first case arrived in an American hospital, but it wasn’t long after that they did.

People bought up masks as fast as they could, in an effort to protect themselves from the deadly virus.

This wasn’t the first time I saw this happen. It happened during the Ebola outbreak of 2014 as well. Pandemics are scary and so people panic easily. They don’t know what to do, so they do what they can. Part of what they can is to buy surgical masks, thinking that they will protect them from catching the disease.

But what do you do when there are no more masks to buy? The first thing that happens is that people run around buying any other kind of mask they can find, hoping it will be good enough.

So, all the dust masks in all the hardware stores and lumberyards sell out just as fast as the medical masks did.

Then what?

Then there’s nothing else to buy.

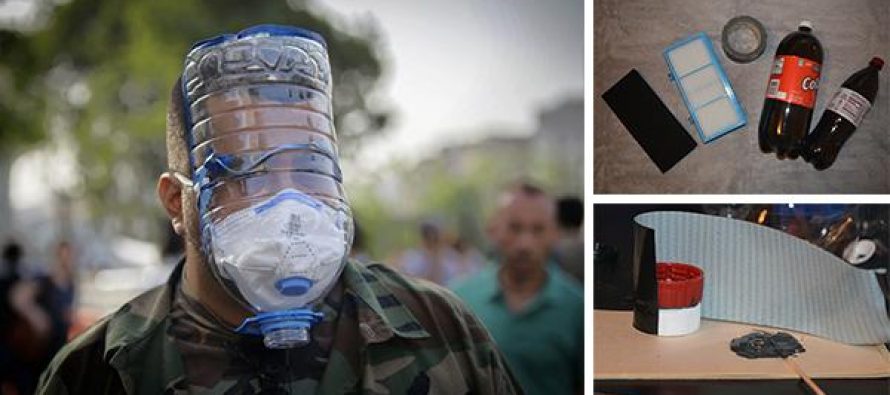
If you want a mask, the only thing left is to make one yourself.

Developing the Parameters

The idea behind wearing a medical mask is to catch airborne germs; both bacteria and viruses. But that’s somewhat of a misnomer, as there are very few diseases which are actually airborne.

Rather, those diseases are spread abroad by what is known as “aerosol;” droplets of spittle from coughing and sneezing. These droplets travel a maximum of either six or 12 feet, depending on which medical studies you believe.

In either case, they carry disease-causing germs within themselves, some of which can be breathed in by others, spreading the disease.

The standard medical mask is made of three layers of material, with the outer layer being plastic, so that water could not pass through it. The other two layers are absorbent.

The idea is that the absorbent layers will catch and absorb the spittle from any coughs or sneezes by the medical personnel wearing them, not that they will protect the doctors and nurses from any coughs and sneezes by their patients.

Nevertheless, since the outer layer of these masks is made of waterproof material, they will stop spittle from their patients, even though they won’t absorb it.

So, the masks are an aid in preventing medical personnel from contracting the disease.

The other common mask is the N95 mask that you’ve probably heard of. These masks are a hard cup-shaped mask, with a soft aluminum strip that forms over the nose.

Unlike the standard medical mask, these are intended to protect the wearer, as they filter incoming air. Molding the mask to the nose, with the aluminum strip, helps to ensure that no disease-laden droplets get around the mask and into the nose or mouth of the wearer.

The N95 rating actually means that the mask is expected to stop 95% of particulate matter; in other words, dust. However, because the outer layer of this mask is absorbent paper, it will also catch droplets of spittle.

So, whatever we come up with must be able to both filter our particulates and absorb spittle. The mask must also seal around the nose and mouth, preventing any stray droplets from getting around the edges and contaminating us.

Here’s what I came up with.

The Homemade Pandemic Mask

I wanted to limit myself to materials that would be readily available, even in the midst of a pandemic. I’m assuming that people can get to the grocery store and the hardware store, even though doing so is a risk.

But the materials must be readily available so that people don’t really have to hunt for them.

How to Make Your Own Mask for a Pandemic1

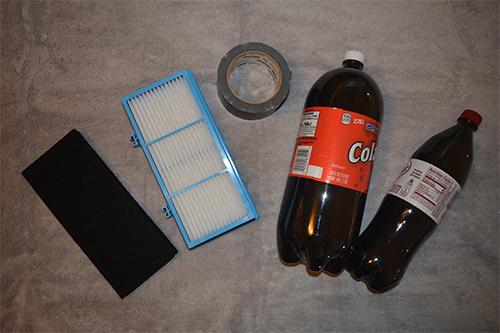
The basic materials consist of:

  • 3-liter soda bottle
  • 1-liter soda or water bottle
  • HEPA filters – such as are used in vacuum cleaners and home air purifiers
  • Carbon filter
  • Duct tape
  • Elastic (not shown)
  • Epoxy (not shown)

Building the Mask

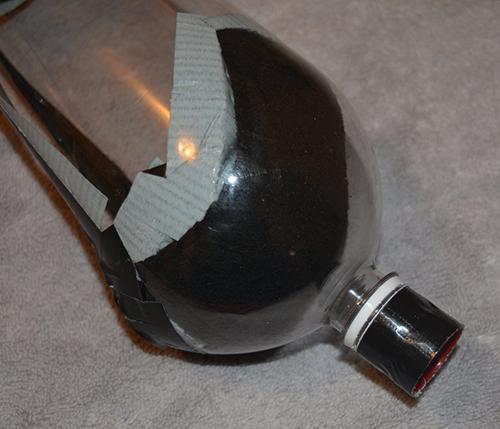
I decided that the mask itself had to cover all openings in the face, including the eyes, nose, and mouth. In severely contagious situations, medical personnel wears full-face shields or goggles, so as to protect them from those germ-rich droplets of spittle. If we’re trying to protect ourselves from a pandemic, it only makes sense that we would need to do the same. Hence the 3-liter soda bottle.

How to Make Your Own Mask for a Pandemic2

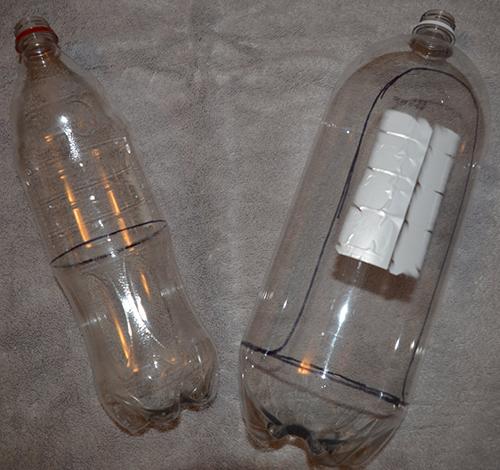
I started by emptying the bottles, rinsing them out, removing their labels and drawing the lines where I was going to cut them. The 3-liter bottle is going to be the face mask and the 1-liter bottle the filter.

I’ll connect the two together with a coupling made from the two caps.

There are no exact measurements for the bottles. I found that the width of the opening in the larger bottle, and especially the line of the curve near the top, needs to match the curvature under the chin of the wearer.

What works for me, doesn’t fit right for my wife. For the smaller bottle, I chose the cut line where I did because the bottle narrowed a bit below that point, which would make it harder to install my filter.

Cutting these bottles is easy; it can be done with a hobby or utility knife. However, I found that it was easier to cut them, once I made an initial slit, with a small pair of scissors, something like those used for cutting hair.

The ones I used were serrated slightly, but I don’t think that made any difference.

Later, I decided to use the bottom of the 1-liter soda bottle as well, like a baffle for the filter. So, although there is no line shown in the picture above, I cut the bottom off that bottle and saved it.

How to Make Your Own Mask for a Pandemic3

Once I cut the outline I wanted in the 3-liter bottle, I taped the edges with duct tape, so as to make it less scratchy. I then punched holes in it with a hole punch and put elastic through the holes to hold the mask to my head.

Building the Coupling

The design concept I have uses two bottles; a large one for the mask and a smaller one for the filter. These two obviously have to be coupled together, in order for the mask to work. Fortunately, the bottle caps made it very easy to create a coupling.

How to Make Your Own Mask for a Pandemic4

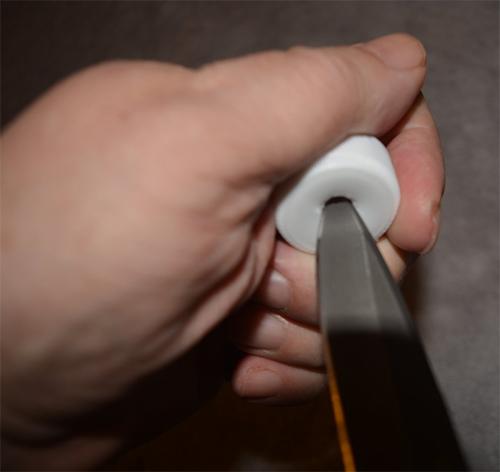
To start with, I needed holes in the caps. Since I had left my drill at my workshop, I grabbed my pocket knife and used that as a drill, to make approximately ½ inch holes in both caps.

Be careful to not use too much pressure on the knife, as you could poke through and cut your hand. The cap material is soft and cuts easily, even when trying to drill through it in this manner.

How to Make Your Own Mask for a Pandemic5

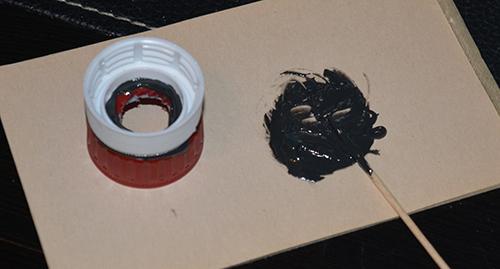
The two caps need to be glued together for the coupling. For this, I went to my go-to glue, fast-drying epoxy. Epoxy is strong and can be used for just about anything. In this case, the bottle caps are probably polyethylene, which doesn’t glue well.

So I roughed up the surface with some 100-grit sandpaper, giving the epoxy something to grip onto.

How to Make Your Own Mask for a Pandemic6

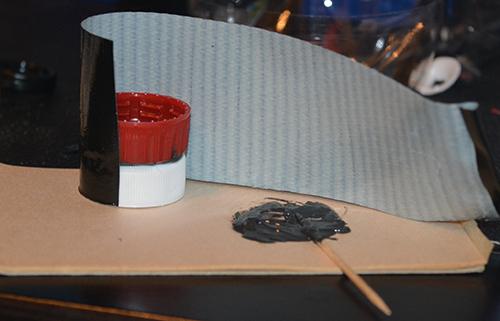
To help ensure the strength of the coupling, I then wrapped it in a piece of duct tape, getting a couple of revolutions around the whole coupling. Then I cut the tape flush with the ends of the coupling. If necessary, the duct tape will be strong enough to hold the coupling together, providing an air-tight seal, even if the epoxy is unable to remain bonded to the plastic caps.

Making a Filter

This left me with the need to make a filter. I decided to use a two-stage filter design, for extra security. The first layer, which will be in the smaller bottle, making it replaceable, is a HEPA filter.

The HEPA (high-efficiency particulate absorbing) standard is one that has been developed for air filtration equipment. It must be able to remove 99.97 percent of all particles that are 0.3 microns in size.

Interestingly enough, this specification makes the HEPA filter roughly the equivalent of the N95 mask filter. Actually, I think it’s a bit better; although I won’t guarantee it, as the specifications are written in such a way that it’s a little like comparing apples and oranges.

The language just isn’t the same in the two specifications.

Nevertheless, a HEPA filter is supposed to be able to remove most bacteria and viruses, in addition to particulate matter, so it’s ideal for our purposes.

How to Make Your Own Mask for a Pandemic7

The HEPA filters I bought are actually designed for use in a home air cleaning system. I could have just as easily used one for a vacuum cleaner, but these were readily available and reasonably priced. By buying them online, I saved myself a trip to the store.

As you can see from the photo above, the filter itself is accordion folded and placed in a plastic housing that holds it that way. As the housing doesn’t match the shape that I need, I just removed the filter medium itself and cut off a section the right size to fit in my bottle. Let me stress – you can do this with any HEPA filter you can find; you don’t need the same filter that I used.

How to Make Your Own Mask for a Pandemic8

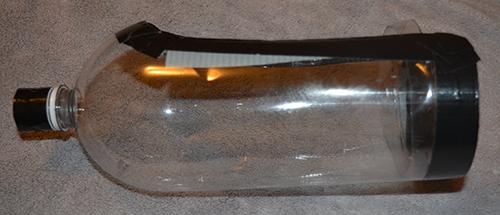
To make my filter unit, all I did was to hot melt glue that accordion-folded filter into the 1-liter bottle. That was actually a bit tricky, as it was hard to get the glue gun down into the bottle to work.

But it is essential that the filter is glued all the way around and that there not be any gaps where air can flow through, without flowing through the filter. You’re better off using too much glue, than not enough.

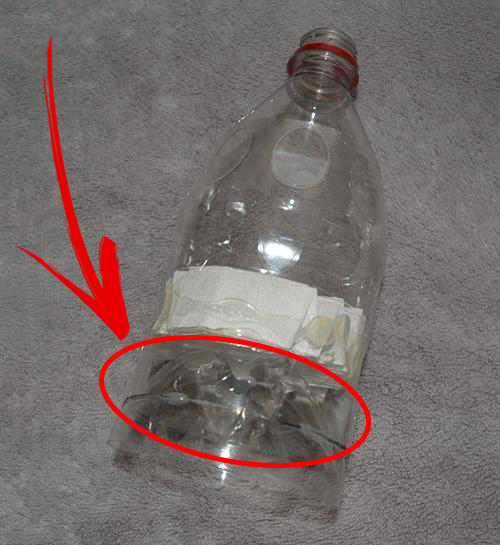
Finally, I took the bottom of the bottle and glued it to the bottom of my filter unit, inverted. It’s hard to see in the picture above, but the arrow is pointing at a gap in the plastic, where the base of the bottle was indented.

There are five of these gaps between the base and the upper part of the bottle, as installed, giving plenty of room for air to get in.

The idea behind installing the base like this is to act as a baffle, keeping droplets of aerosol from coming into the filter unit and hitting the filter medium itself. While it is still possible for droplets to get in, I felt that it was best to make it as difficult as possible, so that my filter would not become clogged from damp spittle.

How to Make Your Own Mask for a Pandemic9

I added a second layer of filtration, taping a double layer of activated carbon filter into the bottom of the mask, with duct tape. This is a backup to the other filter, should anything get through it.

Activated carbon has been used in a large number of different types of filters designed to capture microscopic pathogens of the type we are trying to protect ourselves from.

Using the Mask

In order to use the mask, the two bottles are screwed together by the coupling. Then your chin is the curve of the cutout in the mask and lifts the mask up to your face, pressing the top of it against your forehead.

Slip the elastic band around your head to hold it in place.

How to Make Your Own Mask for a Pandemic10

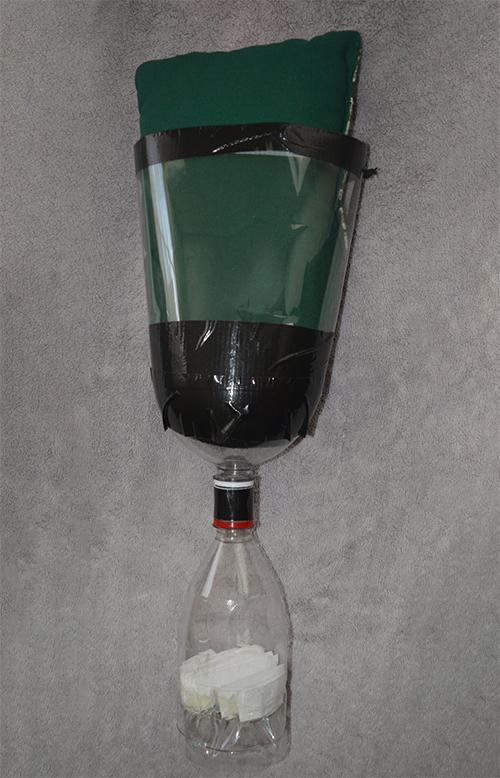
One of the good things about this design is that it allows you to change your filter element as needed. You can make one mask and several filters, changing them as needed.

This should be every eight hours at the most. If the filter seems to be becoming clogged, change it more frequently.


Start now to make sure you are staying prepared.


via:  askaprepper
Save pagePDF pageEmail pagePrint page

Will Cars Still Run After an EMP? The Surprising Truth

Imagine every electronic device going dark in the blink of an eye. Forget about luxuries such as your smartphone or wi-fi, and imagine basic necessities like power, heat, supply chains, and infrastructure rendered completely inoperable. Imagine communications completely disabled.

This is the potential effect of an EMP, or an Electromagnetic Pulse. An EMP could alter the landscape of the entire power-grid in an instant, rendering whole cities blacked out for prolonged periods or even permanently. Food, fuel and water may very well become inaccessible when the power has failed completely.

An EMP event is quite scary, but would all cars on the roads just come rolling to a stop when an EMP strikes? We rely on vehicles for everything from getting groceries from the store to maintaining resupply chains that make our modern life possible. If they were to stop, getting out of town would no longer be an option for most people.

For this article, we’ll look at whether a strong EMP would disable all vehicles, which vehicles are most likely to be safe from an EMP, and how you can safeguard your vehicle from an EMP attack.

What is an EMP?

An Electromagnetic Pulse, or EMP, is a burst of electromagnetic energy. While energy is always in motion around us, an EMP is specifically notable for causing electronic disruptions by inducing current into electronics, sometimes severely damaging or destroying them. In extreme cases, an EMP can even knock out the power grid, or worse.

There are two main types of EMPs: natural and man-made. A bolt of lightning or a solar flare can cause an EMP, for example. The massive increase and change in electromagnetic energy as a result of a lightning bolt is a naturally occurring EMP. Solar flares causing highly charged atoms to shoot at high speeds from the sun towards the Earth is another form of a natural EMP.

Perhaps the best-known example of a man-made EMP source is from a nuclear blast. A nuclear blast shoots off multiple pulses of energy in its wake; these varied waves of energy cause significant disruptions to nearby electronics. Here is a more detailed (and scientific) explanation of EMP’s and how they damage electronic devices.

A major city after an EMP is a dangerous place to be—especially if you’re without a working car.

Many people are understandably concerned over EMP devices that are specifically designed to knock-out power, which are also known as High Altitude Electromagnetic Pulses, or HEMPs. A HEMP could either be a nuclear bomb detonated high in the atmosphere as a weapon or a device designed to knock out infrastructure and electronics without the heavy casualties of nuclear warfare. HEMPs can affect a much larger area in concentric circles from the blast. The area of effect would depend on how high in the atmosphere the device detonates. The US Congress received a detailed report on HEMP effects in 2008.

EMP attacks are not relegated to the realm of Science Fiction. A 1987 solar flare knocked out a large portion of the Canadian power grid. Lightning routinely damages electronic devices, although on a much more localized scale. British scientists, unaware of the electrical damage nuclear blasts would cause, suffered a massive instrument failure (they called it ‘radioflash‘) after their initial nuclear weapons tests in the 1950s. These events happened and they can certainly happen again. It’s a good idea to understand them and understand what EMPs are capable of.

Would an EMP Attack Disable all Vehicles?

No, an EMP attack would not disable all vehicles. According to a study conducted by the United States EMP Commission, only about 1 out of 50 vehicles are likely to be rendered inoperable. The effects of an EMP on hybrid and electric vehicles, however, have yet to be studied and is currently unknown.

Questions about the potential damage to vehicles in the aftermath of an EMP are quite common. An exhaustive study by the EMP Commission to determine the effects of an EMP on the United States (available here) were conclusive: most vehicles would survive an EMP.

U.S. EMP Commission Test Results – Key Points

  • 50 vehicles built between 1987 and 2002 were exposed to a spectrum of EMP blasts (up to 50kV/m in strength).
  • 3 out of 50 vehicles shut down while driving.
  • All 3 of these vehicles continued rolling until they safely coasted to a stop.
  • 1 of those vehicles was disabled completely and would not restart.
  • 2 of those vehicle restarted without an issue.
  • Many nuisance issues arose from the 50 exposed vehicles including radio interference, strange and erratic behavior from headlights, turn-signals or brake-lights, and one vehicle needed to have its dashboard replaced

The EMP Commission believed there was a potential for unnecessary deaths from vehicles if the vehicles were exposed to an EMP burst which exceeded 25kV/m. The potential for death and serious injury would not come as the result of an electronic failure, however, but rather due to potential accidents that vehicles slowing down suddenly could cause, especially if those vehicles had issues with their brake lights.

The EMP test indicates that roughly 15% of running vehicles may shut down if exposed to an EMP blast at or over 25kV/m over a wide range of area. In other words, short of a massive solar flare, only a nuclear explosion or purpose-built EMP would create the kind of pulse needed to cause the shutdown effect to occur.

When considering the EMP Survey by the EMP Commission, there are a few points to think about. First, this study finished in 2004. Second, the cars used in the study were older models, built in a range from 1987 until 2002. Third, we do not know which specific vehicles the Commission conducted these tests on, as the Commission never released information on car makes or models. Fourth, cars have developed far more complex and integrated electrical systems since 2002, the latest model year tested. Finally, the test does not appear to have been recreated and the results are not scientifically verified as a result.

Testing a Modern Vehicle in a Lightning Strike

This video from the British car show Top Gear actually explains this concept quite well. Volkswagen has a purpose-built facility to test their cars against potential lightning strikes with charges of up to 800,000 volts. After the bolt hits, the car starts right up. Modern cars can survive a multitude of electrical issues without failing.

Resilience of Modern Vehicles

By design, modern automobiles can survive extreme temperatures and other harsh conditions. Modern cars have many fail-safe systems in case of electrical or mechanical failure. As a result, most cars will continue to run without major issue even in the face of extreme electrical disruption.

Many commentators on this subject believe the EMP study is out of date. Specifically, there’s a theory that older vehicles lacked the integrated computing systems and complex electrical engineering that modern cars have. While this is true, cars have had computers since Volkswagen introduced one to operate their electronic fuel injection (EFI) system in 1968. Engine Control Units (ECUs) have been widespread since the 1970s. It is safe to assume every vehicle in the EMP Commission Study had an ECU in one form or another.

In one sense, it’s understandable that people worry about modern vehicles being more electronically sensitive to EMP damage. However, modern vehicles have more protective shielding, grounds and plastics to replace metals now than they’ve ever have in the past. In almost all cases, modern cars should be more capable of withstanding electrical interference than they have been in the past. Except of course, if you are talking about vehicles manufactured before ECU’s and were largely mechanical based in their functions.

So, in summary, EMP’s will not disable most vehicles. Many modern vehicles which would seem unlikely to survive the EMP probably will survive the EMP, but we don’t currently have sufficient testing to verify that.

The Strongest Possible EMP Attack

Let us consider the ‘doomsday’ scenario for a moment. An EMP hits and the power goes out. For the sake of argument, let us assume that the EMP completely knocks out the entire power-grid of the United States and that no other country is willing or able to divert power to the country. Manufacturing crumbles, international trade evaporates and the America is transported back to the 1800s.

Realistically, only a nuclear explosion at a specific altitude or a strong solar flare could cause that sort of disruption. Anything with long wires leading to it will be especially vulnerable to this (such as the power grid—or anything connected to it). That’s because the long power lines will act like a giant antenna and gather massive amounts of energy flowing through the atmosphere, channeling it into whatever they’re connected to.

Modern motor vehicles do have a lot of wiring in them, but this wiring doesn’t travel out from the vehicle and are, generally speaking, coiled tightly inside the metal box that is your car’s shell. A HEMP designed to knock out power will probably fail to generate more than 25kV/m outside of the immediate blast area, meaning most cars will survive without any issues at all, as the testing done by the U.S. EMP Commission showed.

Generally speaking, your vehicle will be the least of your concerns in this type of situation.The electrical system of modern cars feature much better shielding. The electrical shielding your car has will not prevent the inevitable part failures all cars experience. The lack of spare parts or able mechanics will likely ultimately sink your vehicle, not the EMP itself.

What Type of Car is Most Likely to Survive?

In a doomsday EMP scenario, the vehicle most likely to be viable is an older model diesel vehicle that lacks electronics. Since the roads will not have maintenance you will probably want a 4×4 vehicle that can go off-road when necessary.

Most modern diesel vehicles are just as technologically advanced and electronically complex as their gasoline counterparts. The big difference between diesel and gasoline is in finding fuels in case the power goes out. A gasoline engine requires highly refined and specifically processed fuel. Diesel engines can run on almost any type of fuel, including bio-diesels like algae and vegetable oil. Yes, vegetable oil.

While both carburator based and fuel injection vehicles are likely to survive the EMP, vehicles utilizing carburetors are far less reliant on modern electronics as fuel injected vehicles are. If you worry about the lights going off and never coming back on, you should avoid fuel injection vehicles.

“If you’re serious about having a vehicle that will survive massive EMP damage, then you’re looking for a naturally aspirated diesel engine from before about 1990. A 4×4 is probably a safer bet than a front or rear wheel drive.”

How does the Military Protect Against EMPs?

The military is an interesting case study in EMP defense. The military not only faces the potential for natural phenomenon, like a lightning strike or solar flare, they also face the possibility of fighting against a foreign power that uses weapons to disrupt communications, navigation, aviation, and other critical aspects of warfare.

The military primarily uses a simple Faraday Cage to protect their equipment against the potential damages of an EMP attack. A Faraday Cage is a simple construction of grounded metal surrounding sensitive electronic wiring and equipment. During a surge of electromagnetic energy, such as the most severe EMPs, military equipment is protected from damage by this simple Faraday Cage.

Advanced equipment, such as jet-fighter planes, are mostly protected by the same concept. In both the case of a car and a fighter plane, military equipment is further designed and developed to operate independently of its electrical systems. Even if the electronics fail, there are a number of active fail-safes in place to operate both vehicles and airplanes by hydraulics and manual control, if necessary, to prevent a critical error and eventual crisis.

It should be pointed out that similar fail-safe systems are in place in civilian aircraft, civilian electronics,and yes, civilian automobiles.

Preparing Your Car for an EMP

Most vehicles will survive the doomsday scenario without missing a beat, and there really isn’t much you need to do. The real threat to a vehicle after some kind of apocalyptic event is a lack of fuel and spare parts, not an electrical failure.

To prepare for the potential EMP disaster, you could stock up on parts that could commonly fail or might be required for routine maintenance. These include:

  • Spare fuel—treated with Stabil fuel stabilizer to extend its shelf life
  • Various required filters (air filter, oil filter, and fuel filter)
  • Oil change supplies
  • Battery
  • Alternator
  • ECU
  • Sensors
  • Any other on-board computers

Keeping regular maintenance items on hand, such as those required to complete an oil change, is a great idea. The other spare parts on this list might be a bit more expensive. You can find the spare parts you need by plugging your VIN into one of the many car-parts websites and looking up replacement parts that fit your vehicle.

However, my favorite source for spare parts to have on hand in case of an EMP is a wrecking yard. Find a vehicle as close as possible to yours at your local wrecking yard and remove all the sensors you can find along alternator and ECU. It’ll be far cheaper than buying all brand new parts.

For a more in-depth discussion on how an EMP may affect batteries, see How Would an EMP Effect Batteries.

You may consider putting spare electronic engine components into a Faraday bag for further protection—that’s what I do. If you’ve gone to all this trouble to be prepared by buying a second set of vulnerable parts, you might as well go a little further by putting them in an EMP-proof Faraday bag such as these.


Another great video to check out:

Protect Generators and Cars from EMP


Describes using conductive cloth to protect cars and generators from a high-altitude nuclear EMP attack. Cloth can be found at https://disasterpreparer.com/?product=emp-cloth.


Start now to make sure you are staying prepared.


via:  superprepper
Save pagePDF pageEmail pagePrint page

Free Homesteading, Cooking, Prepper, Survival eBooks & PDF’s for 10-16-18

Free Kindle Survival Homesteading Books

Free Homesteading, cooking, Survival, , and Prepping Kindle ebooks and PDF’s? Yes FREE Kindle ebooks and PDF’s!! Every now and then Amazon runs special offers on some of their Kindle ebooks and PDF’s, making them free for a limited time (usually just 24 hours).

I will check Amazon on regularly basis for their free Kindle ebooks in related subjects such as survival, homesteading and prepping etc. I will do all the leg-work for you so you don’t have to. You can just come back here regularly, so make sure to bookmark this blog.

These ebooks and PDF’s are only free for a limited time so if you are interested in one make sure you get it right away so you don’t lose out!

Remember you DON’T need a kindle to take advantage of these! There are FREE kindle apps for most major platforms!! iPhone, iPad, PC, Mac and Android. You can find those apps here!

Always check price before engaging, to make sure it hasn’t returned to full price.

imageimageimage

imageimageimage

imageimageimage

imageimageimage

Start now to make sure you are staying prepared.
Save pagePDF pageEmail pagePrint page

Free Homesteading, Cooking, Prepper, Survival eBooks &PDF’s for 10-11-18

Free Kindle Survival Homesteading Books

Free Homesteading, cooking, Survival, , and Prepping Kindle ebooks and PDF’s? Yes FREE Kindle ebooks and PDF’s!! Every now and then Amazon runs special offers on some of their Kindle ebooks and PDF’s, making them free for a limited time (usually just 24 hours).

I will check Amazon on regularly basis for their free Kindle ebooks in related subjects such as survival, homesteading and prepping etc. I will do all the leg-work for you so you don’t have to. You can just come back here regularly, so make sure to bookmark this blog.

These ebooks and PDF’s are only free for a limited time so if you are interested in one make sure you get it right away so you don’t lose out!

Remember you DON’T need a kindle to take advantage of these! There are FREE kindle apps for most major platforms!! iPhone, iPad, PC, Mac and Android. You can find those apps here!

Always check price before engaging, to make sure it hasn’t returned to full price.

imageimageimage

imageimageimage

imageimageimage

imageimageimage

imageimageimage

Start now to make sure you are staying prepared.
Save pagePDF pageEmail pagePrint page

Free Homesteading, Cooking, Prepper, Survival eBooks & PDF’s for 09-26-18

Free Kindle Survival Homesteading Books

Free Homesteading, cooking, Survival, , and Prepping Kindle ebooks and PDF’s? Yes FREE Kindle ebooks and PDF’s!! Every now and then Amazon runs special offers on some of their Kindle ebooks and PDF’s, making them free for a limited time (usually just 24 hours).

I will check Amazon on regularly basis for their free Kindle ebooks in related subjects such as survival, homesteading and prepping etc. I will do all the leg-work for you so you don’t have to. You can just come back here regularly, so make sure to bookmark this blog.

These ebooks and PDF’s are only free for a limited time so if you are interested in one make sure you get it right away so you don’t lose out!

Remember you DON’T need a kindle to take advantage of these! There are FREE kindle apps for most major platforms!! iPhone, iPad, PC, Mac and Android. You can find those apps here!

Always check price before engaging, to make sure it hasn’t returned to full price.

imageimageimage

imageimageimage

imageimageimage

imageimageimage

imageimageimage


Start now to make sure you are staying prepared.
Save pagePDF pageEmail pagePrint page

Free Homesteading, Cooking, Prepper, Survival eBooks & PDF’s for 08-27-18

Free Kindle Survival Homesteading Books

Free Homesteading, cooking, Survival, , and Prepping Kindle ebooks and PDF’s? Yes FREE Kindle ebooks and PDF’s!! Every now and then Amazon runs special offers on some of their Kindle ebooks and PDF’s, making them free for a limited time (usually just 24 hours).

I will check Amazon on regularly basis for their free Kindle ebooks in related subjects such as survival, homesteading and prepping etc. I will do all the leg-work for you so you don’t have to. You can just come back here regularly, so make sure to bookmark this blog.

These ebooks and PDF’s are only free for a limited time so if you are interested in one make sure you get it right away so you don’t lose out!

Remember you DON’T need a kindle to take advantage of these! There are FREE kindle apps for most major platforms!! iPhone, iPad, PC, Mac and Android. You can find those apps here!

Always check price before engaging, to make sure it hasn’t returned to full price.

imageimageimage

imageimageimage

imageimageimage

imageimageimage

imageimageimage


Start now to make sure you are staying prepared.
Save pagePDF pageEmail pagePrint page

Free Homesteading, Cooking, Prepper, Survival eBooks & PDF’s for 08-11-18

Free Kindle Survival Homesteading Books

Free Homesteading, cooking, Survival, , and Prepping Kindle ebooks and PDF’s? Yes FREE Kindle ebooks and PDF’s!! Every now and then Amazon runs special offers on some of their Kindle ebooks and PDF’s, making them free for a limited time (usually just 24 hours).

I will check Amazon on regularly basis for their free Kindle ebooks in related subjects such as survival, homesteading and prepping etc. I will do all the leg-work for you so you don’t have to. You can just come back here regularly, so make sure to bookmark this blog.

These ebooks and PDF’s are only free for a limited time so if you are interested in one make sure you get it right away so you don’t lose out!

Remember you DON’T need a kindle to take advantage of these! There are FREE kindle apps for most major platforms!! iPhone, iPad, PC, Mac and Android. You can find those apps here!

Always check price before engaging, to make sure it hasn’t returned to full price.

imageimageimage

imageimageimage

imageimageimage

imageimageimage


Start now to make sure you are staying prepared.
Save pagePDF pageEmail pagePrint page