We must, all of us, be honest. How many of you really enjoy drinking reconstituted powdered milk? Not me!
On the occasions when I have had to drink it, it was with the deepest loathing. It has that stale “powdered milk” taste, and leaves the uncomfortable feeling I am really drinking white water. I think I speak for the majority of us when I say, Ick!
I have a much better use for powdered milk, turning it into homemade yogurt!
I bet some of you are thinking, “Ugh, that sounds pretty complicated. I’m sure it’s not for me.” Don’t despair! While some advocate carefully monitoring the temperature of your milk through the whole process, using special equipment, I am much more laid back. I have been making yogurt on a regular basis for a few years now and have had great success.
The end product is smooth, tasty and completely devoid of all the characteristics I so hate about powdered milk. Once you try this, you will want to make it all the time! This recipe makes eight cups.
Ingredients:
You will need:
1/2 cup yogurt (your “starter”) – This needs to be yogurt with LIVE bacterial cultures. It can be plain grocery store yogurt or 1/2 cup of yogurt from your own last batch. If using your own yogurt, it will have to be less than two weeks old. Any older than that and the cultures die off and the old yogurt will not properly inoculate your milk to turn it into new yogurt. As an alternative to actual yogurt, cheese supply companies sell powdered bacterial cultures that are specifically formulated for yogurt-making. These will keep in your freezer for up to a year.
Enough milk powder to make eight cups when reconstituted – A quick word here about what kind of powdered milk to use: There are many different brands on the market. I’ve tried several different kinds and some work better than others.
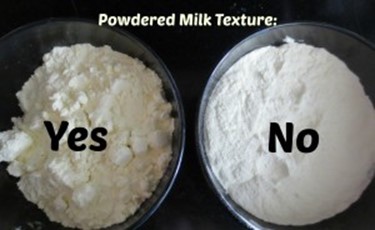
To make sure your yogurt is smooth and creamy instead of grainy or chunky, use a brand that is smooth and fine in texture while it is still in powdered form, similar to powdered sugar or white flour. Grainy milk powder will make grainy yogurt. I use a non-name brand that says to use 3 Tbsp of powder for every cup of water. When making yogurt, I round it up a bit and use 1 1/2 cups of powder for my yogurt recipe.
Eight cups of water
A crock pot – If you have a yogurt maker, you can also use it. You may also be able to find online tutorials that use an electric heating pad or a dehydrator. I understand that these methods also work well. I have always used a crock pot and have never gone wrong, so this tutorial will discuss that method.
A whisk
A food thermometer
Method:
1) Put eight cups of water in your crock pot and then add your milk powder and whisk it vigorously until all lumps are gone. If you miss a teeny little lump or two, it’s not a big deal. Put the cover on your crock pot and leave it on low heat for three hours, after which your milk should be in the neighborhood of 180 degrees F.
2) When your milk has come up to temperature and /or has spent the appropriate amount of time in your crock pot, turn off the heat and unplug it. (Unplugging it is very important if you live in a house with little children who live for toggling knobs and pushing buttons that should not be pushed.) Leave it to cool down for about 2 hrs and 45 minutes, when it is at around 110 degrees. Do use a food thermometer at each step to make sure it’s at the correct temperature.
3) Now, take one cup of warm milk from your crock pot and put it in a bowl with your yogurt starter, to temper your inoculant. Whisk it together until it is smooth, pour it all back into the crock pot and stir it together.
4) Cover the crock pot with a beach towel to hold in the heat and let it sit for about 6-8 hours. You might think that a measly little towel isn’t enough to keep it warm – trust me, it is. If you peek under the crock pot lid after a couple of hours, you will be greeted by a warm, slightly sour yogurty smell that will tell you that the live bacteria are doing their little microscopic jobs.
5) After your yogurt has sat on the counter under the towel for the prescribed amount of time, move the crock into the fridge overnight. You might be tempted to stir it a bit at this point, but this is not recommended. In fact, this is a good way to get grainy yogurt. For best results, don’t disturb the gel until it has completely cooled.
Great! Now What Do I Do With Half A Gallon Of Homemade Yogurt?
My children love this stuff and have been known to go through a whole batch in less than four days. One of my sons prefers it with homemade jam, and the other likes it with a bit of vanilla extract and some sugar for sweetening. I also use it to make naan, a variety of Indian flat bread. It can be drained in cheesecloth to make Greek yogurt or even yogurt cheese.
I want to emphasize that none of these instructions are hard and fast rules. I have sometimes left the milk warming in the crock pot for four hours instead of three, and one more than one occasion I have left the crock pot on the counter overnight! It still has turned out fine
Start now to make sure you are staying prepared.
Via : thesurvivalmom


 Follow
Leave a Reply