Guest post by Sarah at penniless parenting
I will be trying to force myself to take it easy for the next few weeks now that I gave birth, because I know I have a tendency to push myself, but I do need to take it easy if I want to be back to 100% normal faster. But I don’t want to let you blog readers down, and I want to keep the good information flowing from this blog. I’ve asked some friends of mine who are on the same page as I am in some way, to write guest posts on topics that I like for this blog which I’ll be sharing with you readers over the next little while.
First up is this post by my friend, Sarah. She’s a really cool mama who is famous in my circles for her sprouted flour that she makes for her family, as well as provides for others. When Sarah told me she’d write up this post about how she makes her sprouted flour, I was very excited, since sprouting grains for flour is something that I’d been interested in learning about and maybe encorporating into my life, but hadn’t yet. Sprouting makes things more digestible and healthy, and since I have my own grinder and dehydrator, why not? Sarah tends to grind sprouted gluten grains, but this post is good for anyone, gluten free or not, since you can sprout nearly anything you can grind into flour. When I am fully recovered from birth, the first two types of sprouted flours I plan on making are chickpea and buckwheat flours.
Hope you find this post as informative and enjoyable as I did!
Grinding sprouted flour
Properly prepared grains and legumes are a key component to a healthy diet. The main issue with regular spelt/wheat/legume flour is the phytic acid they contain in their unsoaked form. Soaking them gets rid of this issue. Sprouting the grains/legumes after soaking adds additional nutritional benefits: it slightly lowers gluten in glutenous grains, increases the protein quality, and significantly increases vitamins A, C, D, E, K, calcium, iron, magnesium, niacin, pantothenic acid, phosphorus, potassium, zinc, all amino acids, and protein to all grains/legumes. Sprouted flour is actually a bit sweeter from the sprouting process and much more delicious and nourishing than its unsprouted counterparts.
This process can be done with any grain or legume that you can sprout such as wheat, spelt, rye, quinoa, green buckwheat, chickpeas, mung beans, etc. Buy organic if you can to assure good sprouting outcomes.
For things that don’t sprout so well, like brown rice, oat, and some beans, you can follow these instructions just skipping step 4 (sprouting) and going straight to step 5 (spreading out onto dehydrator trays). Doing a long soak (24 hours) makes grains and especially legumes much more digestible and gets rid of the phytic acid. Only soaking yields a flour that is wonderful and healthy without the extra added benefits of sprouting. Both ways are delicious-tasting and great for your body!
In this tutorial I am using a 9-tray Excalibur food dehydrator and high-protein organic spelt grains. I am using 6 kilograms (a bit over 13 pounds) of grain because that is the amount that fills my dehydrator best. Feel free to scale down! For simplicity’s sake, I use the words “grains” and “spelt” in this post which can be replaced with whatever grain or legume you are using.
|
|
|
Bulk sacks of wheat/spelt. |

1) CLEAN: Go over your grains/legumes and pick out stones and anything else that looks funky. You can skip this step and just look over the grains as you spread them out on your dehydrator sheets. In my spelt I usually find some stones, seeds of some sort, little woody pieces (hard to describe) and the occasional bean!
|
|
|
Bathing spelt |

2) SOAK: Put 6 kilograms (a bit over 13 pounds) into a large stainless steel bowl. Make sure that the bowl is big enough to house the expansion of the grains that will occur when you soak. Cover by a few inches with filtered water of your preference. I use reverse osmosis. Soak for 12-24 hours. I usually soak for 12 hours if I plan to sprout. If I don’t want to sprout, I usually do a 24 hour soak (see above notes for more talk about this). Add an acid medium like vinegar, if desired.
(Note from Penny- not all grains/legumes need to be soaked the same amount of time before sprouting. Buckwheat, for example, needs to be soaked no more than 30 minutes or it will get waterlogged and not sprout. Check out SproutPeople.com’s informative site with soaking times for nearly everything you would ever think of sprouting.)
|
|
|
Colander stack–where the sprouting magic happens |

3) DRAIN: After 12-24 hours have passed, find a colander that will fit your grains. I use two colanders stacked on top of each other because I’m sprouting a huge amount. Drain the grains using your colander and rinse with filtered water. Wet a cloth, wring it, and place over the colander.
|
|
|
Perfecto! |

4) SPROUT: Wait for your grains to sprout. Anywhere from 12-24 hours. A short sprout is the KEY to the success and usability of the finished product. You want to sprout just a LITTLE bit. Just when the bud emerges is ideal. Sprouted a little more than that is fine too, just be sure the sprout’s length is shorter than the grain it’s spouting from. Over-sprouted grains are great in salad, but will make the most disgusting, gummy, gross bread EVER. Trust me.
|
|
|
Ready for dehydrating! |

5) LAY OUT: Once spouted to the ideal size (or as soaked as you desire for the soak-only version), it’s time to spread the grains out on your dehydrator sheets. I cut window screens to line my dehydrator sheets because the screens they came with have holes that are too big and spouted wheat and other small grains/legumes fall through once dehydrated. When using 6 kilograms (a bit over 13 pounds) of grain, I put 6 cups of the sprouts on each tray which fills my 9-tray Excalibur perfectly. Pat the grain to spread it out evenly onto each tray.
|
|
|
Fully loaded |

6) DEHYDRATE: Dehydrate on low heat (up to 115 degrees Fahrenheit / 46 degrees Celsius) for 12 hours. Low heat ensures maximum nutritional value. If you don’t have a dehydrator, you can use your oven set to its lowest temperature with the oven door propped slightly ajar.
|
|
|
Spelt mountain! |

7) BAG: Once dehydrated, dump the dry grains onto a large piece of cloth, clean garbage bag, or (as I do) on an empty 25 kilogram (55 pound)-size bulk wheat sack. Transfer the grain to gallon size Zip-lock bags or the receptacle of your choice. If I had a bunch of gallon-sized mason jars, that would be my ideal choice! Each gallon-size bag holds 3 kg (about 6.5 pounds) of dehydrated grain. I like to bag my grains so I can grind a little bit at a time, fresh, right before using.
|
|
|
Ready for chilling |

8) CHILL: Before grinding you have the choice of chilling the grain beforehand or not. I like to freeze my grains before milling to preserve the nutritional value as much as possible. My stone mill doesn’t heat up the flour very much, but for those of you with burr-blade types of mills, this step would be highly recommended. You can chill the grains in your fridge or freezer, wherever you have more space.
|
|
|
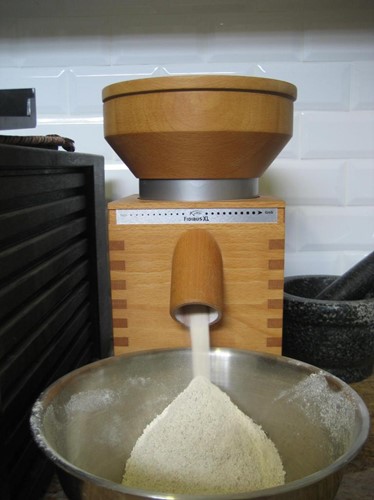
Stone grinder at work |

9) MILL: Grind your properly prepared, dehydrated, chilled (or not) grains. I use a Komo Fidibus XL which is a stone mill. It’s beautiful and I absolutely LOVE it. When stone grinding, make sure to check and adjust the grind setting every time the hopper empties before you put in more grain when you are grinding larger quantities. This ensures an even grind throughout.
|
|
|
Yummy! |

10) BAKE: Use your freshly milled, delicious, traditionally-prepared flour in your favorite recipes. Use as a 1:1 replacement for “regular” whole wheat, spelt, rice, chickpea, or whatever flour in your favorite bread, cookie, cake, and cracker recipes. Enjoy the amazing taste and health benefits of sprouted flour!
Start now to make sure you are staying prepared.
Via: pennilessparenting


 Follow
Leave a Reply