Jerky is the original high energy survival/snack food, and maybe you’re thinking about making your own. Here’s some expert advice about a quick, easy method that uses meat from the grocery store, items you already have in your kitchen, and an oven.
Maybe you had a successful hunting season, and ended up with lots of meat to experiment on. Or possibly, the idea is to learn another do-it-yourself skill, so you can make a healthy snack for the kids’ lunches.
Regardless of your motivation, preppers, survivalists and folks looking for a way to preserve meat for long term storage should learn how to make jerky. Like any survival technique, it may be one of those skills that could prove to be vital sometime down the road.
But making jerky can be expensive. First, there is the cost of the meat. (As a hunter, I can attest to this fact: There is no cheap meat!) Then, there is the investment in a smoker or food dehydrator, and the cost of commercial jerky seasonings. When the math is done, it may appear that it’s cheaper to just buy jerky.
But you can produce top quality jerky fairly inexpensively, according to one expert, using meat from the local grocery store. All you need to do is watch your grocery store ads for sales, and for equipment, you need an oven with some sort of wire rack.
“Jerky is just dried meat, and you can make it out of any kind of meat, and many kinds of fish,” says Clem Stechelin, 79, of La Pine, OR. “People have been making jerky forever, and the process isn’t complicated.”
Stechelin is a retired meatcutter, owner of “Clem’s Oregon Trail Seasonings,” and has been making jerky and sausage for decades. He says jerky can be simple to make, inexpensive and doesn’t require an elaborate smoker or dehydrator system. Originally, Stechelin said, primitive hunters who killed a large animal dried meat by solar power.
“They probably hung strips of meat over a bush or on some sort of rack in the sun,” he said. “Some of the different flavorings, like sage, might have started out when they realized meat dried on a sage bush tasted better.”
Later, these hunters figured out they could dry meat faster if they hung it over a smoky fire, Stechelin said, and people acquired a taste for smoked, seasoned meat. Primitive hunters probably smoked and dried whatever meat they had to use, he said, and some of it probably tasted pretty bad.
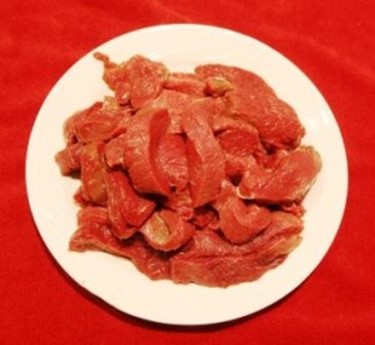
This is some very good organic elk meat that has been cut into strips to make jerky. Talk about expensive ingredients! image by Leon Pantenburg
Today, great-tasting jerky starts with a quality cut of meat.
“It’s like a computer analogy: Junk in, junk out. If you start with a piece of tough meat with gristle, it will end up as jerky that is tough and hard to chew.” Stechelin said. “You shouldn’t use an inexpensive piece of meat, and expect the jerky to turn out well.”
Some of the cheaper roasts have lots of fat and gristle, he said, which needs to be trimmed off before baking.
“By the time you’re done, there won’t be much usable meat,” he said. “You would have been better buying some London broil to start with.”<
Stechelin recommends watching store ads for meat sales. London broil and top round are on sale for about $1.98 per pound “at least once a month,” he said, and those cuts make excellent jerky. Other, more expensive meat cuts that work well for jerky are top round, bottom round and sirloin tip.
“Probably the best cut for jerky is flank steak, but it is usually pretty expensive,” he said. “When you cut it across the grain and make jerky, it ends up tender, is easy to chew and has great flavor.”
Most of Stechelin’s seasoning customers buy beef to make jerky, and use the oven method. (The jerky seasoning feature all natural ingredients, with no nitrates.) It is the quickest, simplest technique, he claims, and anyone can use it to produce healthy, tasty energy snacks.
Here is what you do:
*Cut the meat, across the grain, into uniform slices between one-quarter and one-half in thick. Rub whatever seasonings you choose into the meat.
* Put the meat on a wire pizza rack or cooling rack for bread.
* Set the oven between 200 and 220 degrees. (Individual ovens vary, so some experimentation may have to be done.) Place the loaded racks in the oven, and put a piece of foil or cookie sheet on the bottom rack to catch any drippings.
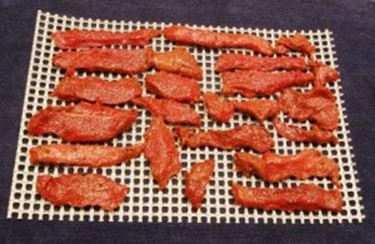
From start to finish, this jerky took about three hours to make. image by Leon Pantenburg
Clem Stechelin has been making jerky and sausage for more than 50 years.
* Prop open the oven door with a towel, so the moisture escapes. If you forget this step, Stechelin said, the batch of jerky will bake instead of drying, and the result won’t be good.
* Cook the jerky for about two and one-half hours, or until it looks done.
“Take the meat out when you can still bend it. The meat will still dry a little more after it’s out of the oven,” Stechelin said. “Don’t leave it in the oven until it’s crisp, or it will end up being too hard and tough.”
All that’s left to do then, is let the jerky cool completely and store it. If you’re going to put the jerky in plastic bags, put it in the freezer, Stechelin advises. Otherwise, put the finished jerky in a cloth or paper bag so any moisture completely evaporates. Then hide some for outdoor excursions.
Home-made jerky is a great after-school snack, but be careful if there are teenagers in your house. Snacking on jerky is addictive, and the kids and their friends may wipe out the entire supply before you know it!
Start now to make sure you are staying prepared.
Via: thesurvivalmom


 Follow
Leave a Reply