Monthly Archives: June 2014

Maps for Hazardous Areas in the United States- Past, Present, AND Future

I found several maps that show interesting info that I wanted to share:


Includes, earthquake prone areas, volcanic hazards,
nuclear fallout areas, earth change maps, and more.

Sources of these Maps

Some maps and images are from government publications or websites, some were found in the newsgroup alt.binary.astro and other websites.

Vulcanic Hazard Map


http://www.volcano.si.edu/


Earthquakes


Source: http://www.kgs.ku.edu/Extension/image/earthquake3.html


Source: http://www.mgs.md.gov/esic/brochures/earthquake.html


Comparison of damage and destruction of 1906 San Francisco,

1811-12 New Madrid, and 1880’s Charleston Earthquakes.


Tornado Risk Map


Nuclear targets and Fallout areas


1990 FEMA Report on Possible fallout regions after nuclear attack


Nuclear targets based on known defense, value of target, population, and military sites


Effects of a ONE megaton nuclear detonation


Effects of a 25 megaton nuclear detonation


Downwind radiation dose-rate after nuclear detonation


Maps of the US after predicted EARTH CHANGES


Gordon Michael Scallion


Lori Toye


John Running Deer Eleazer


http://enni82.hubpages.com/hub/Nuclear-Power-Nuclear-Power-in-the-US-Nuclear-Next-Door#


http://enni82.hubpages.com/hub/Nuclear-Power-Nuclear-Power-in-the-US-Nuclear-Next-Door#


http://commons.wikimedia.org/wiki/File:Nrc_reactors_map.gif


http://www.npr.org/2009/04/24/110997398/visualizing-the-u-s-electric-grid


Start now to make sure you are staying prepared.

Your bug-out “Plan B”

You’ve planned it all out…

You’ve got your survival gear… your bug-out bag is packed and ready to go… you have your retreat destination and routes planned… your retreat is fully stocked with supplies and waiting to safeguard you and your family during a disaster…

  …but you can’t get there!

Look, even the best plans can and do go wrong.

No matter how much planning you do, you might get to your bug-out location and discover…

… your retreat has been compromised by “hostiles”

… maybe there’s a natural disaster between you and it.

… maybe your retreat itself has been damaged beyond repair by the
disaster.

You KNOW it isn’t enough just to flee with your loved ones without having a location to go to, right?

But where do you go if your bug-out plan has been trashed before it could even begin?

You need a “Plan B” destination.  

One place you might not have considered: CAMPGROUNDS!

There’s a few reasons they can work well:

  • Campgrounds are often in secluded locations off the beaten path. Others fleeing will jam themselves into hotels and FEMA stations and won’t think about campgrounds.
  • Most people will be looking for more built-up areas with obvious supplies to loot.  People don’t typically think about “looting tents” so campgrounds will help you avoid these areas where you may encounter hostiles.
  • Many campgrounds have amenities that don’t rely on city services that may go down in a disaster (like water supply, latrines, etc.)

Now, here’s how to find the best campground bug-out site for your disaster plan…

  1. Get out your map. From your home, draw a 360° circle around you that’s about 75-150 miles away from you (a quarter to half a tank of gas, or a 3 days walk)
  2. Within that circle, look for campgrounds that are remote enough, but which have water and toilet utilities and are near secondary water sources like streams. You want to be 15 to 20 miles from a town so you can walk in and resupply, but you aren’t too close.
  3. Map out 3-4 options in opposite directions from you.  This gives you the ability to travel in any direction that poses the least threat to you and your family when a crisis hits.
  4. A campground on elevated terrain is your best option. It’s safer from flooding, gives you a better view of your surroundings, and discourages a lot of people who won’t want to hike up-hill to get to you.
  5. If you need to bug-out, think “ultralight” with your survival gear.  This is the approach used in the light infantry long-range recon (LRRPs) to travel fast and yet have all the gear needed to sustain yourself for long periods of time on your own and without resupply.

In the military, my squad always had a “plan b” for every attack because we never knew if there were going to be new obstacles in the mission or how the enemy would react upon contact.

Well, you never know what Mother Nature has in store for you either, so break out your map and look for your “Plan B” bug-out destination now.


Start now to make sure you are staying prepared.


Via: moderncombatandsurvival

Drink Your Vitamins! Herbal Teas for Extra Nutrition in a SHTF Scenario

Many preppers make sure to have a bottle of vitamins in their emergency supplies. Vitamin pills can be a quick way to make sure you are getting your recommended daily allowance of vitamins, minerals, and trace minerals during an evacuation or short term scenario, when you may not be eating as well as usual.

But what if you were in a situation where your vitamin supplements had run out? In a long term, shelter-in-place scenario, herbs could be invaluable as an extra source of nutrients. After all, the raw ingredients can be grown in a garden or vacant lot!

Plus, herbal teas are also a great way to add a boost of extra nutrition if you are currently looking to be less reliant on bottled supplements. The herbs we will talk about here are a great source of minerals such as calcium, magnesium, iron, and potassium; and some are also high in vitamin C.

With a little creativity and effort, herbal teas can be nutritious and taste great, too!

What Herbs to Use

It’s very simple to design your own herbal tea blends. You will need a mineral-rich herb for the base, and then other herbs for flavoring or secondary benefits. Two of the best herbs to use as a base for a nutritional herbal brew are nettle and violet.  Both are common weeds in North America, so they may already be growing in your backyard. Just watch out when you harvest nettles- fresh nettles sting, but quickly lose that sting as they dry.

Be sure to use a reliable field guide when learning to recognize these plants. They are both easy to identify, but misidentifying wild plants intended as edibles can be a fatal mistake.

Nettles and violets are mild enough to be used as food, so they are safe to use on an almost daily basis. This is not true with all herbs- some of them are considered too potent for everyday use. Other herbs, besides nettle and violet, that can be used regularly include oatstraw, red raspberry leaf, alfalfa, and red clover. It’s best to switch between two or three of these base herbs every few days, because the nutrient profile of each is slightly different.

All of these herbs are very mild tasting and can be used on their own or in combinations with each other. Because they have such mild flavors, it’s very easy to add other herbs as flavorings to change things up a bit. Peppermint is usually a favorite add-in, but you can also try lemon balm for a citrus touch, a small amount of licorice as a sweetener, or hibiscus for a fruity note. I sometimes enjoy adding lavender and rose petals for a more floral blend.

For extra vitamin C, elderberry, rosehips, hawthorn, and pine needles are great choices. They all taste very good by themselves, and they can be combined with each other or any of the mineral rich herbs on the first list.

Herbal Tea Making Basics

The basic recipe for making herbal teas from leaves and flowers is to use 2 teaspoons of herbs to every 8oz of water. Bring the water to a boil in a kettle or pot, then pour the water over the herbs in a heat-safe container. Cover with a saucer or lid and allow to steep for at least ten minutes.

When you are ready to drink your tea, strain out the leaves by pouring through a coffee filter, piece of clean cloth, or fine mesh sieve. I often use a special mesh “spoon” that allows me to brew the tea and then simply remove the strainer when I’m finished.

A study done on the mineral content of herbal teas in 2008, and published in the journal, Food Chemistry, discovered that ten to fifteen minutes is the optimum range for extracting most minerals. That being said, it’s not uncommon for traditional herbalists to allow their infusions to soak for 30 minutes or more (even overnight) if they are looking for a nutrition boosting brew.

I find that the longer soaking time works best for the single herbs mentioned above, rather than blends. Some of the herbs used for flavoring in a blend may lose their flavor or become bitter if left overnight. The milder base herbs don’t usually have that problem, and actually seem to be much stronger and better tasting with a longer brewing time.

Nettle, especially, is often made in the evening and left to its own devices overnight to provide a healthy, deep green drink for breakfast. I wrote an article about making an overnight infusion with violet leaf and flowers here. It is a little more unusual, but, at least  in my experience, has been just as good.

Four Blends to Get You Started

Here are four of my favorite homemade blends. All of these tea blends are fine for children as well as adults. Rather than give specific measurements in cups or tablespoons, I’ve chosen to provide each recipe in parts.

You can measure out each blend in whatever amount makes sense for you. Perhaps try using a tablespoon to measure for your first batch, and then make a larger batch using a one cup measure if you enjoy it. Your tea blends will keep best if stored in a sealed container in a cool, dark place.

Oatstraw with Rosepetals and Lavender
This blend is three parts oatstraw, one part rose petals, and lavender buds to taste. I like this blend on days when I’m feeling stressed. Oatstraw is a traditional herb for nourishing the nervous system, and rose and lavender are also good for supporting mood and healthy stress levels. I like this tea warm, with honey.

Nettle and Peppermint

A blend of equal parts nettle and peppermint. This is one of my favorites in the summer, when the peppermint is extra refreshing. I usually enjoy this one chilled or on ice with a little honey.

Violet leaf with Elderberry and Rosehips

This blend is three parts violet leaf, one part each of elderberries and rosehips. The elderberries and rosehips make this a very fruity blend. It is somewhat tart on it’s own, or honey can be used to sweeten it. It’s good either warm or cold.

Red Clover, Nettle, and Rosehips

A blend of equal parts of all three herbs. This is another tea that’s good either warm or cold. The rosehips give it a tart flavor that can be enhanced with a squeeze of lemon or toned down with a little honey.

The best thing about drinking tea for your vitamins is there’s no pill to swallow, and in dire circumstances, where obtaining multi-vitamins and nutritional supplements may not be possible, knowing how to make nutritious herbal teas may give you a vital boost to your health.


Start now to make sure you are staying prepared.


Via: thesurvivalmom

Gov’t Going too Far? Forced Child Detainment and Questioning in American Hospitals

Would you be comfortable with your child being detained and questioned privately the next time you bring them in for a routine medical checkup like a physical?

Yeah, I wouldn’t either. But it’s happening.

There is now a new Michigan medical records access law that reportedly requires doctors to have a private conversation with minors when the parents bring them in for medical care.

Here’s the sign that Christy Duffy was confronted with when she brought her daughter in for a minor foot injury:


When Mrs. Duffy got home, she wrote this response on her blog as a public warning announcement:

Let’s get one thing straight: no doctor or nurse is going to sequester my children in an exam room and talk to them privately. Period. This public service announcement made necessary because of this sign, posted at the check-in counter of my doctor’s office.

I was there last week for an appointment for Amy. She hurt her foot, which makes dancing difficult, so we had to get that checked out. Amy is 17; I asked if this policy was in effect and if so, how could I opt out. The receptionist told me it’s a new law and there is no opting out. Working to keep my cool, I said, “I’m sure there is.” She said, “No, there isn’t.” At which point I asked if I needed to leave and go to the urgent care center because I was not submitting my daughter to such a conversation.

That did not go over well.

The receptionist closed the window. Almost immediately, the office manager turned the corner and said, “Mrs. Duffy, may I speak with you?”

She said there was a new policy that would allow a child to access his/her medical records online and the child would be allowed to block a parent from viewing the website. The nurse would also inform my children that the doctor’s office is a safe place for them to receive information about STDs, HIV and birth control. That is what the nurse would be chatting about with my children without any pesky parental oversight.

I kindly informed her that no one would be talking with my children privately, and I needed to know how to opt out of this policy before bringing Amy back for her physical next month. (Yay for physicals! Amy is so excited.)

By this time, the doctor was ready to see Amy so I had to cut the conversation short because I was not letting my girl out of my eyesight or earshot. Not when it was clear that these people were angling to undermine my parental authority.

Does that sound a bit dramatic to you? It shouldn’t. Because that is exactly what they are trying to do.

Make sure this is crystal clear: what they want to do is talk to your child about sex and drugs (maybe rock and roll – who knows?) without your input. Is it really such a stretch to imagine that a doctor who does not value abstinence before marriage would encourage your daughters – as young as 12! – to receive birth control? Is it really such a stretch to imagine a nurse telling a young boy – because a 12 year old boy is a BOY – that she will give him condoms so he can be “safe”? Is this what you want told to your children without the ability to filter the info through your world view?

Should a doctor ever ask to speak to a child without a parent present? If he/she suspects abuse then of course. But short of evidence of abuse, a doctor should not need to speak to a child alone.

I am the Mom. I will pick who can talk to my kids about sex and drugs. And rock-n-roll for that matter.

Regardless what health care provider you choose, please know that no one has the right to remove you from your child’s exam room. Perhaps if more of us stood up for our rights as parents, this ludicrous undermining of parental authority might end.

This is just another example of the overreaching we’re seeing at all levels of the government.

You may think that this is a very minor thing but keep in mind that more and more of these laws are getting into the books with more coming.

It may start as something seemingly benign, but if we’re not careful and we let these “harmless” ones pass without resistance it’s only going to get much worse.


Start now to make sure you are staying prepared.


Via: tacticalintelligence

Altoids Tin Alcohol Stove

Altoids are curiously strong mints and the tins they come in are curiously useful.  Of course, there are innumerable variations out there for survival kits that fit into an Altoids tin.  Those kits are fun projects, especially if you’re a fan of putting together puzzles.  This Altoids alcohol stove project is a bit simpler than trying to Jenga-fit a bunch of odds and ends into a small kit.

Here’s what you’ll need:

  • Altoids tin
  • Metal window screen
  • Scissors or tin snips
  • Perlite
  • Denatured alcohol (the higher the grade, the better)

Getting Started

Rinse out the empty Altoids tin and dry it with a towel.  This isn’t absolutely necessary but starting with a clean slate, so to speak, is never a bad idea.

Pull out a handful of perlite from the bag and pick through it, finding the larger chunks and dropping them into the tin.  Fill the tin with perlite all the way to the top.


Adding the Screen

Lay a corner of the screen over the open tin and use a marker to draw an outline that is the same size as the tin.  Use scissors or tin snips to cut this rectangle out.  You’ll note the tin has rounded corners so trim the screen the same shape.


Next, fit the window screen over the top of the perlite and tuck the sides and corners into the tin.  I’ve found using a butter knife works well for this purpose.  The window screen serves to keep the perlite in place as you carry the tin around.

Note: rather than buying a roll of window screen just for this little project, you can either use an old screen you don’t need anymore or you can buy a window screen repair kit.  That kit will come with a few small “patches” of screen that you can put together for this project.


Using the Altoids Alcohol Stove

That’s all there is to it!  When you are ready to use the stove, add three tablespoons or so of alcohol to the perlite, then lay a lit match on the screen to light.  This will burn for about ten minutes or so, long enough to bring a quart of water to a boil.

If you carry your little stove in a bug out bag, you can keep the fuel in a well-sealed plastic container. Keep that and the Altoids tin inside a Ziploc bag, in case the container leaks.


You can’t place your cooking pot or pan directly on the stove as that will smother the flame.  Instead, place a small brick on each side of the stove and lay your pot on the bricks.


If you need to lower the heat level a bit, place a square of aluminum foil over part of the screen.  You can also douse the flame completely the same way or by flipping the Altoids tin lid over the flame but it is safer to just let it burn out and cool down before storing.


Start now to make sure you are staying prepared.


Via: thesurvivalmom

So You Didn’t Marry a Survivalist

Let’s say your spouse isn’t hell bent on bunker building, but you want his/her preparedness support. How does one accomplish that?

(Note that I’m now using gender neutral language. There are SHTF homegirls viewing this site as well.)

Well, this is a subject that’s been covered by others before, but let me give you the Ranger Man version. First off, let’s break the non-preparedness spouse down to a few manageable categories:

  1. No Way, No How;
  2. Whatever, I Don’t Care; and
  3. Fine

“No Way, No How”
The spouse that replies to your survival tendencies in this fashion either 1) is seeking to deny their TEOTWAWKI fears, or 2) thinks the whole preparedness thing is just plain kooky and shudders at the thought of being married to a weird survival ninja. This is obviously the toughest spousal preparedness situation to overcome, because not only is he/she not interested in taking modest steps toward preparedness, but he/she also doesn’t want YOU to take these steps. Good luck with this one. You can either try swaying the person’s mind, preparing anyway in secret (never good), or, as Sena suggested, “trade up.” I suppose dropping your preparation desires and forgetting sweet survival action altogether is another option . . . .

“Whatever, I Don’t Care”
For many people this may be as far as you get. It translates roughly to “I think the whole idea is dumb, but I have better battles to fight.” Take this and run with it, but you’re still on shaky ground. Start off slow with projects like building a pantry or buying a water purifier. Then you can move toward, “Honey, I think you need a .50 BMG.”

“Fine”
Reach this stage and you’re on your way to spouse survival success! The only thing better than this is when your spouse hops on the SHTF train and starts telling YOU how to tan a hide. “Fine” translates roughly to “okay, this sounds like something we might need to do . . . I’m intrigued.” Move on this action, but proceed cautiously. Don’t dive into the sky is falling lingo on bird flu, economic collapse and asteroids all at once. Encourage him/her to come up with ideas on their own.

Ranger Man’s Mrs. is at the “fine” stage. Anything more than that and she might start to scare ME.

SHTFblog Suggestions for Securing Spousal Support:

  • Start Easy, discuss current events and “what if” situations, there’s plenty in the news to spark preparedness suggestions.
  • Watch a movie that could spark discussion on this subject.
  • Read a SHTF book in the presence of your spouse and mention the book’s details as you move through it. At this stage fiction works better than non-fiction, because the odds are higher that your spouse will be interested in a story’s development rather than how to store wheat for 4 years. One of my personal favorites is Parable of the Sower. It’s a newer novel that reads fast and offers real survival advice that could be applied to any TEOTWAWKI event. I’ll discuss this book further in future posts, because it’s that good.
  • Turn the Mrs. on to www.mrssurvival.com. That way she can talk about the subject with other women helping to break down the male dominated views on survivalism.
  • Engage in projects that serve multiple purposes. Gardening for example. You get outside, grow your own food, get some exercise, and save on your grocery bill.
  • Set this site as your homepage, so whenever your web browser opens – sha-zam!
  • Discuss the kids’ safety. That’ll get a parent’s attention any time. Even if he/she won’t prepare for themselves, they’ll prepare for their offspring. This is actually a big part of the reason I prepare. Even if TEOTWAWKI doesn’t hit in my lifetime, living a life with preparedness in mind helps children develop the necessary skills for their own survival. Chances are even higher that S will HTF in the next generation’s lifetime, but hey, you NEVER know when the shit is going down. Could be today, tomorrow or ten years from now.


Start now to make sure you are staying prepared.


Via: shtfblog

Compare and Contrast of Wool Blanket and Poncho and Poncho Liner

For various reasons I don’t keep a sleeping bag in my Get Home Bag or my everyday hiking kit.  Today I thought I’d talk about other options than having a sleeping bag permanently stored in your kit.


First of all I think the best choice a person could make for a serious bug-out is a good sleeping bag, especially up here in the Great White North.  Having said that, keeping a sleeping bag in your pack all the time has two disadvantages:  1.) They’re relatively heavy and 2.)  If you keep your sleeping bag compressed all the time it will eventually lose its loft.

I keep my sleeping bags in a loose bag until I need them.  With a good sleeping bag starting at $150 and up these days I want to protect my investment.

Purpose

The goal is to carry something in my pack that is light in weight, but warm enough to keep me alive if I have to use it to spend the night out. This means carrying different items during the various seasons up here in Maine.

I think it’s important to point out that these items are more for a regular day hiking kit or a get home bag (GHB) than a full five day hiking pack or a long term Bug-Out Bag. Unless you’re very skilled and hard-core you’ll probably want to carry something heavier (like a sleeping bag) if you’re going for an over nighter or a multiple day hike.

The idea here is to have something with you on a regular hike that’s light enough to keep you warm if you get caught out overnight, but not heavy enough to kill you hiking it up a mountain because of its weight.


For example: if I wanted to hike a mountain here in Maine this time of year (it’s May 11, 2014 as I write this) and the temperature today was around 72 degrees. Tonight it could easily go down into the 30′s. That means if I go out on a day hike carrying what the typical day hiker carries, (water bottle, power bar, and maybe an extra t-shirt ) the last thing I’m thinking about is that it’s going to get cold that night. I’ll sweat on the hike getting my clothes wet, which means if I get lost and have to spend a night out with wet clothes, no shelter and no way to start a fire, I’m a prime candidate for hypothermia.

Bear in mind this is about survival and not comfort.  That’s not saying that if you use these as effectively as possible they won’t keep you warm.

Knowledge

A quick word here about knowledge and skills.  If all you have is a poncho liner and poncho and the temperature is going into the 30′s you are going to get cold; however, if you start a fire and reflect the heat back into a shelter you’ve found or made you’ll be much warmer and might even be able to catnap through the night.

This type of knowledge is a force multiplier, which means if you take your piece of gear by itself it will help a little.  But if you combine it with your knowledge of starting a fire you will not only survive the night you’ll be comfortable as well.  They become more effective when used together.

This is true of any gear you put in your pack.  Try to make sure it has multiple uses or is important enough to have a spot.
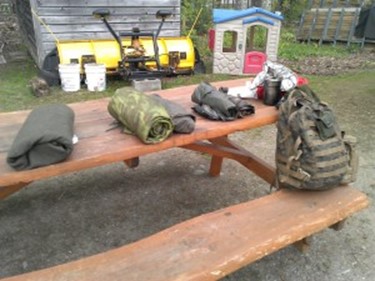
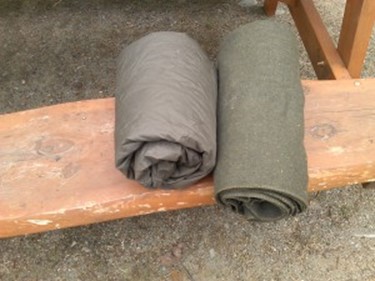
 

Wool Blanket


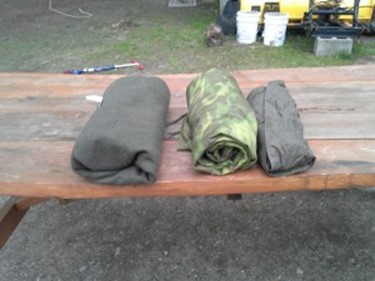
There are many good things to be said about wool.  When it gets wet it still retains a good deal of its ability to keep you warm unlike cotton, which will kill you if it gets wet in cold weather.There are many kinds of wool blankets out there on the market.  I bought a military surplus blanket off Amazon and so far it’s held up pretty good.

You can keep it rolled up tight and it won’t lose its ability to keep you warm, which is what happens to a sleeping bag after it’s lost its loft.  This means you can put it in your pack and forget about it until you need it.

The wonderful thing about a wool blanket is the rage of uses you can get out of it.  There are many YouTube videos out showing many ways to use the blanket as a cloak.  All you need is a way to pin it and it’ll become a great cloak or overcoat to wear while you’re in the woods.

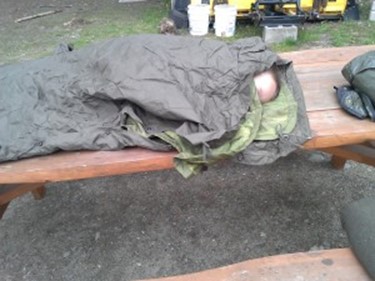
It can be used in different ways such as a cloak, or as a shelter, or just roll up in it and sleep in it next to a fire.  If a spark lands on the blanket it won’t cause the same damage as it would on a synthetic sleeping bag.

Don’t forget that in cold weather a big part of the battle for staying warm is to put some insulation between you and the ground.  If you don’t have a sleeping pad gather some leaves or fir boughs and try to put six inches of this insulating material between you and the ground.  This will help keep you warm.

The wool blanket is quite a bit heavier than the poncho liner, but it’s also a lot warmer on its own

.

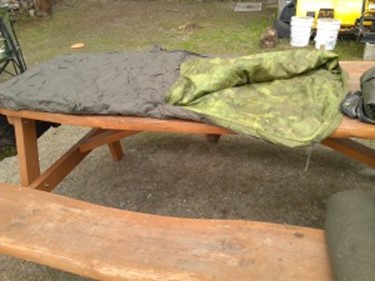
Poncho Liner and Poncho

To be fair I almost always use the poncho liner in conjunction with the poncho unless I’m in the southern latitudes.  When I was in Gitmo, Cuba sleeping on a cot I used a poncho liner, but it was easily in the 70′s at night with a light sea breeze, so it was no big deal.  In North Carolina and other southern states it worked well in the summer because it’s so hot down there.  In the fall I would either pair it up with the poncho or use a light sleeping bag.

Up here in Maine I’ve attached it to the military poncho, which is a heavier duty poncho than the Wal-Mart variety, and then folded the poncho in half and buttoned it up to create a sleeping bag.  This works pretty well, but I haven’t really tested it much below 55 or 60 degrees.  That means I’d want to use this configuration in the summer.  One thing I like about the poncho/poncho liner combination is that it gives you a variety of uses.  You could use the poncho by itself to keep the rain off, or set it up as a shelter, or use it to funnel rain water, and many other uses.

The poncho liner by itself is a very lightweight blanket.  You could use it to help camouflage a position, or you can wrap up in it as a blanket and it will do a fair job of keeping you warm.  Combine the two and you can make a decent sleeping bag.

Weight

The military grade poncho and  poncho liner together when compared with the wool blanket weigh roughly the same.  If it’s going to be cold and wet I’ll carry the poncho and the blanket.  It’s the heaviest combination, but also the warmest and it still won’t drive my pack weight up past 20 lbs. and that’s including my other gear.


Other Options

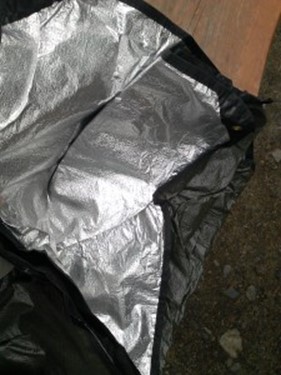
Branching out a little another option I use in the summer is a heavy duty space blanket  and a ripstop poncho.  This is not a military grade poncho and it’s a little smaller, but I’ve slept under it (in a sleeping bag) and it seemed to be up to the task of becoming a shelter without coming apart.  Whereas the military poncho is square, this one has more of a rectangular shape, which I didn’t realize until I went to set it up.  No biggie, but I did have to adjust the design of my shelter accordingly that trip.  The ripstop poncho is also much lighter than it’s military cousin.

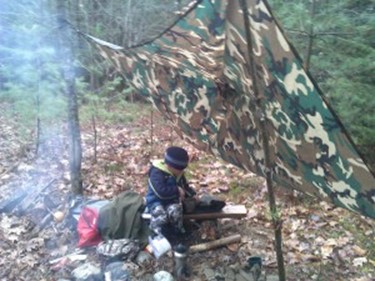
I haven’t really tested the space blanket under harsh conditions.  The thing to remember about this is that it reflects heat and is not insulative.  It’s silver on one side and olive drab on the other.  Very light though, and compresses down fairly well.  It reminds me of a small tarp to some extent.  It is not like the cheap silver space blankets you see everywhere.


 Conclusion

These are all good pieces of gear to have on hand if you want to carry something relatively light.

The lightest combination is the rip stop poncho with the space blanket.  A very good solution for summer time.

The next heaviest is the military poncho with the poncho liner.  This combination probably has the most uses with the individual pieces capable of many different functions.

The heaviest is the wool blanket with a poncho for shelter or keeping the rain off.

The main advantages of carrying these pieces of gear are:

  1. They are lighter than a sleeping bag.
  2. You can put them in your pack and forget about them until you need them.  This way you don’t have to worry about losing the loft in your sleeping bag.
  3. In warmer weather they are perfectly acceptable for sleeping.  People get so hung up on sleeping in a sleeping bag they forget there are other options out there.

I have at least six sleeping bags, but the equipment listed above is what I use in my personal GHB and hiking pack.


When selecting a “wool blanket” read the label (or description) carefully. Some of the more recognizable surplus outlets are now marketing “wool emergency blankets” with as much as 70% poly and only 30% wool. This might be okay if you are under cover from rain or snow, but I prefer the 70% wool variety. There are also some Swiss blankets around that are 90%, but of course more money.

Another thing to research is making a “Match Coat” from your wool blanket. Dave Canterbury has (or had) a couple of interesting how-to videos on this topic on his Pathfinder School website. A Matchcoat can be worn to dry the blanket and will keep you warm both night (as a blanket) or during the day (as a coat).


I’ve never had good results from a “space blanket” and I can tell you that listening to the thing all night when someone else is using one will deny you some sleep. The crinkling sound is enough to drive you crazy. Boy, but are they noisy!


Let me throw some weights at you all to help in the decision process.

These weights are on my digital scale.
All items can be at + or – 10%
That means that 2 identical looking pieces can weigh different.
So these are a good generalization.

Poncho Ripstop Military Style 10 oz
Poncho Current Issue Woodland 1 lb 8 oz
Poncho Old OD Vietnam + era 2 lb 12 oz
Poncho German Issue Cold War era 2 lb 1 oz

Poncho Liner Current Woodland 20 – 21 oz
Poncho Liner Current Marpat 22 oz
Poncho Liner 80′s OD 28 oz

Wool Blanket US Issue 80′s 3 lb 10 oz
Wool Blanket Swiss 80′s 2 lb 8 oz

US Issue Goretex Bivy 2 lb 1 oz
Just thought I would throw that in.

I got soo crazy with weights that I weighed all my web gear looking for a piece that was lighter than the rest. I have duffels full, it took me all day this winter and about a pint of whiskey. These weights are averages of what I have.

There are some great lightweight sleeping bags out there that pack down to the size of a football too.


Start now to make sure you are staying prepared.


Via: shtfblog

Dollar Store Beans and Rice


Beans and rice combine to make a “complete protein,” as most people know. Dollar store beans and rice make a great addition to food storage pantries for two reasons:

1.  They can be purchased and stored in large or small quantities, depending on the likelihood of transport

2.  They are inexpensive! Most Dollar Stores offer two cans of beans for $1. I prefer the Chili Beans, as the seasoning is great, but black and pinto beans are also available at the same price. Dollar store beans and rice are an easy way to stock up for emergencies.

These survival staples have a long shelf-life, and my favorite thing about them is the ease in which I can move them from the pantry to the car or backpack. Additionally, the beans can be heated in the can over a fire or stove, then the empty can remains as a cooking implement for later use.

On a camping trip, prepare the rice, stir in the beans, and enjoy!


Start now to make sure you are staying prepared.


Via: thesurvivalmom

Death by Tooth Abscess: Post-SHTF Reality


I recently read a book where the solider had several of his team die from tooth issues when doctors where not available.


At the same time this came out: Another great article from Dr. Bones.


Tooth Abscess Images by Kathryn Darden

(Dr. Bones says: From time to time, we post guest articles by promising writers in the field of preparedness. This week, our post is from Damian Brindle, who has a ton of preparedness videos, guides, and articles on his website at rethinksurvival.com.  He relates a family story that underscores the risks that dental problems would pose in a post-shtf setting.)

Death by Abscess Tooth: It Could Happen to You Post-SHTF!

by Damian Brindle

Normally, I don’t like writing about medical topics as I’m not qualified to discuss them like the Alton’s are. Regardless, I wanted to point out a real-life situation that happened to my family only a few weeks ago.

Long story short, my wife’s uncle passed away at too early of an age due, I’m told, to not more aggressively treating an abscessed tooth. Don’t worry, they weren’t exceptionally close but it was still a shock to the family.

Anyway, the story goes that he was complaining of a toothache (or general face pain associated with it) which was diagnosed as an abscessed tooth months ago.

It seems the medical professionals attempted to treat the infection first using various antibiotics over that time—I don’t know which ones—which didn’t seem to work. Ultimately, he ended up in the hospital with heart complications that eventually led to his death due to various systemic failures.

–(Dr. Bones says: Indeed, an abscessed tooth may become an avenue for bacteria to enter the bloodstream and cause a body-wide infection called septicemia and even damage to heart valves.)–

According to the doctors there they said that it was all a result of the abscessed tooth not being dealt with fast enough or early enough. I assume they felt the tooth needed to be pulled early but I always thought you needed to treat an abscess with antibiotics before pulling the tooth, though this appears to be up to the medical professionals.

Again, this is all hearsay funneled through multiple people so I could have some of the facts a bit wrong. The point simply is that even seemingly treatable problems such as an abscess tooth in modern times aren’t always curable when the healthcare system is functioning like normal.

If/when the SHTF during a grid-down collapse something like an abscess tooth (or even lesser problems like a poorly treated cut) could easily turn deadly. Just think about what life must have been like a few hundred years ago when antibiotics weren’t readily available and, even worse, when there were all sorts of “snake oil” salesmen… who desperate people believed!

I know it’s possible to stockpile fish antibiotics (and I do) for such occasions–Dr. Alton has several good articles on the topic–but looking at the use of these antibiotics in the hands of a layman like me, I shudder to think about trying to properly diagnose and treat a potentially serious illness like this one.

After all, if the doctors can’t get it right in normal times, what chance to do I have? Likely a very small one, indeed.

Honestly, this event has made me reconsider my small stockpile of fish antibiotics. First, I doubt it’s nearly enough. Second, I probably don’t have the right ones (or the right combinations) for more serious problems. Third, I almost certainly don’t have the knowledge to use them for something like this! In fact, I might do more harm than good in this instance… who knows.

–(Dr. Bones says: Amoxicillin is a common antibiotic used for tooth abscesses, followed by Clindamycin and Metronidazole for penicillin-allergic patients. Incision and drainage, and even tooth extraction, is indicated in many cases if antibiotics fail. Information regarding useful antibiotics for various issues can be found in various articles on our website and, of course, in our “Survival Medicine Handbook”.  Use the category selections on the left sidebar or the search engine function to find what interests you.)–

Also check out these two articles: Survival Antibiotics  and SURVIVAL ANTIBIOTICS-2

This incident is definitely making me consider searching for more knowledgeable people I might be able to rely upon during a grid-down situation. Who that can be where I live now, I don’t know. At the very least, it’s also making me less foolhardy in assuming I can be a medical professional.

Hopefully, you’re not making the same poor assumptions I have.


Start now to make sure you are staying prepared.

Via: doomandbloom

Why I Read Disaster Novels, and You Should, Too


When I was a kid, I was a voracious reader. I read a novel a day and if I couldn’t find something new to read, I would read a book over again. The variety of genres and subjects I read were all over the place and I have gone through phases of reading only mystery or only non-fiction.

While I have recently been on a fantasy/fiction kick (HONOR HARRINGTON SERIES, anyone?), I have also been reading books that deal with some country or world-changing scenario and follow people as they try to survive. I call them “disaster books” for lack of a better term. I suppose they could be called apocalyptic books, or SHTF books, or survivor books. “Dystopian” is the most recent popular term for them. Whatever you call them, these books have a value that many people do not recognize.


With all of the kinds of stories and different perspectives I have read about in my life, I have a great imagination and can put myself into pretty much any role and understand why the character would think, or feel, or act in certain ways. Even the ‘bad guys.’ The entertainment value and escapism is wonderful, of course, but the fact that it enriched my way of thinking and increased my ability to see both sides of the story is far more important. It has allowed me to adapt to odd situations more easily and handle emergencies with calm focus (I tend to ‘freak out’ after it is all over, haha!) and that is vitally important in disaster situations.

Disaster Novels (Dystopian Literature)


With the overall shift of our lifestyle, enter my interest in disaster stories. Stories depicting an EMP taking out the electrical grid in our country


or a meteor hitting the planet and sending tidal waves across the oceans, helps the reader visualize and consider things what they would do and need to counter such an event.


By reading books that present these scenarios in a non-threatening way (it’s just a story, right?), readers can safely get caught up in the emotions and truly contemplate how they would feel, react, and respond. It is easy to judge characters’ decisions while you are safe and secure in your home reading. If you apply what they are going through to your own situation and how it would truly affect you, the realizations may be huge (as in you are NOT prepared at all) or they may simply reaffirm that you have been on the right track for years.


For me, reading these types of books has opened my eyes to areas in which I need to improve or things that I have overkilled. They give great conversation material with your spouse or group on how you would collectively respond. They can expose areas you all need to address to be better equipped to overcome a disaster.

The largest and most valuable side to reading this particular genre of book, though, is the mental aspect of. Reading these books help to expose your mind to these unlikely (but possible) scenarios. If you take it a step further and form a plan in your mind or go all out to improve your chances, you are ahead of the game so far that you have lapped the people on the couch twice already.


One of the biggest skills we can learn as preppers or self-sufficient people is how to react when sudden and unexpected events occur. We have to mentally train our minds to react instead of freeze up. It is my strong belief that reading some of these types of books and really letting yourself get caught up in them will help on that path.

There are dozens of books like this on Kindle and Nook that are usually $3 or less – many are free. Some aren’t the best story or written very well, so choose at your own risk. Reader reviews and rankings can be helpful, if you read them. When a book doesn’t have many reviews, a single person who rates it as one star because they hated the hero(ine)’s name (or five stars because they loved the cover) can seriously skew the results, so it’s worth taking the extra minute. Also, an outstanding book may have only a few reviews if it is new or poorly marketed.

Here are some of the books I have read recently that are not only well done, they can really make you think:

Other books that are recommended:

Survival Books for Your Collection

Here are the books I recommend for every bookshelf, along with Amazon links so you can read more about them, including reader’s reviews.


Wake Up, People! : Books for motivating you to prepare

One Second After by William Forstchen

Patriots by James Wesley Rawles

299 Days Series, by Glen Tate


Last Light by Terri Blackstock

Lights Out by David Crawford

Stacey’s Quest by AK Steele


The Night the Lights Went Out, by John Eider

Back Across The Pond, by Susan Gregersen

A Tale of Two Preppers, by Susan Gregersen

The Rally point: Bugging Home, by Susan Gregersen


77 Days in September, by Ray Gorham


Mental Preparedness

Deep Survival by Laurence Gonzalez

The Gift of Fear by Gavin de Becker

The Survivors Club by Ben Sherwood

The Unthinkable by Amanda Ripley


Wilderness and Outdoor Survival

Bug Out: The Complete Plan for Escaping a Catastrophic Disaster Before it’s too Late by Scott B. Williams

Survive! Essential Skills and Tactics to Get You Out of Anywhere – Alive by Les Stroud

Will to Live by Les Stroud


TEOTWAWKI Survival

The Backyard Homesteadby Carleen Madigan

Build the Perfect Bug Out Bag by Creek Stewart

Crisis Preparedness Handbook by Jack A. Spigarelli

Dirt-Cheap Survival Retreat by M.D. Creekmore

The Doom and Bloom Survival Medicine Handbook by Joseph and Amy Alton

The Encyclopedia of Country Living by Carla Emery

Gardening When it Counts by Steve Solomon

How to Survive the End of the World as we Know it by James Wesley Rawles

LDS Preparedness Manual (free download)

The Modern Survival Manual by Fernando Aguirre

The Prepper’s Pocket Guide by Bernie Carr

Prescription for Herbal Healing by Phyllis A. Balch

When all Hell Breaks Loose, by Cody Lundin

When There is no Doctor by David Werner

Where There is no Dentist by Murray Dickson


Food Storage and Preservation

Ball Complete Book of Home Preserving by Judi Kingry

Cookin with Home Storage by Peggy Layton & Vicki Tate

Dinner is in the Jar by Kathy Clark

Food Storage 101 by Peggy Layton

Food Storage Made Easy

Mary Bell’s Complete Dehydrator Cookbook by Mary Bell

Poverty Prepping: How to Stock up For Tomorrow When You Can’t Afford To Eat Today , by Susan Gregersen


Here’s a link to the Survival Mom’s book, Survival Mom: How to Prepare Your Family for Everyday Disasters and Worst Case Scenarios.


Start now to make sure you are staying prepared.


Via: thesurvivalmom