Guest post from The Ready Store
—————–
Knowing how to make candles in an emergency is a great skill to have. With the right knowledge and skills, you can make a candle out of a wide variety of different objects including fruits, crayons, shotgun shells or even old candles.
Check out these tutorials below to see how you can make candles and become even more self-sufficient.
Bayberries
Early colonists would use berries to make candles. However, it wasn’t the most efficient processes – you need a lot of berries for it to work. With about 4 pounds of berries you can get about 1 pound of wax. Boil bayberries in water and cover. Once the water is boiling remove from heat and allow to chill. A thin layer of wax will form on the top – which you can scrape off and use to create the wax for your candle. Run the wax through a cheesecloth and allow to melt again if needed in order to form into your mold.

Olive Oil
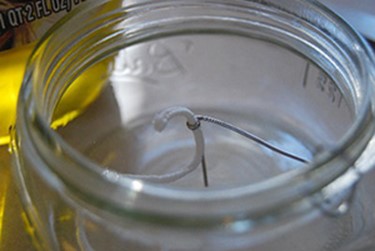
Since olive oil is a fluid, it’s harder to “stick” a wick in of it. Flatten out a paperclip and form it into a shape that will hold onto the wick and the side of a jar. Then fill your jar with olive oil – allowing the oil to spread onto the wick.
Orange
First, locate a large orange and cut it in half. Gently pull away the peel so that it stay in one half-circle piece. You’ll have two orange peel halves – one with a little orange core attached to it. Add about a half inch of olive oil into the base of the orange peel half. Make sure the core gets soaked with olive oil too. Allow the oil to settle for a while and make sure that it’s crusting on the core. Light the “wick” and you’re set to go!
Crayons
Add a bunch of crayons into a bowl of water. Allow to soak for 5 minutes. Collect cookie cutters or any other type of molds you would like. Spray the molds with non-stick spray. This will allow you to easily remove the wrappers from the crayons. Place 10-15 candles in a container that you don’t want anymore. Place the candles in the microwave for about 2 minutes or until they are smooth. Quickly pour the candles into the form that you’ve created because it will harden fast. Let the candles settle for 5 minutes and then place the wick.
Old Candles
Once you’ve used your wax candles, don’t throw them away. You can reuse the wax to create new candles with new wicks that you buy. Make sure there are no wick pieces in the wax and cut the wax pieces into smaller chunks. Spray the inside of a shot glass or other mold lightly with non-stick spray. Set the pre-waxed wick at the bottom of the mold, extending to the top. Now that the mold is ready, set up your melting device (or a double boiler). Set a sauce pan inside of a larger pan filled with water and melt the wax inside. Once the wax is melted, pour into your mold and allow to set and cool.
Crisco
This might be the easiest candle to create. Simply shove a candle wick (or a piece of string) into the middle of an open tub of Crisco. You’ll want to use a long stick or skewer to push it to the bottom. Hit the tub on a hard surface to settle the contents. Not only will the gigantic candle burn, but it will burn for 45 days.

Shotgun Shells
It’s probably a given: ONLY use shotgun shells that have been used and are empty. Do not light active shotgun shells.
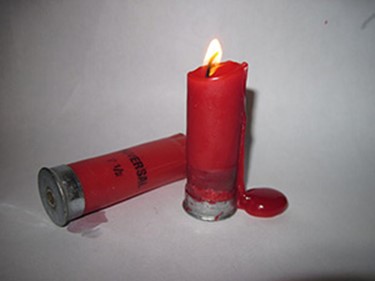
Add wax to a double boiler – or into a sauce pot that is sitting inside of a larger pot of hot water. Turn to medium heat so the wax is melted but not burning. While that is melting, use an old toothbrush to clean and brush the inside and outside of the shotgun shell. Pour the melted wax into the empty shell and place the wick. Once the wax is cooled and settled, remove the plastic outer layer of the shell with an exacto knife and keep the wax candle on the metal base of the shell. Light-a-way!
Lipstick
We’ve even see someone make a candle out of lipstick! Just twist the lipstick out as far as it can go and lay sideways on a cutting board. Use a sharp knife to cut a slit in the side of the lipstick. Lay the wick into the slit and slide to the middle of the lipstick. Roll the lipstick back into it’s tube and light it up.
Other reading:
How to make a Pine Knot Torch for emergency light
DIY Emergency Lights from Solar Yard Lights
Start now to make sure you are staying prepared.
Via: thereadystore


 Follow
Leave a Reply