Tag Archive: Free

Monster blizzard set to slam Northeast – NOT TOO LATE TO PREPARE

I wanted to share this info and site from a guy who has lots of great info. Check it out.

It’s NOT too late to prepare ever.

Monster blizzard set to slam Northeast – NOT TOO LATE
TO PREPARE.
 Its ALL online right now for NOTHING.

If you are NOT in the NE, do this anyway, your
disaster is on the way…sometime soon.

– Its NOT to late to prepare
– Protect Your Family
– This is the right thing to do
– Use these simple, proven tools from Walmart
– Have food and water when others don’t
– No Fear, no pain.  Your Family will love you for it.
– All of this has been created for you by Steven Harris.

Free Family Preparedness Class.  Everything from your
Local STORE that is NOT sold out!

– Make Emergency Bread in 30 seconds from Flour
– Store Water Instantly !! (No! not your filthy bath tub)
– Easy, Simple, Proven, over 250,000+ downloads.
– Listen instantly on your computer or smart phone.
http://www.BeforeTheStormHits.com

Power Your House From Your Car with an Inverter
– 20 buck inverter from Walmart

– All the light you want.  Cell Phones charged forever.
– Step by Step How to – Listen to it Right now.
– One of my best shows EVER.
– Listen instantly on your computer or smart phone.
http://www.Solar1234.com


Emergency Home Power from a Battery Bank.
The 2 Best Interviews Steven Harris Has EVER DONE !!

– How to Power Your House from a Battery in a Disaster
– Step by Step 100% Steven Harris DETAIL
– How the Host introduces Steve is Amazing.
– Listen to the 1st 3 Minutes and you’ll be HOOKED.

http://www.Battery1234.com

* Emergency Power for Your Family 24/7
* Never be without Light, TV or Cell Phone
* You’ll be Safe & Informed when others Suffer
* Don’t Be a Fool & Suffer. This is the Right Thing to Do !
* 8.5 Million People had No Power in Hurricane Sandy
* You are next, something will happen.

Listen to the Interviews RIGHT NOW with 1 TAP on your
smart phone or computer. No signup, no fee, no nothing.
http://www.Battery1234.com
http://www.Battery1234.c om 

Enjoy the Show, You will learn a lot very quickly.
Steven Harris

p.s.  I even made an online HD Video you can watch and see
everything I talk about in the interview

p.p.s.  Want to get ANYTHING you want after a disaster.  Well, if you’ve
Made THIS STUFF from Here, you can get ANYTHING you want.
http://www.iMakeMyGas.com  <–  Alcohol (wink) Fuel.
Make Moonshine as easy as you make coffee in your kitchen.


Save pagePDF pageEmail pagePrint page

Make your Own Herbal Decongestant Salve

Most of us are familiar with the chest rub that comes in the little blue bottle.

You know…the super popular over-the-counter treatment for symptoms of cough and congestion!?!

But did you also know that it’s made — just as many commercially-prepared cosmetics — in a base of petroleum with too many artificial additives and chemicals?

For those who desire to steer clear of these types of ingredients, learning to make this common cold and flu remedy may come in handy this fall and winter.

Herbs with Decongestant Properties

The start of a cold usually includes a runny nose, coughing, sneezing, sore throat, lethargy (the feeling of tiredness), muscle aches, headache, and possible fever.

In my house, as soon as any of us start showing signs of these type of symptoms…I immediately start administering frequent doses of vitamin C, my homemade elderberry syrup, and my herbal cold care capsules.

I also reach for herbs — those that have for centuries been known to possess powerful decongestant properties.

Herbs such as:

  • peppermint
  • eucalyptus
  • thyme

When combined into a salve, these herbs produce an amazingly effective alternative to the other stuff you can buy on the store shelves.

Herbal Decongestant Salve

Ingredients

-4 ounces good quality organic olive oil infused with dried organic peppermint leaf and eucalyptus leaf
-1/2-1 ounce beeswax
-1 teaspoon of each essential oils: eucalyptus, peppermint, thyme, and clove bud

Method
Note: See this salve making video tutorial for additional information.

1. Prepare your herb-infused olive oil. Note: Follow the instructions for making herb-infused oils found in this video tutorial.

2. Using a double boiler or small pot, heat — over low heat – the herb-infused olive oil and beeswax until the wax is completely melted.

3. Remove from heat and allow the mixture to cool slightly.

4. Add the essential oils and stir until well combined.

5. Pour into a small glass mason jar — or these tins if you plan to share this salve with friends and neighbors — and allow to cool completely.

6. This rub is designed for massage application to the chest, back, soles of the feet, under the nose, or temples.

7. Store in a cool, dark place (your medicine cabinet is perfect). It should keep for at least a year. Add a bit of vitamin E and it may stay fresh for up to 5 years.

Relax and inhale deeply.

Please remember: That any time someone — especially a child – struggles to breathe, it should be considered a medical emergency and he/she should be seen by a medical professional as soon as possible.

Where Can I Get This Stuff?

Mountain Rose Herbs…they have everything (dried herbs, essential oils, and the cute little tins) you’ll need for this remedy! It’s your one-stop-shop!

The Bulk Herb Store also carries many of these ingredients if you’d like to price check.

Purchase beeswax by clicking this link.

Via: frugallysustainable


Save pagePDF pageEmail pagePrint page

Make sandwich bread in a tin can.

Bread-In-A-Can Recipes
Believe it or not, there are a few recipes specifically for baking inside of a can.

Banana Bread
Ingredients
2 cups all-purpose flour
1 teaspoon baking soda
¼ teaspoon salt
½ cup butter
¾ cup brown sugar or turbinado sugar
2 eggs, beaten
1 teaspoon vanilla
2 1/3 cup mashed bananas

Directions
Preheat oven to 350°.  Lightly grease 4 soup or vegetable tin cans with cooking spray.  In a large bowl combine flour, baking soda, and salt; stir.  In a separate bowl, cream together butter and brown sugar.  Stir in eggs, vanilla, and mashed bananas until well blended.  Stir banana mixture into flour mixture, until just moistened.  Pour batter evenly into 4 greased soup or vegetable tin cans.  Bake for 30-35 minutes or until skewer inserted in middle comes out clean.  Allow bread to cool in cans.  After cooling, pour bread out of the can, slice, smear with butter (optional), eat, and enjoy.  Or wrap and give away.  (If not giving away the same day as having baked, you will need to store in a sealed container or bag in the refrigerator to maintain freshness.  Can store up to 3 days in refrigerator or 2 weeks in the freezer.  If placing in freezer, take bread out of can to freeze and return to cleaned can when presenting.)

There is also a recipe for tin can sandwich bread:


Tin Can Sandwich Bread

Ingredients

Dough/Bread machine
1 cup warm water
1 tablespoon olive oil
1 egg, slightly beaten
salt to taste
1/4 cup finely minced sun-dried tomato
1/3 cup finely grated Parmesan cheese
1 cup whole wheat flour
2 cups all purpose flour
1 package (or 1 tablespoon) yeast

Directions
Mix all ingredients to create dough
Spray insides of two tall tomato-juice-size cans
Divide dough and place in cans
Cover cans and let rise for an hour
Place cans in cold oven
Turn oven on to 400 degrees and allow bread to heat inside oven for 15 minutes
After 15 minutes, turn oven down to 350
Let bake for 15 more minutes at 350
Let cool and enjoy!

Via: thereadystore


Save pagePDF pageEmail pagePrint page

5 Reasons Why to Carry a Leatherman MUT as your Multi-Tool

The Leatherman MUT is one of the best recommendedMulti-Tools I have come across.

Below are the TOP 5 reasons I believe the MUT should be the ONLY Multi-Tool you should consider:

REASON # 5: EASE OF USE

All of the tools are accessed from the OUTSIDE – there is no need to open the tool to get to the multi-tools inside.  Not only are they easy to get to on the fly, but they are easy to open as well.  Ever had trouble getting your thumb nail or finger nail into the groove to open a multi-tool blade?  Me too!  The MUT has a nice cut-out in the blade that makes it a breeze to open – even with one hand.  Two thumbs up!

REASON # 4: 25 YEAR WARRANTY

Enough said.  Try finding this with any other multi-tool.

REASON # 3: MOLLE SHEATH

I love the sheath.  Not only is it a MOLLE SHEATH, but the quality is awesome.  It can be so frustrating to spend $100+ dollars on a new multi-tool only to find out that the sheath sucks and is cheap.  The MUT Sheath will NOT disappoint you.

REASON # 2: MILITARY GRADE

The MUT (Military Utility Tool) was designed with Military Use in mind.  Thus, it is more rugged and durable than most multi-tools on the market.  It also has some pretty cool built in features for breaking down and cleaning firearms.  Other multi-tools can’t touch these options.

REASON # 1: REPLACEABLE PARTS

All the cutting blades and pieces on the MUT are replaceable.  The entire unit disassembles and individual pieces can be replaced.  With many other multi-tools, once you break a part or blade – the entire tool is useless.  With the MUT, replace the part and your back to square one – no need to buy a BRAND NEW MULTI-TOOL!

You can Download MUT® User’s Guide to get even more information.

There are also other MUT tools such as the EOD and OHT versions

If you want one of the best tools I have seen in a long time, you can’t go wrong here.


Save pagePDF pageEmail pagePrint page

Convert AAA Batteries Into AA Batteries with Tin Foil


If you run out of a charge on a pair of AA batteries but have some AAAs laying around, one suggestion is using a strip of tin foil to convert the AAA battery into a AA battery.

To get this to work, all you need is a AAA battery and some tin foil. Wrap up a ball of foil and stuff it into the case of your device where the battery’s negative terminal connects. As long as you have enough foil to fill in the gap, your device should turn on. This method works great if your mouse battery dies in the middle of a work day or if a flashlight goes out during a storm. It’s not a permanent solution and should only be used in a pinch, but it works great for short periods of time.

via:  lifehacker


Save pagePDF pageEmail pagePrint page

The Best Fire Starter Money Can’t Buy: PET Balls

When it comes to fire tinder and fire starting materials, I could probably write a book on all of the different natural and store bought materials I have used – some working better than others.  However, for the purpose of this post I am going to focus on what I think is the most effective and economical home-made fire tinder/starter available.  Here at Willow Haven Outdoor, we call these very cheap & very effective fire starters PET Balls.  This stands for Petroleum Balls.

Put simply, a PET Ball is a wad of dryer lint saturated with petroleum jelly.  In my experience, a PET Ball will successfully take a spark from almost any ignition device (flint & steel, fire steel, match, lighter, friction coal, etc…) even in horrible conditions.

I keep a container of PET Balls in both my Bug Out Bag and also my excursion pack.  They are SIMPLE & CHEAP (REALLY CHEAP) to make.  Below is the process.


The Raw Materials

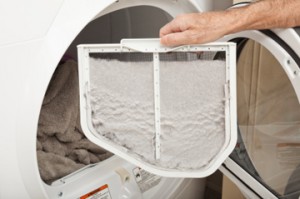
PET Balls Raw Ingredient: Dryer Lint

PET Balls Raw Ingredient: Dryer Lint

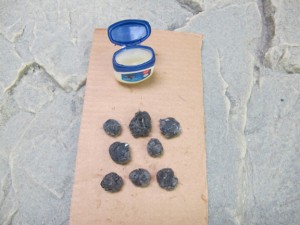
The first ingredient is completely FREE and abundantly available – Dryer Lint.  Dryer lint is the perfect consistency to use as a fire tinder material.  It’s fluffy, fibrous and highly flammable.  This, combined with run-of-the-mill Petroleum Jelly, makes for an incredible fire starter combination.

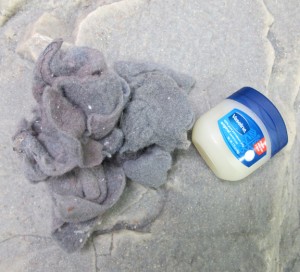
PET Balls: Dryer Lint + Petroleum Jelly

PET Balls: Dryer Lint + Petroleum Jelly


The Process

When mixed with dryer lint, petroleum jelly acts as what’s called a FUEL EXTENDER.  By this I mean that it allows the flame to burn longer than normal.  The fibrous dryer lint is what catches the flame and the petroleum jelly acts of a fuel source and allows the flame to burn longer and slower – giving you more time to feed the small flame with little twigs and wood shavings that you have already prepared.  Without the EXTENDED burn time, your window of opportunity goes up in a flash of smoke – literally! It’s possible, but more difficult. Petroleum jelly can be a fuel extender for many different materials including cotton balls, cattail down, milkweed down, dried grasses, etc… I always carry a tube of CARMEX Lip balm in my pack for this reason.  CARMEX is a petroleum based lip balm and can be mixed with a variety of tinder to make excellent fire starters.

Making PET Balls is a very simple process.  The first step is to slather a big scoop of petroleum jelly on a descent sized chunk of lint like you see below.

PET Balls: Step 1

PET Balls: Step 1

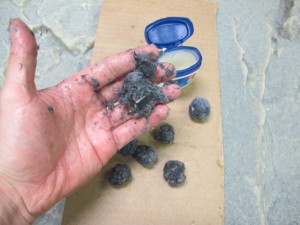
 Then, with your hands, vigorously mix the 2 ingredients until the dryer lint is completely saturated.

PET Balls: Step 2

PET Balls: Step 2

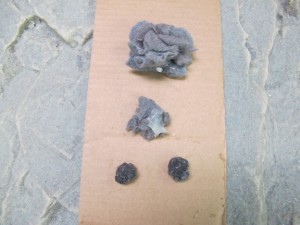
 Finally, simply roll the saturated chunks of dryer lint into small quarter sized balls.

PET Balls: Finished Balls - Ready for a spark.

PET Balls: Finished Balls – Ready for a spark.

When you are ready to use them, simply pull them apart to form a small nest – stretching out the fibers a bit.  Then, land a spark right in the middle and watch the magic.


Packing & Containers

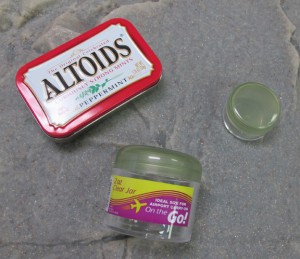
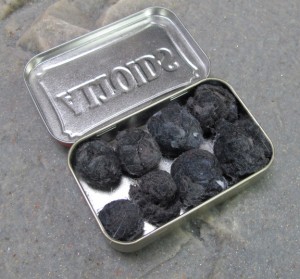
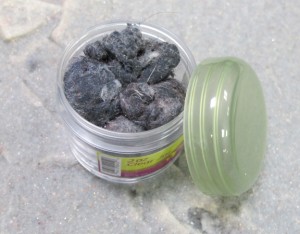
Choosing a container for your PET Balls is pretty basic.  I prefer a waterproof container – even though PET Balls will successfully take a spark even when damp.  You can use any small container and jam in as many PET Balls that will fit.  There are several good small container options in the SMALL TRAVEL SIZE section at most pharmacy stores.  You can also get creative and use containers such as Altoid Tinsand old film canisters.

PET Balls: Container Ideas

PET Balls: Container Ideas

 Once you choose a container, the more PET Balls you can fit, the better.  Jam them is as tight as you can get.  If I were using the Altoid Tin below I would cram in at least double that many.  It helps to saturate the dryer lint even more.  Besides, these little fire-balls weigh virtually nothing and can be life savers in damp & rainy weather conditions.


Sure there is excellent fire starting tinder available at camping and outdoor stores.  But why spend $10 on something when you can spend virtually $0 and a few minutes to create a product equally as effective.  This is exactly what being a survivor is all about – using the resources at hand to meet your basic survival needs – in this case, FIRE.

Via: willowhavenoutdoor


Save pagePDF pageEmail pagePrint page

How To Make an Electricity-Free Refrigerator

Conventional refrigeration does an incredible job keeping food fresh. But that technology hasn’t helped desert dwellers without steady electricity. A more recent development in refrigeration—the Zeer pot-in-pot refrigerator—only requires water, sand, and a hot, dry climate to preserve produce through evaporative cooling. Here’s how to make the simple gadget.

Materials and Tools Required

  • two terra cotta pots with a 2-3 inch difference in diameter. The smaller pot should be glazed and preferably lacking a drainage hole. If the inner container is double glazed (on its inner and outer walls), non-potable water—say seawater—can be employed.
  • a bag of sterile sand
  • a square of burlap cloth large enough to cover the top of the inner pot
  • a trowel

Building It

  • 1. If your pots have drainage holes, plug them with a bit of cork, caulk, or other waterproof material. If you don’t, moisture from the sand will seep into the lower pot and immerse the stored goods or seep out the bottom of the larger one.
  • 2. Put down a one-inch deep, level layer of sand in the bottom of the large pot. Set the smaller pot on top of that layer and center it in the larger one. Make sure that the smaller pot’s lip is even with the larger one’s.
  • 3. Fill sand in around the sides of the of the two pots, leaving about an inch of space below the lip.
  • 4. Pour cold water over the sand until it is thoroughly saturated. Put your food into the smaller pot. Cover that with a burlap cloth, also soaked with water. That’s it! Just be sure to refill the water regularly, about once or twice a day.

How It Works

The Zeer was developed in 1995 by Mohammed Bah Abba, a Nigerian school teacher that hailed from a family of pot makers. The design is incredibly simple: a glazed earthen ware pot nestled inside a larger, porous one with a layer of wet sand separating them. As the water evaporates through the surface of the outer pot, it draws heat from the inner one, keeping up to 12kg food fresh for as long as three to four weeks without using a single watt of electricity.

For his efforts, Bah Abba was awarded the $75,000 Rolex Award for Enterprise in 2000 and the World Shell Award for Sustainable Development in 2001 to help spur its development. Presently, Bah Abba sells about 30,000 Zeer per year for 200 Nigerian naira ($1.30) a piece.

Why It Matters

For unprotected food in the North African heat, there is no such thing as a shelf life. Fresh fruit and vegetables last maybe a day or two, and meat spoils within hours. This means that most food must be either sold or consumed immediately. Taking produce to market, in Sudan at least, is a task that typically falls on the women. This tight freshness deadline leaves little free time for their education. But if they had to go to market only weekly, rather than daily, they might actually have time for school—that’s the promise of the Zeer.

The Zeer benefits not just individuals but the greater Sudanese society as well. Farmers are granted greater negotiating power when they don’t have to sell their wares right there and then. Parents see fewer cases of food-borne illness. And when disease does occur, water and temperature-sensitive medicines can also be preserved in the cool pots.

For the rest of the world, the Zeer represents a zero-electricity option for refrigeration. In extended power outages like the ones we’ve seen this summer, long after the local store sells its last bag of ice, the Zeer could be your best chance to keep critical perishable goods from spoiling in the heat.

Via: gizmodo


Save pagePDF pageEmail pagePrint page