Category Archive: Build it yourself

Free Homesteading, Cooking, Prepper, Survival Kindle eBooks for 02-27-18

Free Kindle Survival Homesteading Books

Free Homesteading, cooking, Survival, , and Prepping Kindle ebooks? Yes FREE Kindle ebooks!! Every now and then Amazon runs special offers on some of their Kindle ebooks, making them free for a limited time (usually just 24 hours).

I will check Amazon on regularly basis for their free Kindle ebooks in related subjects such as survival, homesteading and prepping etc. I will do all the leg-work for you so you don’t have to. You can just come back here regularly, so make sure to bookmark this blog.

These ebooks are only free for a limited time so if you are interested in one make sure you get it right away so you don’t lose out!

Remember you DON’T need a kindle to take advantage of these! There are FREE kindle apps for most major platforms!! iPhone, iPad, PC, Mac and Android. You can find those apps here!

Always check price before engaging, to make sure it hasn’t returned to full price.

imageimageimage

imageimageimage

imageimageimage

imageimageimage


Start now to make sure you are staying prepared.


Save pagePDF pageEmail pagePrint page

Off-the-Grid Phone Chargers, Reviewed


Top off-the-grid phone chargers so you can stay connected when you unplug.

Most of us occasionally want to unplug from the hustle and bustle and head to the great outdoors for exciting adventures or some well-deserved relaxation, but that doesn’t mean we want to leave our phones behind. Smartphones offer many useful features for wandering off the grid, including GPS, maps, survival apps, and of course the ability to make emergency calls – not to mention access to our favorite games, books, blogs, and social media sites. The only problem? Keeping your phone charged when you’re off the grid.

No outlet? No problem! Here are some off-the-grid phone chargers so you can stay connected when you unplug.

Types of off-the-grid phone chargers

Before you can buy the best off-the-grid phone chargers, it’s important to understand the differences between each type. Several different kinds of outlet-free phone chargers are available, including:
Solar phone chargers
Hand-crank phone chargers
Camping/thermoelectric phone chargers
Water-powered phone chargers
Wind-powered phone chargers
Kinetic phone chargers
Bicycle phone chargers

Each type of charger has its own pros and cons, listed in the table below:


Phone charger type Pros Cons
Solar ·
Portable
·
Some have batteries so they continue to work
in overcast conditions
·
No manual power required
·
Free, easily-accessible energy source (the
sun)
·
Not always efficient
·
If no battery, will not work in overcast
conditions
·
Some have lengthy charge times
Hand-crank ·
Portable
·
Works anywhere
·
Some have batteries that are charged by the
hand-crank, so you can charge the battery and then use your phone
·
Requires manual power
·
Conversion process is inefficient; best-used
for emergency calls
·
If no battery, must crank while you use your
phone
Camping/thermoelectric ·
Works anywhere – set it and forget it
·
Not affected by conditions
·
Excellent for camping
·
Portable between campsites, but not on-the-go
(for example, hiking)
·
Requires water or wood and a heat source, such
as a camping stove
Water-powered ·
“Pods” are filled with water to activate
battery cells and generate power
·
Easy phone charging when you have access to
water
·
Portable
·
Must purchase individual pods and have access
to expendable water
·
Pods could get expensive and charger could cut
into your drinking water supply
Wind-powered ·
Unlimited free charging where wind is
available
·
Requires steady supply of ample wind force
·
Must position charger to catch the wind
Kinetic ·
Portable
·
Unlimited supply of power
·
Requires manual power to operate
·
Inefficient, lengthy charge times – best used
for emergency calls
Bicycle ·
Portable
·
Charges while you ride
·
Duplicates manual power (requires no
additional power beyond pedaling your bicycle)
·
Requires a bicycle and typically a special
adapter
·
Will not charge when you’re not riding your
bike


Best off-the-grid phone chargers

Once you determine which type of off-the-grid charger will work best when you bug out, it’s time to decide which model to buy. The following looks at models in each category.

Ayyie, Solar Charger, Solar Power Bank 10000mAh External Backup Battery Pack

image
There are many contenders for the best solar phone chargers, each exhibiting its own unique benefits, but this one has the perfect blend of features for most off-the-grid trips. Unlike large (and expensive) solar panels, this is about the size of a smartphone so it’s ultra-portable.

The diminutive size doesn’t mean it’s not powerful; once fully-charged, the inboard battery has enough juice to recharge an iPhone many times. Moreover, the device features two USB ports so you can charge two devices at once. Because they’re USB ports, it is compatible with just about any popular device, including the Galaxy, iPhone, and even iPads and Kindles.

The only drawback is that it’s limited by its size: because it’s so small, it can take a long time to charge. That means you need to charge it completely before you leave the grid, then leave it in the sun all day and save charging your phone for overnight if you want the power to last. That’s easily within the realm of possibility for most contemporary campers.

Finally, it comes at a friendly price-point, having about a $30 price on Amazon.

SunJack 14W

image
If not for the $140 price tag, the SunJack might be top of list. The four-panel charger folds to roughly the size of an iPad and fully charges within five hours – faster than any other solar charger listed here. Even better, the SunJack charges an iPhone as quickly as a wall outlet (about 75 minutes from 35% charge, according to Offgrid Survival).

The SunJack features a removable backup battery, and you can charge your devices directly from the SunJack while it charges or use the charged battery as a stand-alone device. If you buy a second SunJack battery, you can always have one on the charger and one in-hand.

SunJack also has a 20-watt model.


Zebora Powerful Portable Solar Charger – Equipped with 4 Foldable Solar Panels & 10,000 mAh Dual USB Ports Power Bank for Mobile Devices, Pads and Other USB-charged Devices at $47.

imageimage 


Cobra Electronics CPP 300 SP

image
The $18 Cobra CPP 300 SP doesn’t require direct sunlight (which can actually cause the batteries to swell), only daylight, and takes up to 28 hours to charge – a full 22 hours faster than the Apollo 2. That’s because the 300SP folds out into two solar panels, which nearly cut charge times in half.

The 300SP can deliver three to four iPhone charges on a single charge from its 2.1 Amp rapid-charge lithium battery. It’s small and lightweight, making it ultra-portable, and features three USB charging ports for simultaneous multi-device charging. An onboard illuminated LCD screen eliminates battery level guesswork.

It also has the CPP 100 SP model for around $47 an has 3.7V/6,000mAh Lithium Polymer Battery Pack.

image

Voltaic Systems 4.0W

image image
At $89, the Voltaic Systems 4.0W might be one the best deals. That’s because its dual monocrystalline waterproof solar panels are capable of charging the average smartphone after just 3.5 hours of indirect sunlight – and a single hour of solar panel charging will generate enough juice to power a smartphone for three hours.

The Voltaic Systems 4.0W is unique in that it features a removable battery you can keep in your pocket for portable charging. If you get a second battery, you can always have one battery charging at your campsite and another in your pocket during hikes and other adventures.

Best hand-crank phone charger

American Red Cross FRX2 Hand Turbine ARCFRX2WXR

image
There’s not much to be said about hand-crank phone charges, other than the fact that they require a lot of manual cranking to get a decent charge. That’s why they’re best-used for emergency situations only; all the more fitting for the American Red Cross to partner with Eton to produce an off-the-grid charger that not only charges your phone, but also doubles as an AM/FM/NOAA weather band radio. Add in the secondary solar charging panel – though small and slow-charging – and you can’t ask for much more at this model’s $39 price point.

K-Tor 120 Volt 10W

image
For a no-frills, charge-only experience, check out the K-Tor 120 Volt 10-watt hand-crank phone charger. It’s unique in that it uses an AC plug to charge your devices for universal compatibility; plus, it’s capable of charging at the same rate as a standard wall outlet (though it would take hours of cranking to achieve a full charge). It’s a great emergency device, but at $50 it’s simply not as good a deal as the Eton American Red Cross model.


Nice combo unit for Solar and hand crank power


Eton FRX5 – All Purpose Weather Alert Radio with Bluetooth

The FRX5 BT is solar-powered, splashproof², smartphone and tablet charging, Bluetooth streaming and with S.A.M.E. technology. With the rechargeable lithium battery, super duper solar panel and hand crank power generator, it is an essential for everyday use at home, at work, or in the great outdoors. You now are essentially getting two products in one – a rugged weather radio with alerts and a speaker system where you can stream anything at anytime and anywhere for just $86.

image image

    • AM/FM/NOAA weather bands
    • S.A.M.E. and NOAA weather alerts
    • Bluetooth ready
    • 2000 mAh rechargeable lithium battery
    • Digital tuner and display
    • 5v—2.1A USB output
    • High efficiency solar panel charging
    • Hand crank power
    • Rugged¹ and IPX4 splashproof²
    • Bright LED flashlight, red emergency beacon
    • Ambient light with dimmer
    • Drop-proof from a height of 3.3 ft. (1m). Drop protection varies depending on drop conditions.
    • Water resistant to IEC 60529IPX4. It is not waterproof and should not be immersed in water.
    • Dimensions 5.8 x 7.1 x 2.3” (W x H x D) 14.8 x 18.1 x 5.8 cm (W x H x D) Weight: 1 lb 6 oz (0.62 kg)

American Red Cross FRX3 

The FRX3 which is a multi-powered, multi-function, smartphone charging, weather alert radio which will give access to news and information in an emergency. at $59 it is small and easy to transport.

image image

  • Receives AM/FM (digital radio)
  • Receives all 7 NOAA/Environment Canada Weather bands
  • ALERT function broadcasts in emergency weather alerts
  • Hand turbine and solar power charging in emergencies
  • USB smartphone charge
  • Long-lasting LED flashlight
  • One red LED flashing beacon

5.8 x 6.9 x 2.6” (W x H x D) 14.7 x 17.5 x 6.6 cm (W x H x D) Weight: 0.93 lbs (0.42 kg)


Best camping/thermoelectric phone charger

BioLite Wood Burning Camp Stove

image
Toss a few twigs in the chamber, and the BioLite Wood Burning Camp Stove lets you charge your smartphone while you boil water and cook meals. Charge time is dependent on the strength of your fire, but generally speaking you can get an hour of smartphone use per 20 minutes of charging.

The main drawbacks to the BioLite Wood Burning Camp Stove are that you have to continually feed fuel (wood) into the stove and it’s not really portable, save for transport between campsites. However, quick, easy charging makes the BioLite Wood Burning Camp Stove a good alternative to solar chargers – no sun required. The $125 price tag might be a bit much for a charger, but when you add in the cooking features this dual-purpose device is a good deal.

I have even seen this at local Lowe’s store for as little as $104.


Power Pot 5

image
Like the BioLite Wood Burning Camp Stove, the Power Pot 5 converts heat into electricity so you can power your devices. Unlike the BioLite model, you’ll need to provide the heat source to make the Power Pot 5 work. You also need to fill the pot with water (or soup or other liquid) during operation.

Though the manufacturer claims you can get 90 minutes of talk time per 20-minute charge, customer reviews indicate actual performance depends on the output (some struggled to achieve five watts) and the size of your phone battery. As one reviewer put it, if you have a 2,000mAH battery it would take two hours to fully charge your phone, refilling the pot with water every ten minutes. The Power Pot 5 is a great idea and doesn’t limit you to a single heat source, but at its $82 price you might be better off with the BioLite Wood Burning Camp Stove.

Best kinetic phone charger

Kinetic energy represents the next frontier in off-the-grid phone charging, but results to-date haven’t lived up to the hype. Several companies have gone out of business or received poor reviews (such as the nPower PEG). However, there is hope on the horizon.

For starters, you get AMPY, a $50 motion charger funded via a Kickstarter campaign. AMPY is said to convert the kinetic energy from a half-hour run into three hours of talk time.

image

If AMPY is successful, you can expect similar products to be released soon after. Some products are borderline wacky, including foot pump and yo-yo chargers. Scientists have even developed a battery that can be charged by your heartbeat.
These are all cool ideas, but until kinetic chargers have proven themselves you’re probably better off choosing a tested option when you’re going off-grid.

Best water, wind, and bicycle phone chargers

Similar to kinetic chargers, these types of off-the-grid phone chargers aren’t as tested others. Still, there are some notable options you can consider for your next great escape, including:

myFC Power Trekk – put pods (called “pukks”) in the device and add water to charge your phones; with lukewarm reviews, it’s probably not worth the hassle at $130. Keep an eye out for myFC’s upcoming saltwater card charger, which is about the size of a smartphone and uses saltwater cards to instantly supply hydrogen power (no pre-charging required), but still have to keep replacing cards.

Vindur – Portable Wind Turbine– for $400, sun is more reliable than wind in most cases

K-tor Power Box 20 Watt Pedal Generator –For $200 can use hands or feet to pedal charge items.

Siva Cycle Atom– charges your devices while you ride your bike for $99. Also check out the BikeCharge Dynamo ($110)

Which off-the-grid phone charger should you buy?

There are a lot of cool concepts out there, but if you’re going off the grid your best bet is to choose proven, reliable technology – technology your life just might depend on. In addition, it’s a good idea to have a second option in case your first charger fails. Our recommendation is to choose one of the solar-powered models featured here, backed up by a hand-crank model.

Ultimately, of course, you need to make the best decision for your environment. If you’re venturing through an Alaskan winter, a solar charger won’t do you much good. If you plan to spend a month in the outback, you’ll probably need a larger, more expensive charger than the models mentioned here. For most weekenders, however, keeping an emergency charge on-hand can be accomplished with a solar charger and a backup hand-crank charger.


You could also choose to load up emergency supplies and have them and you ready and use the SolarGoPack solar powered backpack. at $250.

image imageimage 


Or if you want to go much bigger and money is no option, could always look at the Solar Powered Generator – 3.240 Kilowatt Max Output – 19ft Trailer – 24 Panels – NEMA 4X Enclosure at only $111,538.00.

image

or the SOLAR MAX POWER TRAILER 8000– (SMALL HOUSE ON WHEELS) for only $29,885.00.

image

another option the Quantum Harvest Model 6000 Portable Solar Power System for $14,995.00.


So many options you should be able to find or even build something yourself.

Portable Solar Wind Power Generator

image

14 Brilliant DIY Wind Turbine Design Ideas For Living Off the Grid

How to Build a Solar Energy Generator for Emergency Backup Power


Don’t forget to check these posts out:

Family Disaster Planning

How to communicate when the world goes silent

50 Last Minute Ways to Prepare for an Emergency

Emergency Preparedness for Everybody

Reliable Ham Radio Post-Disaster Security Communications


Start now to make sure you are staying prepared.


Save pagePDF pageEmail pagePrint page

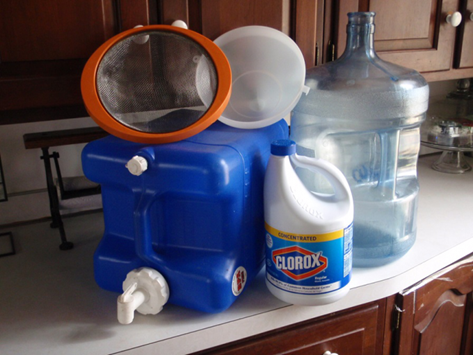
4 Types of Filtration to Consider for An Emergency Home Water Supply


Photo by Tim MacWelch

There are a variety of ways to tackle water filtration in an off-grid scenario.

Waterborne pathogenic organisms have been, and will continue to be, a huge threat to the safety and health of anyone who is providing their own water supply, especially from surface water sources. Dysentery and other water related ailments have been killing kings and commoners alike for millennia, and it’s still happening right now. The World Health Organization estimates that water-borne pathogens kill as many as 3.4 million people a year worldwide.

In a crisis setting, you may not be using your normal source of water. This makes filtration an even more important issue. So whether your back-up water supply comes off your roof, from a spring, or out of a tank – consider using this equipment so that you and your family don’t fall victim to the global epidemic of dirty water.

1. Carbon Filters 
These are the elements in your household “pitcher filters,” which remove chlorine, lead, iron, copper, and other not-so-tasty elements. You can also find these filter elements in the plumbing lines of OTG homes around the world.

2. Reverse Osmosis Filters
The best of the bunch in the opinion of some, reverse osmosis involves pushing water through a membrane. Particles and organisms larger than a water molecule just can’t fit through the pores. This is a fine filter for screening out pathogens, but it’s best used on already clear source water. This filter can clog the fastest, and it may also require “normal range” water pressure, something you may not have on a gravity fed system.

3. Sand Filters
These are exactly what they sound like: vessels of sand that catch and hold particulates and pathogens. These are an excellent “first step” in your system, especially if you occasionally have sediment in your water which would hopelessly clog a finer filter.

4. Ceramic Filters
I’d trust my life with these. The best ceramic filters have silver imbedded in them. The ceramic screens out the larger pathogens, and the silver kills the little ones (like viruses).

Start now to make sure you are staying prepared.

Via: outdoorlife


Save pagePDF pageEmail pagePrint page

How to Create a Safe Room in Your House or Apartment


The homes of many rich, famous people have a secret hidden within them.  Somewhere, in the depths of the home, is a secure room to which the residents can retreat in the event of a home invasion or violent intruder.  A safe room was carved into the original house plan, and many of these are state of the art.  Features might include a bank of monitors for viewing what’s going on outside the room, a small kitchenette, comfortable furnishings, fresh air venting, and a hardened communications system.  These expertly designed rooms can cost tens of thousands of dollars, but you don’t have to be a movie star or a multi-millionaire to build your own version of a safe room. Even the most humble home or apartment can have on a place to which vulnerable family members can retreat if they are under threat.

Why should you have a safe room?

Some folks may read this and think to themselves, “I don’t need a safe room when I have my 12 gauge shotgun and my 9 mm. That’s just running away.”

I completely understand your point. Most of the people who read prepping and survival sites are not of a “retreat” mentality.  But, if a gang of 12 thugs (possibly wearing badges) kicks down your door, how likely are you to shoot every single one of them before someone gets off a lucky shot and hits you?  Hint: If you aren’t tactically trained, the likelihood of this is pretty slim.

Here’s another reason: do you have vulnerable family members in the house? Children? A spouse or elderly relative? Someone who just isn’t a fighter?  Even if you intend to engage, you may have people in the home who are not willing or able to do so, and it will be better for you if they are safely out of the way.

A safe room is honestly just another prep. It doesn’t mean you are cowardly. It means you are ready for a variety of scenarios and that the safety of your family is paramount.  It is a layer of protection that allows vulnerable people to retreat until help arrives.

Here’s a perk: another great use for your safe room is that you can stash your valuables there. Most break-ins occur when you aren’t home.  If your valuables are locked away, a random tweaker searching for things to sell to support his habit is not going to be able to access your important papers, your fine jewelry, your firearms, or your most prized possessions.

Retreating to your safe room

When you retreat to your safe room, you have one goal: to end any possibility of interaction with an unwelcome person. Please don’t call it a panic room. That indicates that you are a scared victim.  You are retreating to a safer location because you don’t intend tobe a victim. In a military gun battle, do soldiers move behind sandbags or into trenches? Of course. They want to limit the likelihood of being shot or otherwise injured. You may or may not be a trained soldier, but your goal is the same. It is to avoid being injured by a person who may be intent on injuring you.

A safe room is not a bunker. You probably aren’t going to be holed up in there for days during a stand-off. It is a point of retreat until help arrives.

The #1 rule of the safe room: DO NOT LEAVE IT UNTIL YOU ARE SAFE AND YOUR HOME HAS BEEN CLEARED. NOT FOR ANY REASON. A criminal will threaten, cajole, manipulate, and bully to try to make you come out. DON’T DO IT.

We’ve often talked about the importance of having a plan (as well as a few back-up plans) and running practice drills. A safe room is no different. All family members that are physically able should be able to quickly access the room. If you have several people in your household, you might want to put a keypad access on the door to the safe room so that whoever has retreated first is safely locked in without worrying about admitting the other family members.

Map out as many different ways as possible to get to the safe room from various locations in the house. This is a great time to get the kids involved, because children are explorers by nature. They may know routes that you had never even considered.  Practice, practice, practice.  Run timed drills and make a game out of how quickly all family members can get to the safe room and get the door secured.

Of course, the success of moving quickly to your safe room rests upon being alerted that someone is in your home.  You should have security measures in place that let you know that the home has been breached:

  • A dog
  • A high quality monitored alarm system
  • A wireless alarm system that sounds an alarm and automatically calls for assistance
  • Outdoor sensors that will alert you when someone comes through your gate or approaches your home. (Note: If you’re like us and you live somewhere with a lot of wildlife, this option may not work well for you.)

The more of these early warnings you have, the better off you’ll be. Someone might get through one of the alarms, but how likely are they to get through 3 or 4 without you being alerted?

Where should your safe room be?

If you are building a new home from the ground up, you have the unique opportunity to have this special room added to the plans. In this case, your far less limited by the existing design and layout of the house. In fact, there are companies whose sole purpose is designing safe rooms for homes and businesses.  One of the most reputable, Gaffco, offers consultations, plans, and even construction of these rooms. Additionally, they offer “pods” that were originally designed for the US military, which can be incorporated into the design of your home or connected to the home via a breezeway.  These options are top of the line, and may be out of the affordable price range for the average family.

Most of us aren’t in that building process though, so we need to adapt part of our living space to make a safe room.   Some people adapt a large walk-in closet or pantry, while others refurbish a room in their home. DuPont offers a “Stormroom” that is reinforced with Kevlar and is epoxied to your garage floor. It’s designed to withstand a Category 5 hurricane, so it’s a good be that it will also withstand your average home invasion.  These start at $6000 for the smallest size.

Here are some important qualities:

  • No windows to the outside
  • Ventilation
  • Thick/reinforced walls
  • Water and a bathroom
  • Enough space for the number of people likely to shelter there
  • Ease of accessibility for the family from multiple locations in the house

Of course, finding all of these things, sitting there in one room, waiting for you to reinforce the door may not be likely so you have to work with what you’ve got.

Some good options are:

  • Walk-in closet
  • Master bedroom with attached bath
  • Basement family room
  • Storage room
  • Wine cellar (Not as outrageous as it sounds – surprisingly the humble little 2 bedroom Victorian cottage we used to live in had one)
  • Interior den with no windows
  • Inside an attached garage

If you intend to go full out and reinforce the walls, it will be less expensive to convert the smallest area that will house the required number of family members.

It is of vital importance to locate the safe room in a place that can be quicky and easily accessed by family members. If you have to run past the entry through which intruders just burst, you probably aren’t going to make it to the safe room. Remember, the most ideal safe room situation is one in which the criminal has no idea that you were home or, if he knows you’re home, has no idea where you may have gone.

One important thing to remember is that your safe room doesn’t have to only be a safe room. The best use of space would have the room used regularly for other purposes.  Most of the modifications you’ll make don’t have to be obvious. For example, if you’re reinforcing the walls, you can drywall over your reinforcements, paint the wall a happy color, and carry on with your life.  An attractive exterior type door can be painted to match the other interior doors in your home.  Even if you live in an apartment or condo, you can make some subtle changes to create a safe place to retreat.

The key here is to do the best you can with your resources and the space you have available. Let’s talk about the most important modifications.

The Door

The very first line of defense is the door you will slam behind you.  For many of us, this is where the majority of the money will be spent.

Forget about flimsy interior doors.  Most of them are hollow core and your average everyday axe wielding murderer or gangbanger intent on mayhem can get through them by kicking or punching through. Go to Home Depot and get yourself the very best exterior steel slab door that you can afford.  If your safe room is an ordinary room in the house, look for a door that can be painted to blend in with the other doors in the house. There’s no sense making it obvious that this room is special.

There’s no point in having a great door in a cruddy door frame. Your door is only as solid as the frame that holds it, so replace your standard interior door frame with reinforced steel. Get the absolute best quality you can afford, then paint it to match the rest of the door frames in your home.  Hang your door so it swings inward. Then you can add extra layers of security to the door.

You want to add more locks than just the doorknob type. For your primary lock, choose aheavy duty reinforced deadbolt system. You can also add a jimmy-proof security lock like this one for an added deterrent, but this should NOT be your primary lock.  You can add adoor bar, the hardware for which would be fairly unobtrusive when the bar is not across it.  If you make all of these changes, NO ONE is getting through that door by kicking it in.

The Windows

Windows are a definite weak point in a safe room. If you are using a room that is also used for other purposes (like a master bedroom) you probably have them.  Don’t despair – they too can be reinforced.

The biggest threat with a window, of course, is that the glass will easily break, allowing someone to either get in the room or shoot people who are in the room.

You can go all out and replace the window in that room with a bulletproof security window.  Although they are very expensive, you may decide it’s worthwhile since it’s just for one room. If this is out of your price range, you can purchase ballistic film and apply it to your existing window.  This video shows you how much a high quality ballistic film will withstand.  If you’re doing this, do NOT skimp on quality.


If you have windows, no matter how resistant they are to impact, it’s a good idea to have curtains too.  You don’t want the aggressor standing out there watching you or casing your retreat.  Not only would that be mentally rattling, they just might figure out a way to breach your safe room or counteract your safety plan, like secondary communications.  They do not need to know how many people are in the safe room, what equipment and supplies you have, or what you’re doing in there.  Get heavy curtains and make sure they’re completely closed with no gaps whatsoever.

The Walls

This is where the serious expense comes in.  A round from a 9mm handgun can easily penetrate the walls of the average home. Dry wall does NOT stop bullets, not even from a weaker caliber gun. That’s why one of the most important rules of gun safety is to not only know your target, but what is beyond your target.  If your walls aren’t sturdy enough to withstand bullets, then you’ve basically just put your family into a box to be shot more easily.

One way to lessen the expense of this is to choose a room in the basement. If you build your retreat into a corner, then you have two exterior walls that are concrete surrounded by dirt – virtually unbreachable.  Then you only have two walls to worry about.  If you are in an apartment, the laws in most states insist that walls separating two apartments must be fire resistant. Therefore, the wall between your apartment and the next could be made of cement, providing one wall of safety.

Free plans for a variety of safe rooms are offered by the Department of Homeland Security. As well, FEMA offers free plans for a safe room that is designed to withstand natural disasters. This could be easily adapted for home security purposes too.

There are a few different ways to reinforce the walls of your safe room. Some of the following options may be out of your price range or skill level, and some may not be practical for your living situation.

  • Armored steel panels: One of the best ways to convert an existing room into a ballistic haven is by adding armored steel panels to the walls. You can add drywall over the panels and no one will even realize they are there. These are heavy and use on upper floors could damage the integrity of your structure. They’re expensive, with a bottom end price of about $400 for a 4×8 panel, but depending on the layout of the room, they may not be needed on every wall.
  • Kevlar: These resistant walls are made out of a fiberglass type material.  This is a much lighter weight alternative and can be used in places that can’t hold up to the addition of heavy steel or concrete. You can learn more about Kevlar construction from Total Security Solutions.
  • Poured concrete:  This MUST be used on a ground floor or in a basement because of the extreme weight.  This is a far less expensive option and can withstand most threats.
  • Sand:  This is another heavy weight option, but it can be far less expensive than other options, particularly if you live in an area with abundant sand.  A 12 inch thick barricade of sand can protect against many different ballistic threats. In a basement room, a sand-packed wall in between the exterior of the room and interior drywall can provide substantial protection at a lower price. The Prepper Journal has an interesting article on using sandbags to stop bullets. The ideas could potentially be adapted to the interior of your home.  For example, you could stack sandbags halfway up a wall and then build a lightweight wall over the sandbags – the inhabitants of the room would need to shelter behind the sandbags to remain safe.

Temporary options: For the average family, many of these solutions can be out of reach.  If you rent, you probably won’t want to do major construction, either. It’s best to choose a room that is already as sturdy as possible and then reinforce the weak points. Although these options aren’t anywhere near as resistant as the ones above, they are better than nothing.

  • Have a heavy duty item you can shelter behind, like a steel desk or deep freezer.
  • Line your walls with heavy furniture, like loaded bookcases with real wood backs, not flimsy particle board.
  • Line your walls with metal filing cabinets, fill the drawers with anything, and stay low.

The Camouflaged Safe Room

Even though safe rooms aren’t really a “fun” topic, a secret hidden safe room is the kind of thing that stirs the imagination.  After all, how many awesome movies from your youth began with the magical discovery of a stairway or room hidden behind a bookcase or a mysterious doorway at the back of the closet?

The success of a camouflaged safe room rests on the residents of the home quickly moving into hiding without the intruders even knowing that they are home. This is the best case scenario for an event during which you need to retreat to a safe room.

You don’t have to have a mysterious Victorian mansion to have a hidden safe room. Amazon sells a hidden door hinge system that you can use to create a bookcase door. (You can also buy plans for installing a bookcase door or even an entire bookcase door kit.) Other options might include a trap door in the floor hidden under an attached throw rug or a discreet door at the back of a closet behind all the clothing.

Don’t rely strictly on the secret entry for your security. It should be followed up by the reinforcements described above, in the event that the intruders discover you’ve gotten away.

Communications

As was discussed in the introduction, a safe room is simply a retreat. If you don’t have help coming, you could remain trapped in there indefinitely, particularly if the intruders decide to wait you out.

Remember the #1 rule of the safe room? DO NOT LEAVE IT UNTIL YOU ARE SAFE AND YOUR HOME HAS BEEN CLEARED. NOT FOR ANY REASON. A criminal will threaten, cajole, manipulate, and bully to try to make you come out. DON’T DO IT.

You may not have had time to call 911 or your well-armed neighbor before sheltering in your safe room.  If that is the case, then you need to be able to summon assistance from within the safe room. Here are a few suggestions:

  • Cell phone: Make sure you have an additional charger for your cellphone that stays in the safe room.  Remember that a cell phone is not 100% reliable.  While it’s not exceptionally likely that your average home invader will jam your cell phone, it’s possible. (WikiHow explains how easily one can be made and this device jams  both cell signals and WIFI. )
  • Landline phone: Put an old fashioned phone in your safe room. Don’t get one that relies on electricity to work. Even better, install a secondary buried line in the event that your primary line is disabled. If a criminal cuts one phone line, he generally won’t look for a secondary line.
  • Computer: Just like the secondary landline, above, consider a secondary internet access as well.  If you have Skype, you can also have an internet telephone system from which you can call for assistance, but be warned that you many not immediately reach your local 911 from a Skype phone.

Once you have 911 on the line, be sure to let them know that you are armed. (Cops hate surprises.)  If at all possible, stay on the line with the 911 operator so that you can confirm that help has arrived without opening the door of your safe room.

  • Two-way radio: If you have a trusted friend or neighbor nearby, a two way radio system is another way to summon help. This one transmits up to 36 miles.
  • Ham radio:  Be warned, you need an FCC license for a ham radio.  You can learn more about the different kinds of ham radios in this article.
  • Cameras:  While cameras won’t help you summon help, they can let you know what’s going on outside your safe room.  Especially important, a camera outside the door of the room will give you some advance warning if your retreat is about to be breached.  It can let you know if help has actually arrived or if the intruders are just trying to trick you into thinking so. This system feeds into your cell phone or your computer.

Supplies

You want to have enough supplies to stay in your safe room for 24-48 hours. Since this is a safe room and not a bunker, you don’t need  year’s supply of beans and rice in there.

  • Food: Stock up on food that doesn’t require any cooking or refrigeration. (This article is about food that you’d eat during a power outage but many of the suggestions will work for your safe room supply.)
  • Water: Even if you have an attached bathroom with running water, store at least one gallon per person that is likely to be in the room,.  Just in case. Because stuff happens, especially when bad guys are around.
  • Cold weather gear: In the event that your heat stops working during cold weather, stash a selection of winter coats, gloves, hats, sleeping bags, and a warm change of clothing.
  • Entertainment:  Really.  If you end up in the room for more than a couple of hours, you’ll go insane just staring at the monitors.  As well, if there are children in there with you, they’ll handle the ordeal much better with some distractions.  Keep some books, games, puzzles, DVDs, etc., in the safe room.
  • Sanitation: Ideally, you’ll have an actual bathroom as part of your safe room. If not, you’ll need a place to relieve yourself.  The best portable option is a camping toilet, which will eventually have to be emptied, but holds over 5 gallons and should last throughout any amount of time you’d be in your safe room. Also stock hand sanitizer, baby wipes, feminine hygiene supplies, and diapers, if applicable to your family.
  • Special needs items:  Remember that movie “Panic Room”, with Jodie Foster and Kristen Stewart?  They were forced to leave the safe room because it wasn’t stocked with the necessary supplies for the diabetic child.  Don’t let this happen to you. Not only will you stock your safe room with food, but keep extra medication for any family members with special needs.
  • First aid supplies: Keep a full first aid kit, as well as a manual, in your safe room. If a family member was injured on the way to the room, you want to be able to provide some care for them. Particularly focus on supplies necessary for traumatic injuries.  Also stock things like antacids, pain relievers,  and anti-diarrheal medications. You can find a great first aid supply list in this article.
  • Emergency supplies: Always keep a fire extinguisher, goggles, and some particulate masks in your safe room.  A very determined criminal might try to force you to leave the room by starting a fire. Depending on the materials used in the construction of your room, this could be successful.  The goggles and masks aren’t perfect, but they give you a chance to launch an offensive if you do have to leave the safe room.

Defense

Here’s the bottom line: If an intruder somehow manages to breach your safe room, the time for retreat is completely over.   There’s no option left – you have to be prepared to fight like your life depends on it.  If an intruder has gone to the trouble to break through all of your defenses to get to you, your life most likely does depend on your ability to mount an aggressive defense.

Aside from your primary defense weapon (which you’re probably carrying with you), all of your other weapons should be stored in your safe room. Your extra ammunition should be stored there too.

Is every person of reasonable age in your family able to handle a weapon? If not, it’s time to sign up for classes or go to the range.

You need to have a plan in the event your defenses are breached. You don’t want any “friendly fire” injuries to occur. This plan will be different for every family based on individual skills, on available weapons, and on the set-up of your safe room.

The safe room is your final point of retreat. If someone brings the battle to you, you must be prepared, both mentally and physically. Otherwise, you and your family are like fish in a barrel, neatly corralled targets for the intruders.

Outside of your safe room, might want to consider this:


Start now to make sure you are staying prepared.

This article originally appeared in The Organic Prepper

Via: apartmentprepper


Save pagePDF pageEmail pagePrint page

Building A Group Shelter


Bushcraft Quebec shows how to build a shelter that holds by pressure with natural materials.

This is a formidable method for making a shelter when you are in the wilderness and need to survive.


Start now to make sure you are staying prepared.

Via: survivalist


Save pagePDF pageEmail pagePrint page

How to Make a Tin Can Trail Alarm

Many of you, have watched the old war movies where the approaching enemy trips an alarm made of tin cans, which in turn alerts the good-guys to their approach. The advancing troops trip the wire and the cans fly up into the air, making enough noise to alert the good guys to the approach, allowing them time to mount an effective counter.

In the real world there are better, more effective alarms that can be made to guard the entry points to your position, but since we love movie magic, I thought this infamous contraption would be a good place to start.

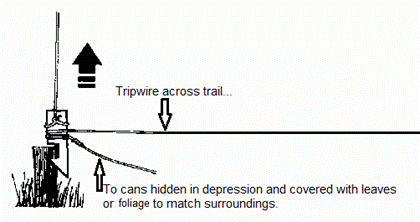
First find the most likely area of approach and one offering enough cover to effectively hide the trap and wire. One of the best places is where the trail makes a sharp turn in another direction, this makes it more difficult for the target to spot the wire before tripping the trigger and sounding the alarm.

Try to make everything look natural, avoid braking branches, turning over leaves or loose dirt, clean up all wood shavings etc. You want everything to look just like it did before you set the alarm.

It’s best to dig a slight depression to hide the cans, do this on the opposite side of the tree away from the approaching enemy. Add two or three rocks to inside each can then cover with natural cover to hide them from view.

This design and trigger can be used with other “noise makers” one of my favorites is a cowbell or goat-bell, a bell is louder and easier to hide. The main problem is that they may not be available when needed. But I’m sure you can come up with more ideas.

If you are interested in learning more about traps and path guards I recommend the Trapper’s Bible: Traps, Snares & Pathguards by Dale Martin. This book includes pest snares, large animal snares, and transplant traps, plus camp alarms that alert you to intruders and deadly pathguards that could save your life.


Start now to make sure you are staying prepared.


Via: thesurvivalistblog


Save pagePDF pageEmail pagePrint page

Make Your Own Shoot-and-See Targets

Why spend a lot on things you’re just going to perforate?


Targets should be cheap, right? I mean, you’re just going to shoot them full of holes, after all. And sometimes, paper targets can be affordable, but targets that let you see your shots, like Birchwood Casey Shoot-N-C and Caldwell Orange Peel, can cost more than $2 each.

Someone came up with a way to make targets that do the same thing for cheap. The nice thing is, you can even do it to a large surface affordably if you’re just starting to zero a gun and don’t know where it’s hitting. It would cost a small fortune to cover a two-foot-square piece of cardboard with commercially-made targets, but you could apply this method to the same size surface for considerably less than a buck.

The video below will show you how, but here’s the gist: Take some brightly-colored paper like construction paper. Cover one side of it with slick plastic packing tape. Spray paint it with “el cheapo grande” flat black spray paint. Then paint (or stick on) some dots for aiming points.

Voila! Now you can see your shots, and you saved some money that you can use for ammo, gasoline, or a nice cold beverage to enjoy when the shooting’s over.

Nice.


Start now to make sure you are staying prepared.

Via: alloutdoor


Save pagePDF pageEmail pagePrint page

How to Make a Candle Out of Anything

Guest post from The Ready Store


—————–

Knowing how to make candles in an emergency is a great skill to have. With the right knowledge and skills, you can make a candle out of a wide variety of different objects including fruits, crayons, shotgun shells or even old candles.

Check out these tutorials below to see how you can make candles and become even more self-sufficient.

Bayberries
Early colonists would use berries to make candles. However, it wasn’t the most efficient processes – you need a lot of berries for it to work. With about 4 pounds of berries you can get about 1 pound of wax. Boil bayberries in water and cover. Once the water is boiling remove from heat and allow to chill. A thin layer of wax will form on the top – which you can scrape off and use to create the wax for your candle. Run the wax through a cheesecloth and allow to melt again if needed in order to form into your mold.


Olive Oil
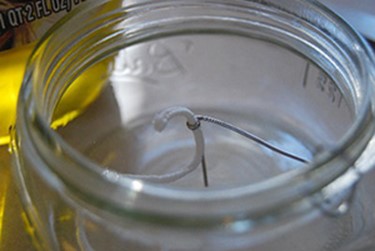
Since olive oil is a fluid, it’s harder to “stick” a wick in of it. Flatten out a paperclip and form it into a shape that will hold onto the wick and the side of a jar. Then fill your jar with olive oil – allowing the oil to spread onto the wick.

Orange
First, locate a large orange and cut it in half. Gently pull away the peel so that it stay in one half-circle piece. You’ll have two orange peel halves – one with a little orange core attached to it. Add about a half inch of olive oil into the base of the orange peel half. Make sure the core gets soaked with olive oil too. Allow the oil to settle for a while and make sure that it’s crusting on the core. Light the “wick” and you’re set to go!

Crayons
Add a bunch of crayons into a bowl of water. Allow to soak for 5 minutes. Collect cookie cutters or any other type of molds you would like. Spray the molds with non-stick spray. This will allow you to easily remove the wrappers from the crayons. Place 10-15 candles in a container that you don’t want anymore. Place the candles in the microwave for about 2 minutes or until they are smooth. Quickly pour the candles into the form that you’ve created because it will harden fast. Let the candles settle for 5 minutes and then place the wick.

Old Candles
Once you’ve used your wax candles, don’t throw them away. You can reuse the wax to create new candles with new wicks that you buy. Make sure there are no wick pieces in the wax and cut the wax pieces into smaller chunks. Spray the inside of a shot glass or other mold lightly with non-stick spray. Set the pre-waxed wick at the bottom of the mold, extending to the top. Now that the mold is ready, set up your melting device (or a double boiler). Set a sauce pan inside of a larger pan filled with water and melt the wax inside. Once the wax is melted, pour into your mold and allow to set and cool.

Crisco
This might be the easiest candle to create. Simply shove a candle wick (or a piece of string) into the middle of an open tub of Crisco. You’ll want to use a long stick or skewer to push it to the bottom. Hit the tub on a hard surface to settle the contents. Not only will the gigantic candle burn, but it will burn for 45 days.


Shotgun Shells
It’s probably a given: ONLY use shotgun shells that have been used and are empty. Do not light active shotgun shells.

Add wax to a double boiler – or into a sauce pot that is sitting inside of a larger pot of hot water. Turn to medium heat so the wax is melted but not burning. While that is melting, use an old toothbrush to clean and brush the inside and outside of the shotgun shell. Pour the melted wax into the empty shell and place the wick. Once the wax is cooled and settled, remove the plastic outer layer of the shell with an exacto knife and keep the wax candle on the metal base of the shell. Light-a-way!

Lipstick
We’ve even see someone make a candle out of lipstick! Just twist the lipstick out as far as it can go and lay sideways on a cutting board. Use a sharp knife to cut a slit in the side of the lipstick. Lay the wick into the slit and slide to the middle of the lipstick. Roll the lipstick back into it’s tube and light it up.

Other reading:

How to make a Pine Knot Torch for emergency light

DIY Emergency Lights from Solar Yard Lights

Quick tip for more light.

Start now to make sure you are staying prepared.


Via: thereadystore


Save pagePDF pageEmail pagePrint page

Thrifty Ways To Increase Your Yarn Stash

From our friends at : thesurvivalmom

—–

Within the community of knitters and crocheters, “yarn stash,” or sometimes just “stash,” is an actual term. It refers to the amount of yarn one has hiding in the closet or under the bed, likely in an attempt to keep one’s significant other from knowing exactly how much yarn you have (or from knowing how much you spent on yarn that month). If you knit, crochet, or do anything that that requires the use of yarn, then you probably have a yarn stash.

Knitting is perceived by many to be a thrifty sort of craft. Instead of dropping $50 on a designer sweater, you can just make one yourself, right? Sadly, this is not an accurate picture of what knitting entails. Many non-knitters may not realize that the yarn is often the most expensive part of any knitting project.

When I bring this up with people who are new to knitting, they almost always cite a particular brand of cheap acrylic yarn that can always be found at big box stores. That brand is inexpensive, but it is also like sandpaper next to your skin. There is a place for this variety of acrylic yarn, but that place is not in hand-knit clothing. Why would you want to put all the effort into knitting something beautiful if you can’t actually stand to wear it? Life is too short to knit with cheap yarn.

Don’t despair! It is possible to source higher-quality materials without having to pay exorbitant amounts of money, although sometimes doing so requires even more creativity than the actual knitting.

Thrifty yarn stash ideas

Method One: Recycling old sweaters


This yarn will have a second life as something I would actually want to wear.

How to do it: Take a trip down to your local second-hand store and browse their sweater section. Look for something kind of bulky. We’re going to be unravelling it later, so make sure the yarn out of which it is made is a weight that you are comfortable knitting. It is possible in this way to obtain really gorgeous yarn, yarn that is made out of cashmere, angora, and merino wool. Stuff that would ordinarily set you back about $50 per skein.

When you get your sweater home, you need to unpick the seams. It is important to unpick, and not just cut the pieces apart. When that is done, find the bind-off edge. This is the “end” of the knitting. Most sweaters are knitted starting with the bottom and going up, so the bind-off edge is likely to be near the top of the sleeves or at the shoulders. Once you get the end unbound, it’s just a matter of unraveling the sweater and rolling the yarn up into a ball. It can be knit as is, or, if you’d prefer to block it to get the tell-tale curls out of the yarn, this is the time to do it.

While that sounds pretty simple, depending on the quality of the sweater, it might be horribly difficult to unpick. However, if the yarn is nice enough, it will be worth it. Once at a local clothing exchange I obtained a really ugly, but free, Ralph Lauren short-sleeved turtleneck sweater. The yarn was a blend of cashmere, angora, and merino. Heaven! But, it being a Ralph Lauren, it took me ages to unpick that darn thing. The mittens I intend to knit with the reclaimed yarn will be worth every second I spent wrestling with the parent sweater.

Method Two: The Yard Sale, and its Maiden Aunt, the Estate Sale

I will come clean and say that I have had some success with this method, but not a lot. If you go to a yard sale with the express purpose of looking for yarn, prepare to be disappointed. It’s hard to tell ahead of time whether the person having the yard sale is a former yarn addict. But if you already browse a lot of yard sales anyway, definitely keep your eye out for yarn. (Or, more old sweaters). There will always be someone who is getting rid of her stuff and doesn’t fully appreciate the value of what she has. That includes not only yarn or sweaters made from high quality material but also other knitting and crochet supplies.

Once I came away from a yard sale with a whole grocery sack of nice acrylic/wool blend yarn which cost me $3.75 altogether. The same yarn would have cost upwards of $40 at the store. However, I have been to many other yard sales without having quite so much luck.

Method Three: Make Your Own Yarn

I’m talking about spinning. This could be its own 50-part series of blog posts, and indeed, there is even a quarterly magazine devoted solely to this topic. I include it here under false pretenses, because people don’t take up spinning to save money. But what embodies a provident, thrifty, self-sufficient mentality better than the ability to make a cute hat out of fluff?

I won’t turn your hair white with horror stories about the high cost of a decent spinning wheel (spoiler: its high.), but if you are interested in dabbling in the art of spinning but don’t want to spend your life savings, you can get a simple drop spindle and some spinning fiber for less than $20. Many online retailers cater to handspinners. Etsy is also a good place to look.

Spinning yarn instead of buying it allows you full control over every aspect of the finished product. I like to begin with a specific project in mind, and I can choose the fiber content, the weight, and the color. If I am working from a fleece, I can even choose the wool from a specific sheep, because every fleece has its own unique characteristics.

I taught a Survival Mom webinar on the subject of spinning, “Learn How to Spin Your Own Yarn.” Watch that for a good, overall introduction to both spindle and spinning wheel yarn spinning.

If you have ever thought of taking up spinning, I encourage you go for it. You might find that you’ll never go back to purchasing mere yarn.

Have any of you ever found yarn in unlikely places? What do you find is the most frustrating thing about finding good yarn?

Helpful resources:


Save pagePDF pageEmail pagePrint page

Make Your Own Fish Cage Trap

Fish traps are as old as humans themselves. They date back to pre-historic hunter gatherer groups, and like many primitive tools, remain perfectly useful to this day.

A stout fish trap offers a fisherman many similar advantages that land-based traps offer hunters. The main advantage of a fish trap is that it allows you to catch fish while you’re off doing other chores or gathering other supplies or food. With a bit of time, a few vines, and some strong reeds or tree branches, you can easily build a fish trap to gather fish for you. This kind of trap can be the difference between life and death in dire situations, or can make running a homestead much easier. Here’s how you can build a working fish trap out of easy to find materials.

Collect your materials
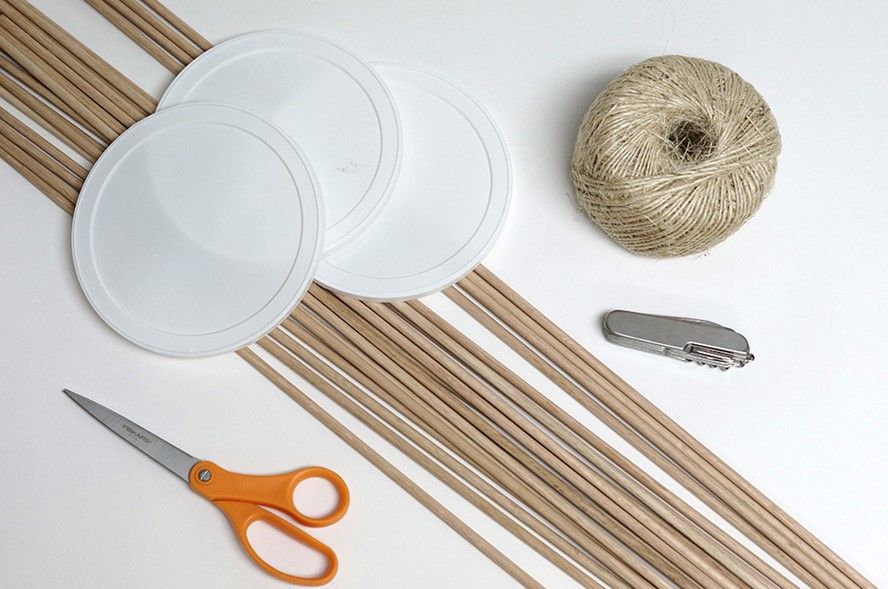
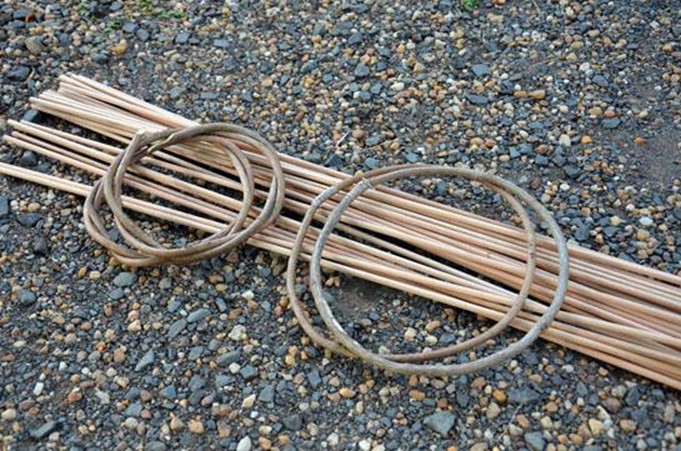
You will need a survival knife or a sharp arrowhead as your primary tool. The fish trap will be constructed from about 20-40 dowels, tree branches or shoots, or strong reeds; and about 100 feet of pliable vine. Wisteria and kudzu runners are particularly good options for your vine. You will need to cut them from the main plant about a week before you want to construct your fish trap so they can dry out and shrink. If possible, some thick cord and strong string or twine are also very useful for this project.

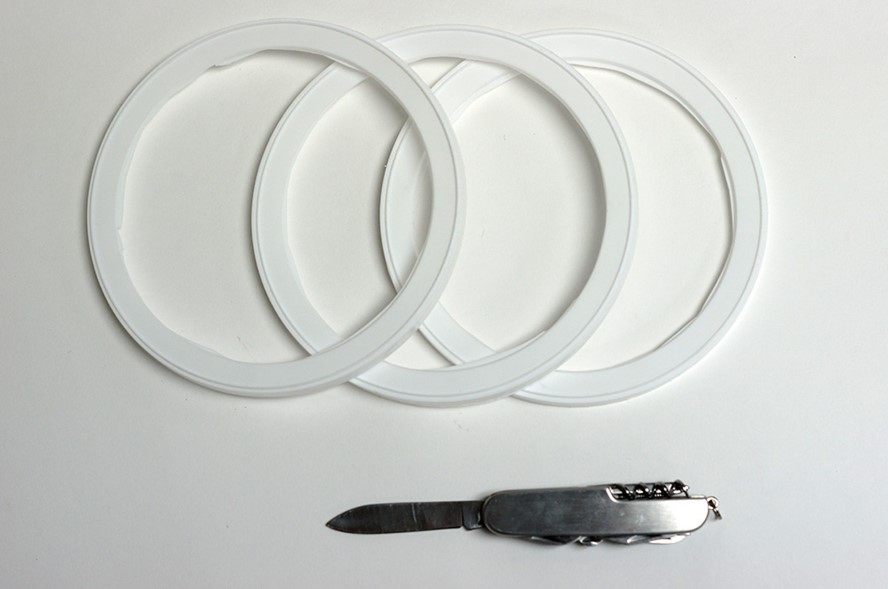
You can use any type of circular object for the frame of your cage – vines, branches, whatever. We use food storage lids in our pictures.


Build the shell
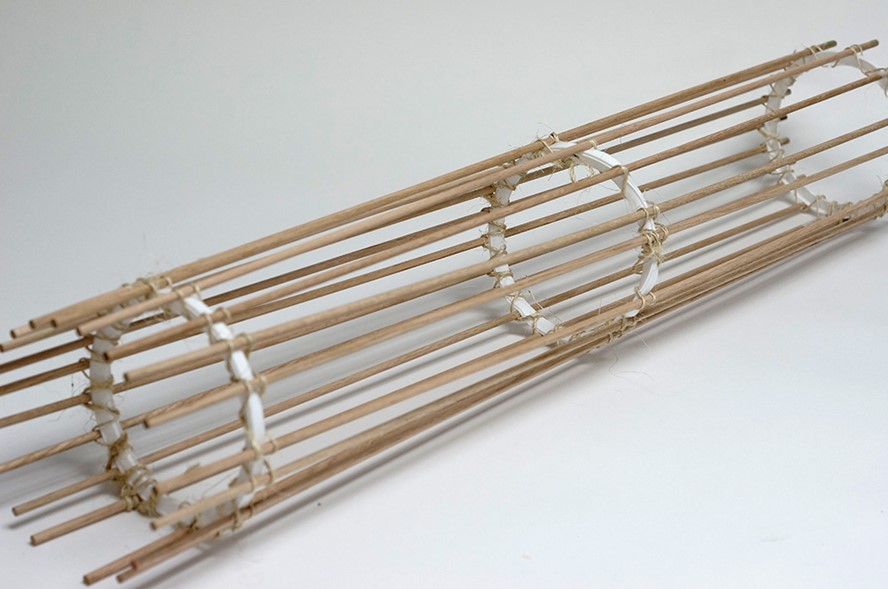
Using the thickest parts of your vines, make three hoops that are about nine or ten inches in diameter. We cut out the tops of food storage lids and used those instead.


The string will be useful for tying the ends of each hoop together, but if you don’t have this available, use more vine to secure the ends of each hoop. Be sure to tightly tie the ends so there is no risk of them coming apart when fish are in the trap.


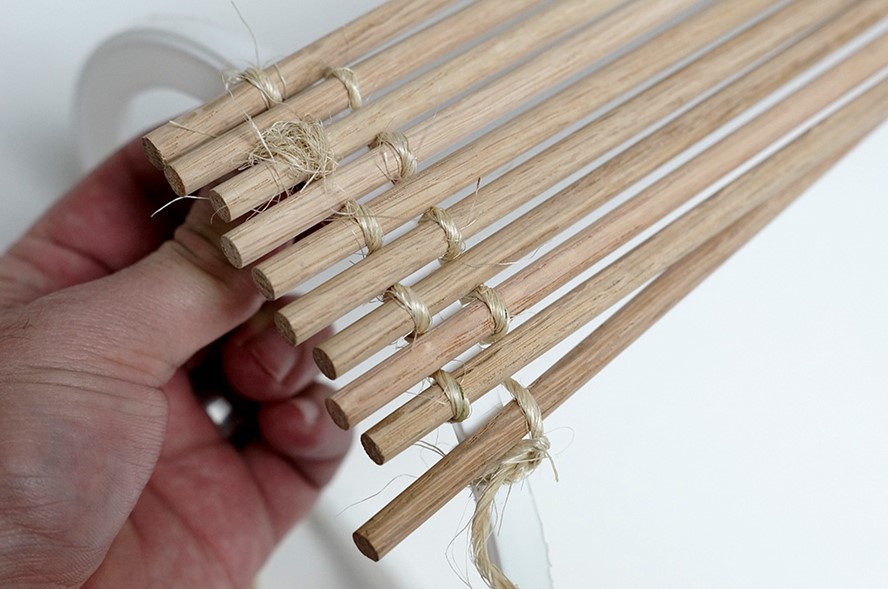
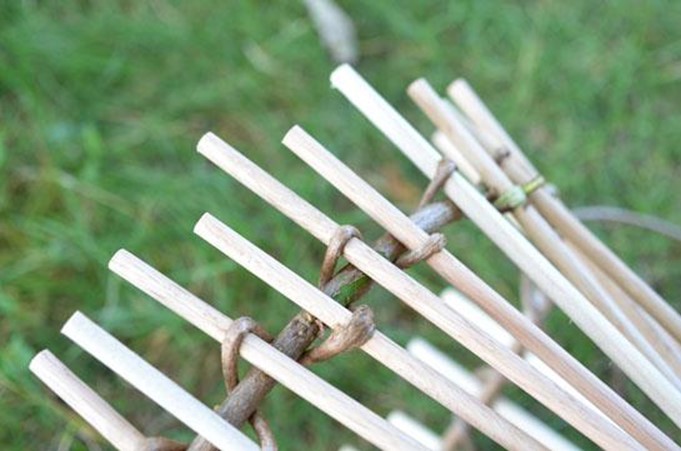
Next, connect all of the dowels (or branches/tree shoots) at one end to one of the hoops using an alternating weave with more vines. Repeat this process with the second hoop in the center of the reeds, and again with the third hoop at the remaining end to build a cylinder-shaped trap.


You’ll want to spread out the dowels or branches evenly after you’ve completed your weave.


Secure the end
Close off one end of the trap (it doesn’t matter which) by placing smaller dowels/branches across it and securing them between the ends of the lengthwise dowels. Then, weave more vine over and under these dowels to create a mesh that is too small for fish to escape through but that will still allow water to flow through it. Secure the mesh to the hoop with more vine (or use twine if you have it).


Build the funnel entrance
A cone-shaped funnel is the key to a successful fish trap. It will allow fish to enter the trap, but prevent them from leaving it. Using short vine, make another hoop that is slightly smaller in diameter than the cylinder so that you can push it snugly into the trap.


Attach short dowels/branches of irregular lengths to the hoop, securing them with twine or vines. Weave more twine or vines around the middle of these pieces to form them into a cone shape. Push the funnel into the trap, teeth first, and secure it by tying it to the sides of the trap with vines or twine.


Bait and set the trap
Bait the trap using a piece of rotten meat or fish or several worms. Tie the bait to a piece of string and then to the inside of the trap so that it hangs down near the center. If you find that you are losing bait without catching any fish, this is probably because small fish are able to enter and exit the trap. Build a small box using more vines around the bait, and hang this from the center of the trap.

Place the trap in a lake, stream, or river, and secure it to the bottom with a rock. If you are placing it in a stream or river, configure it so that the opening of the trap faces upstream; this will make it even harder for fish that enter it to swim back out. Check it on a regular basis. To harvest your catch, remove the trap from the water, allow the fish to asphyxiate, and then simply open the funnel with your hand, and dump the fish out.


Another option of same thing:


Fish traps offer the fisherman many of the same rewards that terrestrial traps offer the hunter. Chief among them is the ability to catch something to eat while you’re not around. Given some time, some flexible vines, and a bundle of reeds or tree shoots, you too can build an “automatic fisherman” to bring in fish while you’re busy elsewhere. These traps can be worth a great deal to a starving survivor in a wilderness area. They can also help an angler collect some useful bait fish (where legal to do so). Here’s how to put together a simple fish trap at home.

1. Get The Materials


You’ll need a knife, a bundle of dowels or tree shoots (34 pieces, ¼ inch by 36 inches), and about 100 feet of flexible vine. Kudzu and wisteria runners are great choices. Cut them one week prior to when you want to do complete project to allow for drying and shrinkage. You’ll also need some strong string and some thicker cord.

2. Start The Shell


Take some sections of your thickest vine and tie together two hoops that are 9 to 10 inches in diameter. Use your strong string and tie it tightly. Even if basket weaving is not your strong suit, use the alternating wrap shown in the picture to connect all of your dowels around one of your hoops.

3. Finish The Shell


Repeat the process on the other end to create the cylindrical shell of the trap. Tuck in any loose vine ends to secure the weaving. If you’re not certain it will hold without unraveling, tie some cord around any questionable spots.

4. Plug the End


Time to make a decision: Either weave a plug for one end of the trap or build two funnels. For this trap, I plugged an end with a mesh of dowel and vine. Two funnels may get more fish into the trap, while a solid end may keep more fish in the trap. You’ll have to decide the best approach for your situation.

5. Build A Funnel


Creating a cone-shaped funnel is one of the last steps in building a functional trap. Use string and some short vine pieces to create the cone. Weave in some slender vines to make it stable. Use a variety of lengths in the cone’s “teeth” to make an irregular opening. This funnel should be tied in place after the trap is baited.

6. Baiting And Setting


Using a bit more string, tie some rotten meat inside the trap, near the center. If bait loss becomes a problem, typically due to small fish eating it and swimming through the cage, build a small box with the techniques and materials you used to make the trap. Place the bait in the box and place the box in the trap.


Some other options:


Start now to make sure you are staying prepared.


Via: thereadystore, outdoorlife


Save pagePDF pageEmail pagePrint page