Category Archive: Build it yourself

Sew – a needle pulling thread

Guest post by Vicki C


When I am cleaning house or doing the laundry my mind roams but eventually comes around to a SHTF scenario. When I consider the most common immediate needs, to me the order of importance would be — water, food, weapons, fuel, tools, medications and so forth, but what about…Material? The following is a small list with a smaller list of usage ideas, use your imagination, walk around and look at materials in your home. Better yet spend an hour and go to a fabric store and look around, this will give you an idea of what is out there to use and what possible purposes they could be used for.

Fabrics and notions (buttons, thread, elastic, snaps, etc)

So many to choose from, what is most important and what can I use it to make?

1. Wool or fur to be used for blankets, jackets, socks

2. Cotton/muslin/linen for bandages, clothing or heaven forbid, wrapping a body (human or your pet) for burial.

2. Leather for moccasin type shoes or repairing shoes or jackets, making a sling shot

4. Denim to patch your jeans, make a vest, carry all bag

5. Stuffing material to
insulate your jacket, make a pillow

6. Waterproof fabric for ground cloth or lean to

7. Black out fabric in case you need to cover your windows

8. Netting for catching fish or making bags for hanging food or carrying things

9. Cording or heavy string, uses for these items alone are endless

10. Yarn for making caps or scarves. Over the last year I learned to use the “quick knit” looms just as a side hobby, I have made over 100 different size cap for foster kids and a few scarves. I can make a knit cap in about 2 hours. No electricity needed and you might be able to use these for trading.

How about a durable or water type glue for sealing material when you can’t find your needles?  I found this website on what types of glue works on what materials.

http://lifehacker.com/5875781/this-glue-chart-guides-you-through-which-glue-to-use-where


Then of course you need thread, elastic, buttons, needles (many types/styles, different uses, get an asst pkg), scissors, etc. These can also be used for bartering items. Think, think, think.

Threads come in all types of weight and strength as well, buy an assortment for your different types of fabrics, you don’t want to use cotton thread if you are sewing a tarp. Maybe fishing line would be stronger for that and your type of needle needs to be appropriate size and strength as well.

Material for clothing, you need to consider is it breathable or too hot for your environment, how thick or heavy does it need to be to patch something else

Even though I took 4 years of home economics in school I couldn’t begin to make a suit but I can do repairs and make some basic items.

This list could go on and on, the area you live in or plan to bug out to would make a difference on what your needs might be. While we might like to think we could take our house and all supplies with us that probably won’t be the case so you have to think/plan ahead.

Most of us wouldn’t think of raiding or stealing from a fabric store, good heavens what good would that do you?  You might just want to think again to locate and remember where you saw the last one. If you have room to store a few yards of such items to get you started before they are needed, even the better.


Start now to make sure you are staying prepared.


Via: thesurvivalistblog


Save pagePDF pageEmail pagePrint page

How to Convert an Ammo Can into a Faraday Cage

What you plan to do is pretty simple, since the can and lid are already great Faraday shields. The only issue is the gap where they join. That joint needs to be conductive, in order to create a fully protective cage. I recommend that you:

1.) Remove the can’s rubber gasket. (Save it, in case you decide to restore the can to water-tightness, at a later date.)

2.) Wearing eye protection, use some coarse sandpaper or a rotary wire brush to remove the paint on at least a 3-inch section of both the top lip of the can and underneath the lid where the gasket was attached. This bare metal will provide a good electrical contact between the lid and body of the can.

3.) Replace the gasket with continuous thick “fuzz” of stainless steel wool that will just barely allow the lid to to be clamped shut. (Selecting the correct thickness to use takes a bit of experimentation.) The steel wool can be glued in place so long as you do not insulate the short section(s) where you sanded off the paint.

Store items inside wrapped in plastic bags or in heavy duty cling wrap, to insulate them from the can. Use additional padding (bubble pack or gray foam) inside if the cans will be transported loaded with fragile gear.

Do not add an external grounding strap.

Start now to make sure you are staying prepared.

Via: survivalblog


Save pagePDF pageEmail pagePrint page

How To make a Tear Gas Mask

Tear Gas
The first thing to remember about exposure to these chemical weapons is that it is not the worst thing that could happen to you. The hype and fear surrounding them is enormous, but in reality, if you are careful and smart, you should survive it with little problem. This information is the result of conversations with experts and prior experience.

1. How They Are Deployed:

Tear gas and pepper spray can be sprayed from small hand-held dispensers or large fire-extinguisher size tanks. Pepper spray also comes in plastic projectiles which are fired at the chest to knock the wind out of a person, who then takes a deep breath of pepper from the burst projectile. Tear gas is most commonly deployed via canisters, which are fired into crowds, sometimes directly at people. It’s important that you know not to pick up the canisters without gloves as they are extremely hot. Be aware that the time it takes you to throw it will allow you to be heavily exposed.

2. How They Affect Humans:

Both tear gas and pepper spray are skin irritants, causing burning pain and excess drainage from eyes, nose, mouth and breathing passages. Pepper spray is more popular with authorities as an agent of control because of its immediate pain-causing qualities. It is harder to remove from the skin and has the capacity to cause first degree burns.

If you are exposed to either tear gas or pepper spray, you may experience:

  • Stinging, burning in your eyes, nose, mouth and skin
  • Excessive tearing, causing your vision to blur
  • Runny nose
  • Increased salivation
  • Coughing and difficulty breathing
  • Disorientation, confusion and sometimes panic
  • Intense anger from pepper spray exposure is a common response; this can be useful if you are prepared for it and are able to focus it towards recovery and returning to the action. Channel your anger, release it from your system, avoid holding it in.

The good news is that the above effects are temporary.

Discomfort from tear gas usually disappears after 5-30 minutes, while the worst pepper spray discomfort may take 20 minutes to 2 hours to subside. The effects of both diminish sooner with treatment. Because pepper spray penetrates to the nerve endings, its effects may last for hours after removal from the skin.

3. Avoid Inaccurate & Dangerous Treatment Myths:

There are many myths about treatment and prevention. Much of this misinformation is potentially dangerous. Some of it, if applied, could greatly increase or prolong a person’s reaction to exposure, or at the very least provide a false sense of security.

4. When to Prevent Exposure:
For most healthy people, the effects of tear gas and pepper spray are temporary. However, for some people the effects can be long-lasting and life-threatening.

People with the conditions listed below should be aware of these risks and may want to try and avoid exposure. Please be aware that in intense actions such as police behavior can be unpredictable, and avoidance is not always possible. Those with the following health conditions should avoid entering crowds where there is risk of exposure to these substances.
Conditions:

  • Folks with respiratory diseases, such as asthma, emphysema, etc. risk exacerbation, or permanent damage if exposed.
  • Vulnerable people such as infants, the elderly, and the immune compromised, risk intensified and possibly life-threatening responses.
  • Anyone with chronic health conditions or those on medications that weaken the immune system, (ie: chemotherapy, Lupus, HIV, radiation, or long-term corticosteroids such as prednisone) risk exacerbation of illness, intensified response and possible delayed recovery.
  • Women who are or could be pregnant, or who are trying to get pregnant, may be at risk of spontaneous abortion, or increased risk of birth defects.
  • Nursing mothers risk passing toxins on to their infant.
  • Folks with skin conditions (ie: severe acne, psoriasis, or eczema) and eye conditions (i.e.: conjunctivitis or uveitis) risk an intensified response.
  • People wearing contact lenses may experience increased eye irritation and damage due to chemicals being trapped under the lenses.
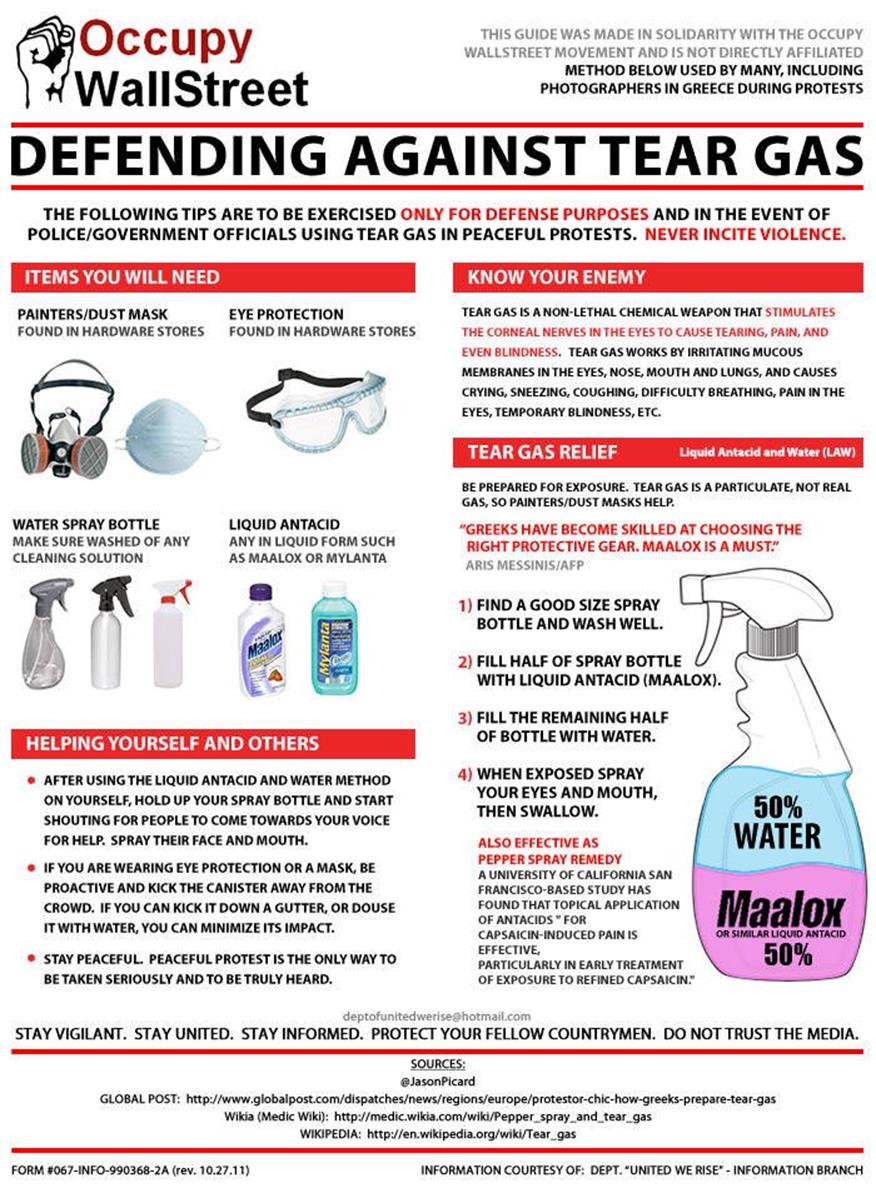
5. Protection:

  • Avoid the use of oils, lotions and detergents because they can trap the chemicals and thereby prolong exposure. Wash your clothes, your hair and your skin beforehand in a detergent-free and unscented soap.
  • We recommend using a water or alcohol-based sunscreen (rather than oil-based). If your choice is between oil-based or nothing, we advocate using the sunscreen. Getting pepper sprayed on top of a sunburn is not fun.
  • We also recommend minimizing skin exposure by covering up as much as possible. This can also protect you from the sun, as can a big hat, baseball cap or bandana.
  • Gas masks provide the best facial protection, if properly fitted and sealed. Alternatively, swimming goggles (with shatter-proof lenses), respirators, even a wet bandana soaked in vinegar over the nose and mouth will help.

6. What to Do When Exposed:

  • STAY CALM. Panicking increases the irritation. Breathe slowly and remember it is only temporary. Educate yourself prior to going out, to know what to expect, and thereby reduce the likelihood of panicking.
  • If you see it coming or get a warning, put on protective gear, if able, try to move away or get upwind.
  • Blow your nose, rinse your mouth, cough and spit repeatedly. AVOID SWALLOING.
  • If you wear contacts, try to remove the lenses or get someone to remove them for you, with CLEAN, uncontaminated fingers. AVOID WEARING CONTACT LENSES BEFORE GOING OUT.
  • DO NOT RUB IT IN.

7. Remedies
We have been doing trials with pepper spray to find good remedies and have found some things will definitely help minimize the discomfort. None of these are miracle cures; using these remedies will help people to feel better faster, but it will still take time.

For the eyes and mouth:

We recommend a solution of half liquid antacid (like Maalox) and half water. A spray bottle is ideal but a bottle that has a squirt cap works as well. Always irrigate from the inside corner of the eye towards the outside, with head tilted back and slightly towards the side being rinsed. It seems from our trials that it needs to get into the eye to help. This means that if the sprayed person says it’s okay you should try to open their eye for them. They most likely won’t be able/willing to open it themselves, and opening will cause a temporary increase in pain, but the solution does help. It works great as a mouth rinse too.

For the skin:

We recommend canola oil followed by alcohol. Carefully avoiding the eyes, vigorously wipe the skin that was exposed to the chemical with a rag or gauze sponge saturated with canola oil. Follow this immediately with a rubbing of alcohol. Remember that alcohol in the eyes hurts A LOT. Anyone whose eyes you get alcohol in will not be your friend.
Secondary treatments can include: spitting, blowing your nose, coughing up mucous (you don’t want to swallow these chemicals!), walking around with your arms outstretched, removing contaminated clothing and putting on new clothing, In fact, it is essential to shower and wash your clothes as soon as you are able.

WARNING: pepper spray can dry on your skin, and then get re-activated when you shower due to contact with moisture! See section below on how to get rid of pepper spray before you shower!

These chemicals are toxic, and will continually contaminate you and everyone around you until you get rid of it. Until then, try not to touch your eyes or your face, or other people, furniture, carpets etc. to avoid further contamination. Also rinse your washing machine in highest heat after you wash your clothes in them, to get rid of residue inside the machine.

Remember, it is only temporary, and our bodies are extremely strong and have detoxification mechanisms built in

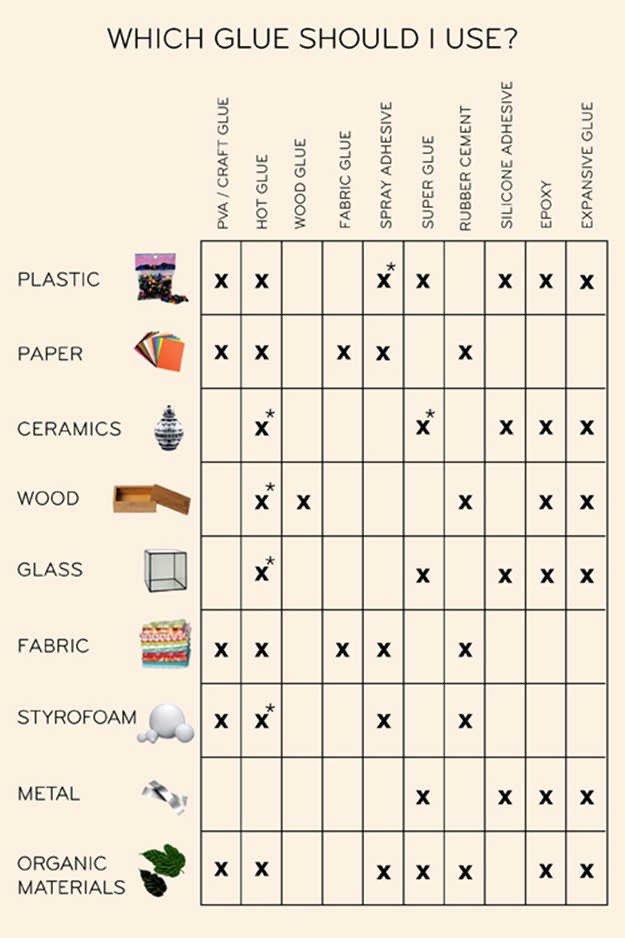
8. Essential Protective Gear:

A bandanna soaked vinegar and tied tightly around the nose and mouth is a last resort. It is far better than nothing, but remember that it is merely a barrier and not a filter and so won’t do much for long-term protection. You can keep it soaking in a plastic bag until ready to use. Bring several, as multiple uses will render a bandanna as gassy as the air around you.

For protecting your eyes, swim goggles work well as they have a tight seal. Shatter-resistance is another nice quality for goggles to have. Most goggles have air holes to prevent fogging–fill these with epoxy (glue).

Covering these holes with duct tape can work in a pinch against an initial attack, though not for long term protection. Try them on with your respirator or bandana to ensure that they are compatible and that both will provide a tight seal.

You should be aware that whatever protection you choose will be visually quite powerful. Gas masks work the best; they also look quite scary and intimidating and can be alienating to others. They can however also make you a target of police violence. Think carefully about your impact on others when you decide how to protect yourself. Aim to wear the same kind of gear as a group, not just you as an individual. Strength in numbers.

We suggest that you trial your gear at home before you head out, to make sure you understand your protective mechanisms and are familiar with them, prior to entering the heat of action.

Here’s a tip I got from Palestinian demonstrators:

Smear lime fruit juice on the inside of any fabric which covers your mouth such as a scarf – anything you use to cover your mouth. This is claimed to remove all effects from the CS gas (tear gas) although I haven’t really tried it myself.

9. Improvised Gas Mask:

Find a bandana, or a rag: something to wrap around your head made of strong material.

Now find some charcoal. Smash up the charcoal. Soak the bandana/rag in water. Line one side of the bandana/rag with charcoal dust. Fold bandana/rag over and wrap around your nose and mouth.

10. Onions as Protection Against Tear Gas:

If you don’t have any vinegar or water-soaked bandanas, or may be around someone who doesn’t, carry an onion on you. If gassed, break it in half and sniff it, and get it close to your eyes….it greatly reduces the irritation in the eyes and nasal cavity. I Learned that from a photojournalist in Gaza.

Get each friend to carry an onion in their pocket before you head out.

11. How to Safely Get Rid of Pepper Spray – DO NOT APPLY WATER!

When dealing with OC sprays (Pepper Gas) you will find that they are activated and reactivated by water. In other words, even if you have let it dry on your skin you are still at risk to reactivation, if you were to get it wet again.
The safest way to remove contamination from the skin is to let the skin dry, dab with a dry cloth or fan the skin. Pending availability, products like baby shampoo can be applied to a contaminated area around eyes and face (it works even better if it is refrigerated prior to application) to provide temporary relief (also the drying of the shampoo will help remove a large amount of the loose capsaicin).

It’s not uncommon to feel unable to open your eyes.

When sprayed, I have found the quickest relief is to strobe your eyes to get tears flowing again. Once you can open your eyes and tear, stare for as long as you can bear letting the tears flow to clear your eyes as quickly as possible. The longer you keep your eyes shut and the longer you strobe your eyes the longer you will be contaminated. You want the body fluids in the mouth, nose and eyes to be running as much as possible (this is your bodies’ /body’s natural defense clearing itself out – work with it!).

What is capsaicin? From Wikipedia: Capsaicin is the active ingredient [derived from chilli peppers] in riot control and personal defense pepper spray chemical agents. When the spray comes in contact with skin, especially eyes or mucous membranes, it is very painful, and breathing small particles of it as it disperses can cause breathing difficulty, which serves to discourage assailants.

12. How to Safely Get Rid of Tear Gas – DO NOT APPLY WATER!

Do NOT wash your face with water if you suffer tear gas. You should not wet your skin: it increases the effect of the tear gas.

Instead, apply vinegar or lemon juice to the skin in order to get rid of the effect of the tear gas. Cloths with some apple vinegar or pure lemon juice are very useful in riots. You can press some lemon in a plastic bottle before going to the protest. So you can wet your mask with lemon juice (or vinegar), and it will decrease the effect of tear gas.

In case of old teargas

No water , yeast dissolved in water or cold water and soup while showering

13. How to Handle Tear Gas Canisters

The thick gloves used by construction workers are good to throw the tear gas cans back to the Basiji goons.
Warning: The tear gas cans are too hot to hold with bare hands!

14. Afterward, Wash Your Clothes As Soon As You Can

Wash your clothes as soon as possible because there are chemicals on those clothes!

Remember to eat well and sleep tight before going to a protest. If you smoke or take drugs, stop it before you go.

For your skin, a couple of boxes of Baking Soda will help in addition to regular soap with skin conditioners. Remember, the pepper spray is going to really get to your mucous membranes. Under your armpits, Crotch (sorry ladies, its going to burn like hell). The snot is going to pour out of your nose like someone turned on a fire hydrant and its going to burn the whole time. Your eye lids are going to swell up too. Use the Benadryl (Diphenhydramine hydrochloride ) for that.

If you eat tear gas, don’t use water – it makes everything worse. Use fresh lemon juice or vinegar instead.

15. Designed to Induce Panic – Stay Calm:

If you get hit by tear gas, or something worse, it will feel like you are unable to breathe. This is how it works, and is designed to work. You panic, and riots stop. The trick is to understand that while it feels like you are unable to breathe, you are actually breathing just fine. Tear gas doesn’t kill people unless they have a severe allergic reaction to it or have a medical condition/weakness already.

So try and remain calm. If you can, sit down in a place out of the way and just remind yourself that you are breathing. Getting rid of the panic eliminates a lot of the effectiveness of the anti-riot gas.

16. Conclusion:

Educate yourself about the tear gas and pepper spray challenge.

Print this page, and share it with all your friends. Stock up on cloths, goggles, vinegar/lemon juice, and water.

Some more info:


Tear Gas Dibenzoxazepine | CR GAS

Chemical weaponry was first used in the United States in the Civil War at the siege of Charleston. Wood was saturated with sulphur and burned under the parapets around the city hoping that favorable winds would propel huge clouds of choking smoke to drive out the defenders. French law enforcement is reputed to have been the first police organization to have used a chemical lachrymator (tear-producing) in a hand-thrown device. At the start of World War I (1914-1918) the French Army had limited stocks of hand and rifle grenades, loaded with a liquid tear-producing agent called Ethylbromacetate.

Agent CR (Dibenzoxazepine) is a potent sensory irritant. CR is the parent compound of Loxapine Succinate, an Anti-Psychotic drug. CR is usually disseminated in a liquid solution with a propylene glycol base. CRs physical properties are similar to those of CS, but CRs effects on the individual are more severe. In addition to affecting the eyes and respiratory tract, CR induces intense skin pain.

CR causes eye pain and excessive tearing. Slight edema to the eye lids may last for 2 to 6 hours. Skin pain and reddening are CR’s two main effects. Although burning sensation may last for 15 to 30 minutes, the reddening may persist for several hours. Areas of the skin previously exposed to CR may become painful again when exposed to water even after 24 hours or longer. CR, when entering the mouth, causes a burning sensation, excessive salivation, sore throat, and a mucous discharge from the nose.

CR appears to have a greater safety ratio than either CN or CS. However, CR is a relatively toxic agent and the mortal dose in a human subject is of the same order of magnitude as the other war gases. In a poorly ventilated environment an individual can inhale a fatal dose within minutes. Death results from asphyxiation associated with the development of pulmonary edema.

CR medical treatment is largely palliative (to lessen the severity without cure), and induces reassurance, removal of contaminated clothing, and washing of eyes and skin. Eye pain can be relieved with medications.


Start now to make sure you are staying prepared.


Save pagePDF pageEmail pagePrint page

How To Make A Glowstick Perimeter Alert System

The purpose of this device is to warn you when someone crosses your perimeter. The rat trap, when tripped, breaks the glowstick and causes it to illuminate. So, not only will you hear the trap snap shut, you’ll see where your perimeter was breached.

The glow stick perimeter protector relies on line of sight in order to be an effective option for an early warning sign. This nifty little contraption could provide a cost effective solution for providing an added level of security to a safe haven location. These are fairly easy trip wire signaling devices that will alert you to the location an intruder is approaching from.

The glow stick perimeter protector can be strategically placed around the entire encampment giving all those concerned a little extra breathing room as far as security is concerned.

I started by painting the rat trap OD green because, as everyone knows, painting it this color makes it 40% more awesome. Then I drilled 6 holes through the trap. Be sure to use a “rat trap” and not a mousetrap.


Pull your lines through the holes in the trap as shown here. The top and bottom lines will be used to tie the trap to a tree or post. The top and middle lines are used to hold the glowstick in place. I tied butterfly knots in the top and middle lines to secure the glowstick. Having the loops in 2 different lines allows you to place the glowstick in either a vertical or horizontal position. I tested both configurations and they functioned equally well.


The completed trap should look something like this. Tie your “tripwire” to the rat traps trigger and set it about knee high so that little critters don’t set it off. I used the line that came with the glowstick during testing, but there are certainly other ways that you could rig this up.


Do not make the mistake of relying on the glow stick perimeter protector as a stand-alone solution. As I mentioned previously, these devices require line of sight in order to be effective. They do not emit enough light to visibly see who or what is approaching, but they do glow enough to identify a direction of intrusion, allowing you to respond to an affected area and investigate.

Here is a extra commnet on this:

What you could also do .. is mount it a bit higher, and put it on tension with springs, so when it snaps and cracks the glow stick, it will also shake and the liquid would receive more movement.. though dont make it too lax that it spins around and the glow stick ends up between the trap and the tree… tight enough but with springs so it jiggles and shakes the liquid enough to give you a faster igniting glow.

Also using a Hi Intensity Stick as they light faster and Brighter.

Via: survivormedic


Save pagePDF pageEmail pagePrint page

How to Treat Minor Injuries Without a First Aid Kit

Everyone should have a first aid kit somewhere in their house and/or car if possible. However, if you find yourself in extenuating circumstances, there are certain things you should still be prepared to do.

It’s worth pointing out that nothing stated here is an acceptable substitute or a replacement for having proper first aid gear and training. Treating burns, broken bones, or bleeding without proper equipment should be the backup of your backup of your backup plan. That being said, planning for every contingency is just good practice. So if you find yourself in the middle of the woods without your first aid kit, and obvious exits are North, South, and Dennis, here’s what to do.

Stop Bleeding Without Bandages


If you’re dealing with smaller cuts and scrapes where blood is flowing, the first order of business is to clean the wound. Wash it off with any clean water source you have available. Next, you’ll want something to soft and absorbent to place on the wound. Paper towels and napkins can do, as well as strips of clothing if they’re clean. It’s important to make sure you don’t infect the wound you just cleaned. For tiny cuts, you can also use super glue to quickly seal the fleshy fissure.

Also, if you’re in a pinch, you can use tampons in place of cotton balls. In what may be one of the most obvious-once-you-think-about-it hacks, tampons happen to be very good at soaking up blood. They’re also useful for nosebleeds if you don’t have any other options laying around.

Once you’ve found a good absorption pad, you can use any form of tape to adhere the pad to the wound. If you don’t have any tape, tie a piece of cloth tightly around the wound. Be careful not to cut off circulation, or make the knot too tight.

For larger wounds, you’ll want to skip cleaning the wound, as it’s more important to stem the loss of blood, rather than preventing infection (though both are important). With heavy blood loss, keep the wound elevated above the heart to slow down the flow, apply an absorption pad or your hands if nothing is available directly to the wound, and use pressure points to slow the flow of blood.

It’s extremely important to know when to use a tourniquet. Using one should be a last resort option as it’s designed to prevent death from loss of blood. Improper or inappropriate use of a tourniquet can result in damage to the cut off portion of a body and, depending on how long it’s on, may even result in the need for an amputation. Keep this in mind before applying one.

Stabilize a Broken Bone


Broken bones can be extremely tricky, because you can cause more damage than you fix if you treat it improperly. For closed broken bones—that is, injuries where a bone is broken, but does not break through skin—the first thing to do is stabilize the wound. Do not try to straighten the bone if you can avoid it. While this needs to be done to heal, the bones inside the body are very sharp and can cut blood vessels, muscles, and cause all manner of nasty damage if you try to set the bone wrong.

Instead, keep the bone steady. Don’t let it move if you can help it. Try to find something to stabilize the bone. If you’re able to keep the person still and wait for help to come to you, try to keep the wound elevated above the heart to help prevent swelling. When you’re far from civilization, you may need to create a splint using straight and sturdy sticks, fastened with rope or fabric to keep bigger breaks steady.

As much as possible, try to ice the break. This will help keep swelling down and prevent further internal damage. Place ice in a bag—never directly on the skin—and keep it on for twenty minutes, then off for twenty. Rinse and repeat. Rinsing optional.

Soothe Burns

For minor burns, the first thing you want to do is cool the affected area. Burns retain a lot of heat (for very obvious reasons) so the first thing to do is reduce the heat before more damage is done. Run the burned region under cool (but not freezing) water.

Once the burn has cooled down, you’ll want to wrap it in something protective that won’t stick. You want to give the burn enough air to breathe and keep any loose fibers or foreign objects from getting in it. Gauze is ideal, but you don’t have any on you, right? In place of that, again paper towels or a clean cloth will work.

For second-degree or higher burns, try to get professional medical help as quickly as possible. Very small second-degree can be managed without help, but anything larger than a couple inches should be treated professionally as soon as it can. If you’re dealing with a chemical burn, also be sure to clean off the burning chemicals. Use like methods to do the cleaning, too. If it’s a dry powder, use a dry brush to clean it off. If it’s a wet chemical, run it under water to rinse it off.

Relieve Pain Without Medication

Pain relief is going to be a very subjective case. Without medication or sedatives, treating pain for things like broken bones won’t be very feasible. For minor pain like headaches or soreness, there are ways to minimize pain, or just generally keep your body healthy enough that it stays out of pain in the first place.

For starters, stay hydrated. It should go without saying, but we need plenty of water to live well. When you don’t get enough fluids, muscles dry out, joints get creaky and your whole body gets tense. Water isn’t a pain reliever in the same way aspirin is, and you can’t just chug a gallon to make your sore back go away, but by getting into the habit, you can reduce long-lasting pain.

Another alternative is copious amounts of vitamin C. Several studies examining cancer treatments found that high concentrations of vitamin C can help reduce pain. Consuming extra vitamin C can sometimes help. A lack of vitamin D can also cause some pain, so look into eating some food rich in vitamin D as well.

Keep in mind, you’re not popping pills to immediately reduce pain, you’re treating underlying causes to make your body more healthy. If you’re in pain, you might be able to get some small relief immediately, but more than anything you’ll be helping your body be in a better condition to feel better overall.

Of course, if you’re reading this now and no one around you is bleeding, in pain, or has broken bones, chances are you have time to prepare properly. There are plenty of guides out there for putting together first aid kits, so take a look at those. Also, the Red Cross offers an app with plenty of emergency first aid instructions and contact information, so download it and keep it handy.

Via: lifehacker


Save pagePDF pageEmail pagePrint page

How to set a broken bone in an emergency

Obviously, if you have a broken bone, you’ll want to go to a professional to have the bone reset.

However, imagine that you are out hiking or are in an emergency situation, and you break a bone. What can you do to set the bone or at least hold it in place until you can get some help?

Fractures
There are two types of fractures – open and closed. Open fractures typically have a bone protruding through the skin and includes an open wound. A closed fracture has no open wound.


If you have an open fracture, it is recommended that you manipulate the injury as little as possible. This is due to the fact that you can mess up nerve and blood vessels.

If you notice that there is a lot of swelling, numbness or discoloration below the break, this may be a sign that a major blood vessel has been severed. If this is the case, you’ll need to control the internal bleeding, allow the person to rest and provide them with lots of fluids.

If you feel that you need to quickly place the bone back in position you can use a tree notch to assist you in holding your arm in place while you adjust.

If the broken bone is in a very muscular area (ie. thigh), you’ll need to create a splint until you can get some help. Here is an example of a splint that you can make in the wilderness:

  • Get two forked branches or saplings at least 5 centimeters in diameter. Measure one from the patient’s armpit to 20 to 30 centimeters past his unbroken leg. Measure the other from the groin to 20 to 30 centimeters past the unbroken leg. Ensure that both extend an equal distance beyond the end of the leg.
  • Pad the two splints. Notch the ends without forks and lash a 20- to 30-centimeter cross member made from a 5-centimeter diameter branch between them.
  • Using available material (vines, cloth, rawhide), tie the splint around the upper portion of the body and down the length of the broken leg. Follow the splinting guidelines.
  • With available material, fashion a wrap that will extend around the ankle, with the two free ends tied to the cross member.
  • Place a 10- by 2.5-centimeter stick in the middle of the free ends of the ankle wrap between the cross member and the foot. Using the stick, twist the material to make the traction easier.
  • Continue twisting until the broken leg is as long or slightly longer than the unbroken leg.
  • Lash the stick to maintain traction.

Note: Over time you may lose traction because the material weakened. Check the traction periodically. If you must change or repair the splint, maintain the traction manually for a short time. (Courtesy of Wilderness Survival.)


Dislocation
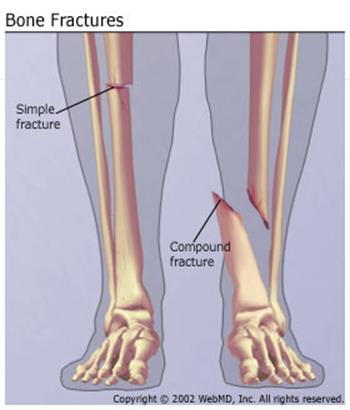
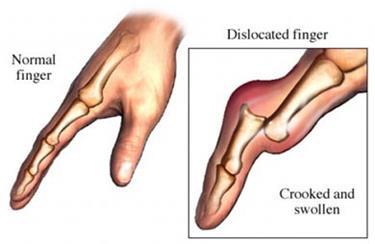
Dislocated bones are when bone joints have been separated. They can be very painful. They can push against nerve and blood vessels causing nerve tenderness and your circulatory system to have trouble.

You can tell if you have a dislocated bone because it will be tender along the joint, have swelling, discoloration, limited range of motion and sometimes deformity.

You can use simple weights to pull the bones back into place. If done properly, the pain should decrease and allow for natural function and circulation.

After you place the bone back in place, you should leave it immobilized for a few days. You can create a simple splint – holding the area in place to ensure proper healing.

Video


Please remember that these techniques can be used in extreme situations and we recommend that you seek out professional assistance if it is available.

Via: thereadystore


Save pagePDF pageEmail pagePrint page

How To Make Your Own PVC Water Well Hand Pump


Check out MeAndMother2 9 part, Make Your Own Hand Pump for a Water Well using PVC plumbing parts  video series.


PARTS LIST and SCHEMATIC

DIAGRAM AND PARTS LIST>> : http://www.repentnow.com/waterwellpar…
It uses ordinary plumbing parts except for two 3/4 inch stainless steel balls in two valves. Find balls on ebay or go to www.precisionballs.com

Here is a link to the schedule 80 3/4 x 3/8 bushing adapter:
http://www.pvcfittingsonline.com/9839-099-3-4-x-3-8-schedule-80-cpvc-reducer-bushing-flush-style.html


Save pagePDF pageEmail pagePrint page

Arc Welding with 3 Car Batteries (Tutorial & Demo)

Check out this Tutorial & Demo on how to Arc Welding with 3 Car Batteries.


If you want to download these videos to your machine from youtube try this:

YTD Video Downloader

Click to see larger images

Formerly known as plain old YouTube Downloader, the recently renamed YTD Video Downloader updates to version 4.0 with a promise of 2x faster downloads and 2x faster video conversions, and perhaps more usefully, the ability to resume downloads after the temporary loss of an Internet connection. As usual, the installer includes a Spigot-based YTD Video Toolbar and offers to change your default search engine to Yahoo and add 5-6 shopping extensions to Google Chrome. Clicking the “Decline” button during the lone advertising screen in the installer lets users easily opt-out of all offers.

Downloading worked very well for popular video sites like YouTube, Vimeo, and Blip.TV.

http://download.cnet.com/YTD-Video-Downloader/3000-2071_4-10647340.html


Save pagePDF pageEmail pagePrint page

A Sun Oven Experience

I have been hearing a lot about the new surge in solar energy.  Technology has vastly improved, costs are coming down, and great rebates are available from electric companies and federal and state governments.  What I didn’t know is that I could be using solar energy every single day, saving money on my electric bill, and keeping my kitchen cool at the same time!


I had the opportunity to sample homemade bread and a fabulous peach cobbler, both baked in a solar Sun Oven.  I was thoroughly impressed and ran home to tell the Paranoid Dad that we simply must own one of these contraptions!  Here’s what appealed to me the most.

First, seasonal electric bills can be sky high.   With new government regulations looming on the horizon, they will likely only get higher.  According to my resident expert, the Paranoid Dad, the typical home would recoup the price of the oven via savings in their electric bill in eight to nine months.  With the Sun Oven, my baking is virtually free and I won’t use even an ounce of fossil fuel!

I love saving money, but I love the idea of self-sufficiency even more.  I have been a little nervous about my food storage because a lot of it requires a heating source, either gas or electricity, to prepare.  Should our city experience black-outs or if there was a failure of our vulnerable electrical grid, I’ll still be able to keep my family well fed using a solar oven.  I like the idea of having that extra “safety net”.

There’s virtually nothing that can’t be baked in a solar oven.  I can even use it to hard boil eggs!  Cookies, casseroles, steamed veggies, and roasted chicken are just a few examples of its’ versatility.  Add a solar cookbook or two, and we’ll never miss our traditional oven.  Heck, I might even be inspired to cook more often!

I’ve spent a lot of time on the official Sun Oven website, scoured their list of recipes, and am pretty impressed with the product.

Have you used a solar oven?  What are your own hits and misses?

Via: thesurvivalmom


Save pagePDF pageEmail pagePrint page

Shipping Containers for Survival Shelters

One of the more expensive aspects associated with developing a self-reliant lifestyle is the purchase, or construction, of a safe haven. As part of the survivalist/prepper community we discuss various types of shelters that can either be purchased from a manufacturer, or built through the blood, sweat and tears of our own trials. Using shipping containers for survival shelters is not a new concept per se. Several people in the past have purchased and repurposed shipping containers for survival shelters.

It never ceases to amaze me the financial expenditure some survivalists will go to in order to secure a safe haven. Millions of dollars invested in purchasing and retrofitting a decommissioned missile silo, to me at least, seems excessive for any prepper, even if you are financially fortunate enough to afford such a prepper palace. Using shipping containers for survival shelters is a cost effective approach to getting your bug out bunker in place. There are also some advantages to using shipping containers for survival shelters that are not possible, or easy to accomplish, with other prefabricated platforms.

DBS:

Shipping containers are useful as bunkers for many reasons. They are inexpensive and easy to transport, air and water tight, and designed to withstand extremely heavy loads.

As they are made of steel, they can easily be modified with basic electric or hand tools. They can also be placed side to side or one on top of the other to allow for expansion of the shelter.”

Given that information, one could argue that using shipping containers for survival shelters covers most, if not all, of the concerns we as survivalists have regarding what a well-built bunker should encompass. Considering shipping containers for survival shelters allows the prepper in question the opportunity to configure their chambers according to their own needs and desires.

DBS:

“The shipping container design proves efficient because it is inexpensive, can be constructed quickly, has massive structural strength, and can be constructed by an average person with basic equipment.”

Okay, so that is a little misleading. Obviously if you elect to use shipping containers for survival shelters they will need to be hauled to the site and a hole will need to be excavated to accommodate the size. Now I suppose you could dig the hole with ‘basic equipment,’ such as a shovel, but I would highly recommend using a backhoe for this part of the process.

DBS:

“In today’s turbulent times of war, terror and natural disasters, bunkers are becoming more popular as people prepare for emergencies.

In the wake of the deadly tornado in Oklahoma, more and more people are preparing for the worst and are looking into ways to protect their families.”

It is not necessary to spend hundreds of thousands, or even millions, of dollars designing a suitable safe haven. Another advantage associated with using shipping containers for survival shelters is their international availability. They are used worldwide and can be found listed for sale in a number of media publications and advertisements. I think we can all agree that using shipping containers for survival shelters will provide all of us with the opportunity to invest more of our hard earned income on other survival related gear. That million dollar missile silo isn’t going to serve much purpose if you spent all your pocket change acquiring it!


Another commnet made:

Great for general storage and as an above ground storm shelter….especailly if almost totally full of supplies.
I have 4″ thick styrofoam that has sheat metal glued to each side on the top as insulation from the TX sun. Plus it is faily shaded. Stays about the same temp inside as the outside temp. Remember the movie “The Book of Eli”? Put in a hand pump well. Do your own with one like a Hydrodrill. Does not have to be registered with the county. Keep it covered up until needed.

Via: survivalist


Save pagePDF pageEmail pagePrint page